
How to Clean Keycaps: Step-by-Step Guide
[ Back to Mechanical Keyboards 101 ]Keeping your keyboard clean isn’t just about looks - it’s about performance and durability. Dirty keycaps can jam keys, reduce feedback, and damage switches. Here’s how to clean them safely:
// keycap fix path
Need keycaps that actually fit and feel better?
If this guide helps you diagnose the problem, the next step is simple: check compatibility, use the right puller, then choose a set that matches your layout. Start with our in-stock keycap sets, grab a CY stainless steel keycap and switch puller, or look at the budget-friendly KFA Cherry Profile Blank PBT keysets.
- Preparation: Turn off your keyboard, unplug it, and take a photo of the layout for reference.
- Tools Needed: Wire keycap and switch puller, mild dish soap, warm water, soft-bristled brush, microfiber cloths, and compressed air.
-
Cleaning Steps:
- Remove keycaps with a wire puller.
- Brush off loose debris.
- Soak keycaps in warm, soapy water for 30 minutes (longer for heavy grime).
- Gently scrub with a soft brush and rinse thoroughly.
- Air-dry keycaps for 8-24 hours before reassembling.
- Keyboard Base: Clean with isopropyl alcohol and compressed air, avoiding liquid contact with switches.
Keycap Material Tips:
- PBT Keycaps: Durable and alcohol-safe. Handle warm water and scrubbing well.
- ABS Keycaps: More fragile. Use only lukewarm water and mild soap to avoid warping or discoloration.
Regular maintenance every 2-3 months keeps your keyboard performing its best. Start today for a cleaner, longer-lasting keyboard.
How to Clean a Keyboard Properly (Remove the Keycaps)
sbb-itb-3cb9615
Tools and Materials You'll Need
Using the right tools is crucial to protect your keycaps and maintain your keyboard's functionality. Before you start, gather everything you’ll need: a wire-style keycap puller, mild dish soap, warm water, a soft-bristled brush, microfiber cloths, compressed air or a vacuum with a brush attachment, and a large bowl or container for soaking. For tougher cleaning tasks, keep 70% isopropyl alcohol on hand to tackle stubborn spots on PBT keycaps.
If you’re planning to go beyond basic cleaning - like opening switches to deal with spills or lube your switches - you might want to invest in a KFA Switch Opener ($19.00 from KeebsForAll). While not necessary for regular keycap cleaning, it’s useful for deeper maintenance when debris gets into the switches or when cleaning agents strip away factory-applied lubricant.
Basic Cleaning Tools
A wire-style keycap puller is gentle on keycaps, avoiding scratches that plastic pullers might cause. Mild dish soap combined with warm water effectively breaks down oils and grime without damaging the plastic. Be careful with water temperature - use warm, not hot, water to prevent warping, especially with ABS keycaps. A soft-bristled brush helps clean textured surfaces and hard-to-reach areas, while microfiber cloths are perfect for drying and wiping without leaving lint behind. To clear out loose dust and debris, use compressed air or a vacuum with a brush attachment. For disinfection, 70% isopropyl alcohol is ideal for PBT keycaps. However, HHKB warns:
"IPA solutions are far more likely to ruin these [ABS] keycaps. If you don't know what type of plastic your keycaps are made of, stick to soap and water."
PBT vs ABS Keycaps: What You Need to Know
PBT keycaps are known for their durability and heat resistance. They can handle 70% isopropyl alcohol for disinfecting and can be scrubbed with a soft-bristled toothbrush. For a standard clean, soak them in warm, soapy water for 30 to 60 minutes - or leave them overnight if they’re heavily soiled. While textured PBT keycaps may trap more dirt, they resist warping during cleaning.
ABS keycaps, on the other hand, require a gentler touch. These keycaps are more fragile and tend to develop a shiny surface from finger oils over time. As Anirban Saha from TechBullish advises:
"Never use harsh chemicals or alcohol-based cleaners [on ABS], as they can damage or discolor your keycaps."
Stick to lukewarm water with mild soap and use a soft cloth or sponge for cleaning ABS keycaps. Keep in mind, they are prone to yellowing from UV exposure. If you’re unsure about your keycap material, it’s safer to assume they’re ABS and use soap with lukewarm water.
With your tools at the ready and these material-specific tips in mind, you’re all set to start cleaning your keyboard.
Getting Ready to Clean
Taking the right steps before diving into keyboard cleaning ensures your hardware stays safe and makes the process more efficient. A little prep goes a long way.
Turn Off Your Keyboard and Take Photos
Always start by turning off your keyboard. For wired keyboards, unplug them completely. For wireless or laptop keyboards, make sure they're powered down. This simple step prevents electrical mishaps and stops accidental key presses while you work.
Once your keyboard is off, snap a clear overhead photo of the layout with your phone. This is especially helpful for custom setups or keyboards with varying keycap shapes across rows. If taking a photo isn’t an option, search online for an image of your keyboard model to use as a guide.
Anirban Saha from TechBullish shared a key lesson:
"I learned this the hard way after spending an hour figuring out the correct key placement on my first clean."
Remove Loose Dust and Dirt
Before popping off keycaps with a keycap and switch puller, deal with the surface grime. Flip your keyboard upside down and gently tap the back. This will shake out any loose crumbs or debris that could otherwise fall into the switches during cleaning.
Follow up with compressed air to clear out the spaces between keys. Use the thin straw attachment, hold the can upright, and apply short bursts. Never tilt the can while spraying - it might release liquid propellant onto your keyboard. Test the spray away from your hardware first to ensure no liquid comes out. If compressed air isn’t handy, a soft-bristle brush (like a clean paintbrush or makeup brush) can sweep out dirt effectively. Alternatively, a vacuum with a narrow brush attachment works too, but keep it away from delicate sensors.
As Digital Trends highlights, "jamming keys are a primary sign that your keyboard is dirty and needs to be cleaned".
Once you've tackled these steps, you're ready to remove the keycaps and dive into the deeper cleaning process.
How to Clean Your Keycaps
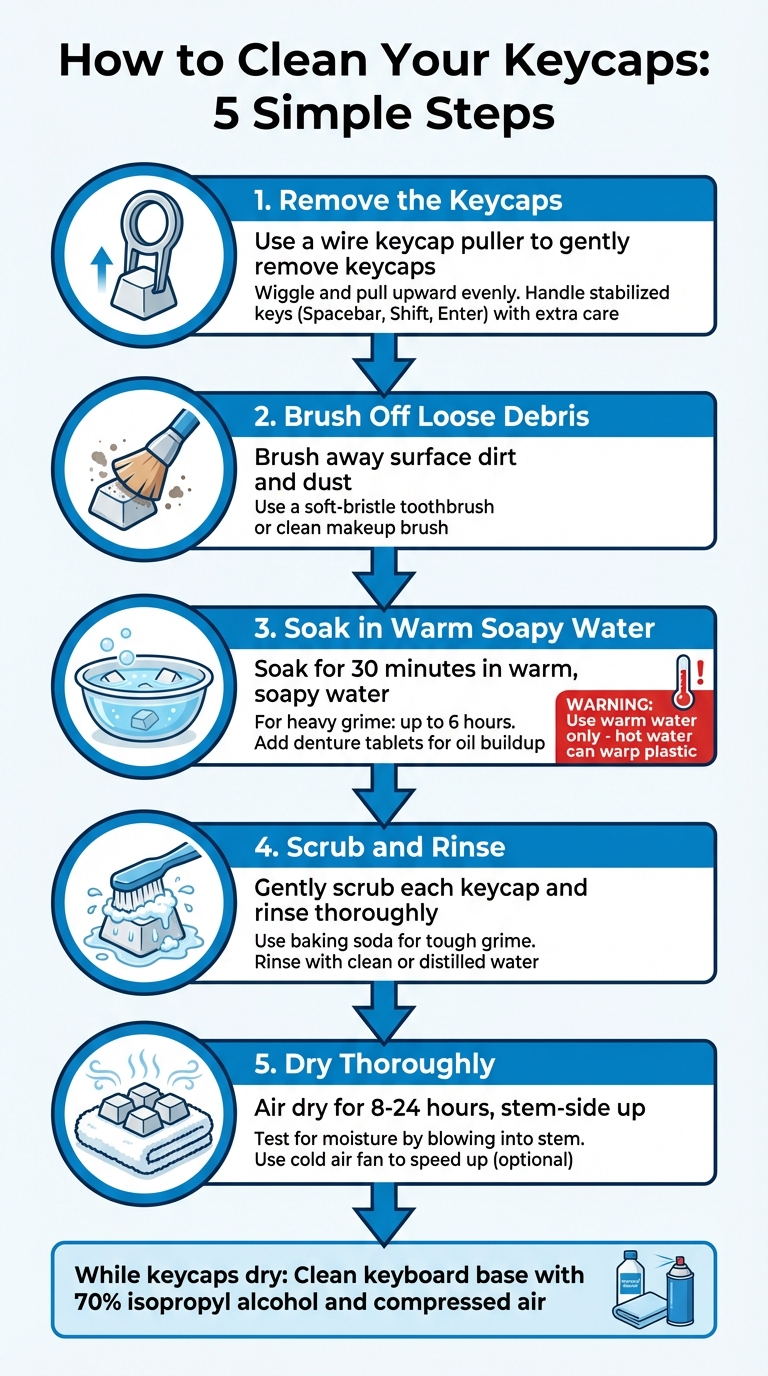
5-Step Keycap Cleaning Process Guide
Step 1: Remove the Keycaps
Once your workspace is prepped and free of debris, start by taking off your keycaps. A wire keycap puller is your best tool here, as it flexes to fit each key and avoids scratching the sides. Avoid plastic pullers, which can be less gentle. For an even smoother removal process, consider using a KFA Switch Opener from KeebsForAll.
To remove a keycap, loop the wire under two opposite corners, then gently wiggle and pull upward evenly. If a key feels stuck, don’t force it - this might be due to a stabilizer underneath.
Larger keys like the Spacebar, Shift, Enter, and Backspace require extra care. These keys often have metal stabilizer bars underneath. To remove them, carefully lever the keycap upward to detach it from the switch, then slide it horizontally to release it from the stabilizer clips.
Step 2: Brush Off Loose Debris
Before soaking the keycaps, it’s a good idea to brush off any loose dirt or dust. A soft-bristle toothbrush or a clean makeup brush works well for this. Sweeping away surface grime now prevents it from turning into a muddy mess when the keycaps are submerged.
If you have a vacuum with a narrow brush attachment, you can use it to gently pick up debris without scattering particles across your workspace.
Step 3: Soak in Warm Soapy Water
Fill a bowl with warm water and add a few drops of mild dish soap. Submerge the keycaps completely and let them soak for about 30 minutes. For keycaps with heavy oil buildup, you can add two denture cleaning tablets to the mix. If the grime is particularly stubborn, extend the soak time to up to six hours.
Be cautious with water temperature - stick to warm water, as hot water can warp the plastic, especially if your keycaps are made of ABS material.
Step 4: Scrub and Rinse
After soaking, take a soft-bristle toothbrush or a cotton swab to gently scrub each keycap. Pay attention to all surfaces, especially the edges where dirt tends to collect. This will help keep printed legends intact.
For tough grime, sprinkle a little baking soda onto your brush for extra cleaning power. Once scrubbed, rinse the keycaps thoroughly with clean or distilled water to prevent water spots. Afterward, set the keycaps aside to dry completely while you move on to cleaning the keyboard base.
Step 5: Clean the Keyboard Base
While the keycaps dry, turn your attention to the exposed keyboard base. Dip a cotton swab in 70% (or higher) isopropyl alcohol and carefully clean the areas between switches to remove oils and grime. Use compressed air to blow out any remaining debris, and gently wipe around each switch housing with a slightly damp swab. Be cautious not to let any liquid seep into the switches.
Catherine L. from Kinetic Labs highlights the importance of drying thoroughly:
"It's essential that the underside of each keycap is completely dry, to ensure proper function when contact is made with sensitive components."
Once all components are clean and completely dry, you’re ready to reassemble your keyboard.
Drying and Putting Everything Back
With your keycaps cleaned and ready, here’s how to dry them thoroughly and reassemble your keyboard step by step.
Dry the Keycaps Thoroughly
After rinsing, give each keycap a good shake to release any trapped water. Then, gently pat them dry using a microfiber cloth - skip the paper towels since they can leave lint behind or scratch the surface .
Arrange the keycaps stem-side up on a clean towel to help them dry faster . Let them air dry for at least 8 to 24 hours. If you're in a rush, overnight drying is the minimum safe option .
To check if the keycaps are completely dry, blow into the stem. If you see fog, there's still moisture. You can also press a dry tissue against the inner walls to confirm. Want to speed things up? Use a desk fan on low or a hairdryer set to cold, keeping it at least 12 inches away. Avoid using heat - ABS keycaps can warp at temperatures as low as 140°F.
Reassemble Your Keyboard
Once you're sure the keycaps are completely dry, start reassembling. Begin with the larger keys like the Spacebar, Enter, Shift, and Backspace. Use the reference photo you took earlier to make sure everything goes back in the correct spot. Align each keycap over its keyboard switch stem and press straight down until you hear it click into place.
When the reassembly is done, plug in your keyboard and test each key to ensure everything is functioning as it should.
Tips to Prevent Future Damage
To keep your keyboard in good shape, wash your hands before typing and wipe it down weekly with a microfiber cloth . If you’re a heavy user (4+ hours daily), aim to surface clean every two to three weeks and do a deep clean every two to three months. Opting for PBT keycaps can also help - they’re better at resisting oils and grime compared to ABS, making them a more durable choice over time .
Conclusion
Cleaning your keycaps is a simple process: safely remove them, using a keycap puller, soak them gently, dry them thoroughly, and reassemble with care.
Beyond improving how your keyboard looks, regular cleaning plays a big role in keeping your keyboard functional for years to come. Dust and grime can build up long before any electronic or mechanical issues appear. While top-tier mechanical keyboards are built to last decades, poor hygiene often shortens their lifespan. And with the average adult typing around 12,000 keystrokes per hour, it’s easy to see how quickly oils and debris can pile up.
"Clean keycaps boost both appearance and performance, extending your keyboard's life." - Anirban Saha, Founder & Editor, TechBullish
This routine not only refreshes your keyboard but also makes future cleanings much easier. Keep your workspace tidy, wash your hands before typing, and use a dust cover when the keyboard isn’t in use. These simple steps, paired with regular deep cleaning, will help your mechanical keyboard last for the long haul.
FAQs
How do I tell if my keycaps are PBT or ABS?
PBT keycaps are known for their durability and textured feel, resisting shine even with extended use. On the other hand, ABS keycaps have a smoother surface, are more likely to develop a shiny appearance over time, and can fade or yellow when exposed to UV light. To figure out which type you have, pay attention to the texture and shine: PBT keycaps feel textured and maintain a matte finish, while ABS keycaps feel smoother and tend to become shiny with regular use. Additionally, PBT keycaps are often thicker compared to their ABS counterparts.
What should I do if liquid gets into the switches?
If you spill liquid on your keyboard, the first thing to do is unplug it right away to avoid any potential damage. Next, turn the keyboard upside down at an angle to let the liquid drain out naturally - don’t shake it, as this could spread the liquid further. For sticky spills, gently clean the affected switches using isopropyl alcohol and a soft cloth or brush. Once cleaned, make sure the keyboard is completely dry before plugging it back in to avoid short circuits or additional damage.
Can I use a hairdryer or heat to dry keycaps faster?
Using heat or a hairdryer to dry keycaps isn’t a good idea. High temperatures can harm keycaps, particularly those made from materials like ABS or PBT plastic. To avoid issues like warping or other heat-related damage, stick to safer options such as air drying or using an air blower. Gentle drying methods are the best way to keep your keycaps in great condition.
Related Blog Posts
- How to Lube Mechanical Keyboard Switches: Step-by-Step Guide
- PBT vs ABS Keycaps: Complete Comparison Guide
- How to Clean Keycaps Safely
- Ultimate Guide to Keyboard Cleaning Tools
KeebsForAll next step
Fix, clean, or upgrade your keycaps
Most keycap problems come down to layout support, switch stem compatibility, or damaged/dirty caps. Before buying, check your keyboard size, bottom row, stabilizer keys, and switch stem. Cherry MX-style switches use the common cross stem, but layouts like 65%, 75%, Alice, split spacebar, and ISO may need extra keys.
Start with sets available now. Get a safe puller
$4 tool, 33 in stock when checked. Budget PBT upgrade
Cherry profile blanks, simple and affordable.
Quick compatibility checklist: match your layout size, confirm the bottom row, check spacebar/stabilizer sizes, and make sure your switches use MX-style stems.