
Keycap Installation: Step-by-Step Guide
[ Back to Mechanical Keyboards 101 ]Keycap replacement is a simple way to refresh your keyboard's look, feel, and sound. Whether you're switching to PBT or ABS keycaps, or adjusting for a custom layout, this guide walks you through the process step-by-step. Here's what you'll learn:
- Preparation: Confirm keycap compatibility (layout, size, stem type) and gather tools like a wire keycap puller, compressed air, and microfiber cloth.
- Removal: Use a wire puller to safely remove keycaps, paying extra attention to larger keys with stabilizers.
- Cleaning: Clean your keyboard with compressed air, brushes, and isopropyl alcohol before installing new keycaps.
- Installation: Align and press keycaps into place, ensuring proper orientation and fit, especially for sculpted profiles and stabilized keys.
- Testing: Check each key's function and fix common issues like wobbly keys or stabilizer noise.
Swapping keycaps takes 15–30 minutes and can make a big difference in your typing experience. Follow these steps for a smooth upgrade.
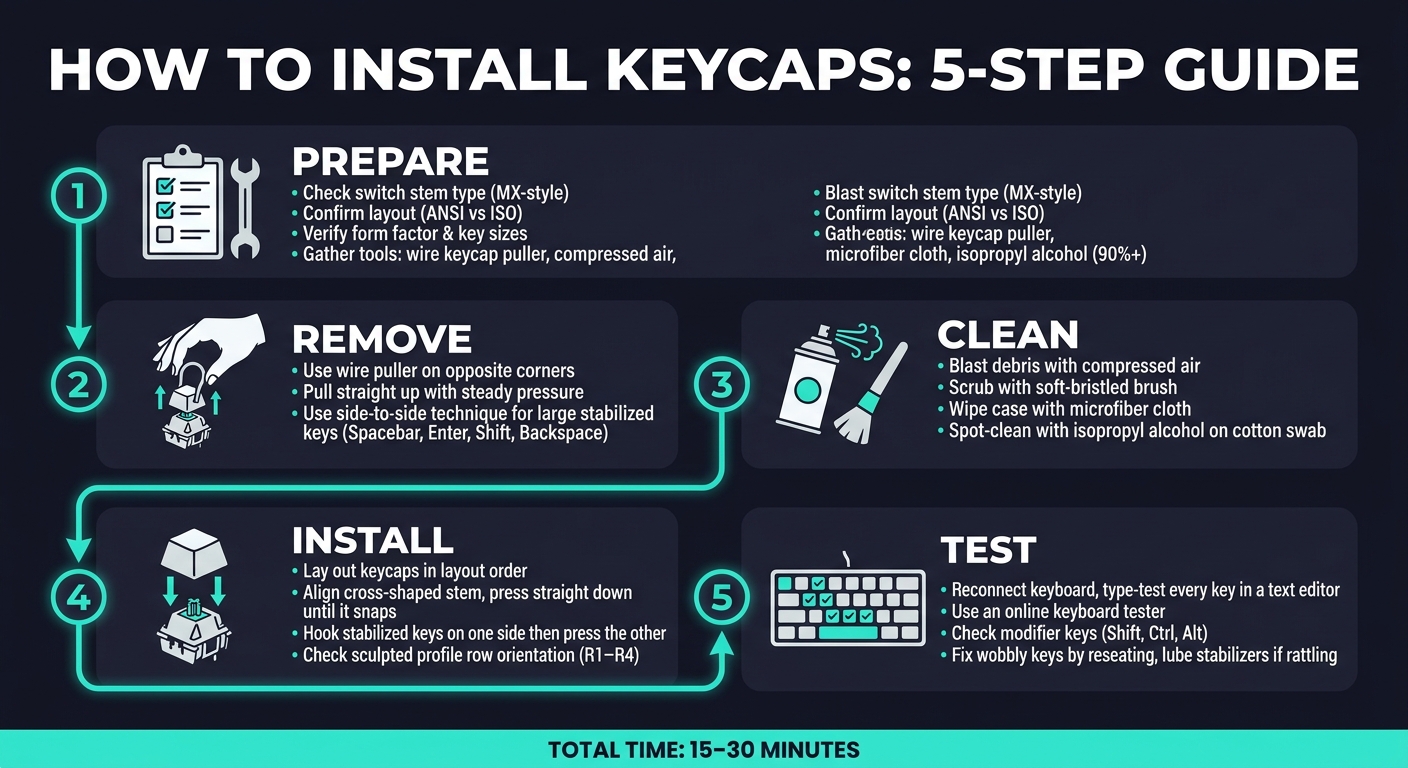
How to Install Keycaps: 5-Step Visual Guide
How to Change or Remove Your Keyboard Keycaps - Quick and Easy Guide
sbb-itb-3cb9615
Preparation and Tools
Getting ready for a keycap swap involves confirming compatibility and setting up your workspace to avoid unnecessary frustrations.
Keyboard and Keycap Compatibility
Start by identifying your switch stem type. Most aftermarket keycap sets are designed for MX-style switches with cross-shaped stems, so ensure your keyboard uses these switches.
Next, determine your keyboard's layout standard. In the U.S., most keyboards follow the ANSI layout, which features a wide, rectangular Enter key and a long Left Shift. In contrast, the ISO layout, common in Europe, has a vertical Enter key and a shorter Left Shift. If you accidentally buy an ANSI keycap set for an ISO keyboard (or the other way around), some keys simply won't fit.
Your keyboard's form factor is equally important. A full-size keyboard has 104 keys, but smaller layouts like 65% or 75% often use non-standard key sizes, especially for the bottom row and Right Shift. For instance, many 65% keyboards use a 1.75u Right Shift instead of the standard 2.75u. Always compare your keyboard's key sizes with the dimensions listed in the keycap set to avoid mismatches.
| Key | Standard Size | Common Non-Standard Size |
|---|---|---|
| Spacebar | 6.25u | 7u (custom/vintage layouts) |
| Left Shift | 2.25u | - |
| Right Shift | 2.75u | 1.75u (65% layouts) |
| Bottom Row Modifiers | 1.25u | 1u (65%/75% layouts) |
| Backspace | 2u | - |
Once you've confirmed compatibility, focus on setting up a safe and organized workspace.
Workspace Setup and Safety
Start by unplugging your keyboard to avoid accidental inputs or electrical issues. If you plan to work near the PCB, discharge static electricity from your hands by touching a metal object first.
Set up on a clean, flat, and well-lit surface. Use a deskmat or soft towel to protect your keyboard and keep small parts from slipping away. Before removing any keycaps, take a clear overhead photo of your keyboard layout - this will serve as a helpful reference when reinstalling, especially for non-standard layouts.
Tools You Will Need
You don’t need a lot of tools, but having the right ones can make the process much smoother. Here’s what you should have ready:
- Wire keycap puller ($5–$10): Essential for safely removing keycaps. The wire loops apply even pressure, protecting the switch stems and avoiding scratches. Try to avoid plastic ring pullers, as they can scrape keycap sides.
- Soft-bristled brush and compressed air: Perfect for clearing out dust, crumbs, or debris from the keyboard plate and switches after removing the old keycaps.
- Microfiber cloth: Ideal for wiping down the keyboard case without causing scratches.
- Isopropyl alcohol (90%+): Great for deep cleaning. It evaporates quickly and is safe to use on electronics.
- Small bowl or tray: Keeps removed keycaps organized and prevents them from rolling off your desk.
- Lubricant (e.g., Krytox 205g0): If you’re planning to lube your stabilizers during the swap, it’s worth the effort. Products like Krytox 205g0, available from places like KeebsForAll, are popular among enthusiasts for improving stabilizer smoothness and reducing noise.
Removing Existing Keycaps
With your workspace prepped and tools in hand, it’s time to start removing those keycaps.
How to Remove Standard Keys
To remove standard keys, position the wire loops of your keycap puller around opposite corners of the keycap - typically the top-left and bottom-right. Once secured under the keycap, pull straight up using slow, steady pressure.
A common mistake is pulling at an angle, which can bend or even snap the switch stem, potentially damaging the switch. If a keycap feels stuck, don’t force it. Instead, reposition the puller and try again. As you remove each key, place it in a tray or arrange it on your desk in the same layout as the keyboard. This will save you a lot of hassle when it’s time to reinstall them.
Removing Large and Stabilized Keys
Larger keys like the Spacebar, Enter, Backspace, and Shift keys require a bit more care. These keys are connected to stabilizers, which can either be Cherry-style (internal clips) or Costar-style (external wire hooks). These stabilizers add resistance and require a different removal method than smaller keys.
"For larger keycaps with stabilizer bars, detach the stabilizers by using the puller prong on one side, then repeat on the other." - Timesact, Signature Plastics
Start by placing the puller on one end of the key, lifting gently, and then do the same on the opposite end. This side-to-side technique ensures the stabilizer connections are safely released without bending the metal wire. Avoid pulling a large key straight up from the center - this can warp the stabilizer bar. If you’re working with a Costar-style setup, it’s normal for the wire hooks to detach from the keycap inserts during removal.
Once all your keycaps are off, you’re ready to clean the keyboard.
Cleaning the Keyboard Before Installing New Keycaps
Before installing the new keycaps, take some time to clean the keyboard thoroughly. Start by using compressed air in short bursts to clear away dust and debris. Follow this with a soft brush to loosen any stubborn particles. Finally, wipe the surface with a microfiber cloth.
For sticky spots or areas with built-up grime, use a cotton swab dipped in 90%+ isopropyl alcohol. Gently clean around the problem areas, but be cautious to avoid letting liquid seep into the switches. A clean board not only looks better but also ensures smooth performance when you reinstall your keycaps.
Installing New Keycaps
With your keyboard cleaned and layout prepared, putting on your new keycaps should be a smooth process.
Mapping Your Layout and Keycap Orientation
Start by laying out your keycaps in the correct keyboard arrangement before attaching them. If you took reference photos earlier, now’s the time to use them.
Pay close attention to the profile of your keycaps. Sculpted profiles like Cherry, OEM, and SA have varying heights and angles for each row (commonly labeled R1 through R4). Placing a keycap in the wrong row can result in an awkward angle. On the other hand, uniform profiles like DSA and XDA keep the same shape across all rows, making placement easier. Many keycaps include helpful markers, such as row numbers or arrows on the underside, to guide you.
Double-check the size of your modifier keys as well. Key sizes are measured in units (u), with a standard letter key being 1u (about 18 mm wide). For example, Caps Lock is typically 1.75u, Left Shift is 2.25u, and the most common Spacebar size is 6.25u. Using an incorrectly sized modifier can disrupt the layout, so it’s worth verifying before you start.
Once you’ve confirmed everything is in the right place, you’re ready to begin attaching the keycaps.
Installing Standard Keys
Begin with the alphanumeric keys, including letters, numbers, and the top-row function keys. Align the cross-shaped mount on each keycap with the switch stem, ensuring the legend faces you. Misalignment can damage the switch stem, so take your time.
Press the keycap straight down with steady pressure - avoid tilting or rocking it. Most keycaps will produce a subtle snap when they’re securely attached. After installing each key, press it to confirm it moves smoothly and sits evenly with its neighbors. If a key looks tilted or feels off, remove it and re-align it rather than forcing it into place. Make sure all keys are firmly seated before moving on to larger keys with stabilizers.
Installing Large and Stabilized Keys
Larger keys, like the Spacebar, Enter, Backspace, and Shift, require extra care due to their stabilizers. These keys have a central switch stem and additional stabilizer points on the sides, which need to be properly engaged for smooth functionality.
Start by hooking one side of the keycap onto its stabilizer, then press down on the opposite side until it snaps into place. Apply even pressure across the keycap rather than pressing on just one end. A correctly installed large key will sit flat and feel sturdy when pressed anywhere along its surface. If it feels loose or uneven, remove it and check that all stabilizer points are properly seated before trying again.
"To replace your keycaps, simply push down on the keycap until it snaps securely over the switch and stabilizers, making sure it sits level." - Signature Plastics
Testing and Troubleshooting
Testing Your Keyboard After Installation
Once your new keycaps are in place, it's time to ensure everything works as it should. Start by reconnecting your keyboard and opening a text editor. Test each key individually by typing to confirm they respond correctly. For a more detailed check, consider using a free online keyboard tester. These tools display a virtual keyboard layout and highlight keys as you press them, making it easy to identify any that aren't functioning.
Don't forget to test modifier keys like Shift, Ctrl, and Alt, as they often require combinations to work. Be mindful of system settings like Windows' Sticky Keys, which can sometimes interfere with these keys. If something feels off, double-check your settings before assuming there's a hardware issue.
Fixing Common Issues
If you encounter problems after swapping keycaps, don't worry - most issues are minor and easy to resolve. For example:
- If a key feels "mushy" or fails to click properly, it might not be seated correctly. Remove the keycap and press it straight down until it snaps securely into place.
- If a key doesn't respond, try unplugging the keyboard, waiting a few seconds, and reconnecting it. Switching USB ports can also resolve many connection hiccups.
For hot-swap boards, a non-responsive key could mean a bent pin on the switch. Carefully remove the switch and inspect the pins. If they're bent, use fine-tipped pliers to straighten them gently. For rattling on larger keys like the Spacebar or Shift, the stabilizer is often the culprit. Applying a small amount of dielectric grease to the stabilizer's contact points can make a noticeable difference.
Here’s a quick troubleshooting guide for common issues:
| Symptom | Likely Cause | Quick Fix |
|---|---|---|
| Wobbly or crooked keycap | Improper mounting | Remove and reseat the keycap |
| Rattling on long keys | Unlubricated stabilizer | Apply lube to the stabilizer wire/housing |
| Stuck or heavy key | Debris or obstruction | Use compressed air to clean around the switch |
| Key doesn't register | Bent pin or dead switch | Straighten pins or replace the switch |
| Loose keycap | Stem size mismatch | Check compatibility with your switches |
Storing Old Keycaps
After confirming your keyboard is functioning perfectly, take care of your old keycaps. Store them in labeled zip-lock bags or small containers, organized by row. This makes reinstallation simpler and keeps everything together. Make sure the keycaps are completely dry before storage - any trapped moisture can cause long-term damage.
If you're not planning to keep them, consider selling your old set. The KFA Marketplace is a great platform for listing used keycaps or even custom keyboards. It's an easy way to clear up space while giving your old set a second life with another enthusiast in the community.
Conclusion
This guide has walked you through every step of upgrading your keycaps, from removal to testing, ensuring the process is straightforward and hassle-free. Swapping out keycaps not only changes the appearance of your keyboard but also enhances its overall feel and functionality.
Here’s a quick recap of the process: use a wire puller to carefully remove the old keycaps, clean the keyboard plate, align the new keycaps with the switch stems, and press them firmly into place. Don’t forget to pay special attention to larger keys like the Spacebar and Shift, as these often require extra care to ensure they’re properly stabilized and quiet. Once installed, test each key to confirm everything is working as it should. And with this upgrade complete, you’re all set to explore other customization options in the future.
If you’re looking for more keycap sets, check out KeebsForAll. They offer a range of options, from affordable sets starting at $20 to premium PBT sets priced up to $100. Plus, they provide free shipping on orders over $70 within the U.S.
"We designed this QuickStart Guide to assist you with setting up your FreeBird keyboard, as well as replacing keycaps, changing switches, or answering other troubleshooting questions that you may have." - KeebsForAll
Before making your next purchase, double-check that your keycap set matches your keyboard’s layout (ANSI or ISO) and the correct spacebar size (6.25u or 7u). Happy typing!
FAQs
How do I know if keycaps will fit my keyboard?
To ensure your keycaps are compatible, start by confirming that your keyboard uses Cherry MX-style "+" stems, as these are the most common and widely supported. Next, identify your keyboard's layout (such as ANSI or ISO) and size (like full-size, TKL, or 60%) to guarantee the keycaps will fit correctly, especially for larger keys like the Enter and Shift keys. Lastly, consider the keycap profile (e.g., Cherry, SA) and material to ensure they align with your keyboard's design and spacing preferences.
What’s the safest way to remove stabilized keys?
To safely remove stabilized keys, it's best to use a keycap puller - either a wire or plastic one. This tool helps lift the keycap evenly without applying too much force. For larger keys like the spacebar, make sure to support the stabilizers to avoid bending or twisting them. Use a gentle wiggling motion with the puller to loosen the keycap, and handle the stabilizer assembly with care to avoid any damage.
Why does a key feel wobbly after installing new keycaps?
A key that feels wobbly might be caused by a few factors: stem compatibility issues, manufacturing flaws, or improper installation. Start by checking the keycap stems to see if they are warped, uneven, or don’t match your switch stems. Misaligned stabilizers or keycaps that aren’t seated correctly can also lead to wobbling. To address this, make sure the keycaps are compatible, inspect for any defects, and reinstall them carefully to ensure they’re firmly in place.