
Keyboard foam is an easy way to improve the sound and feel of your mechanical keyboard. It reduces unwanted noise like echoes and metallic pings by dampening vibrations inside the case. The process involves adding a thin layer of foam between the PCB and switches or inside the case itself. This modification is reversible, affordable, and requires only basic tools.
What You’ll Need:
- Tools: Keycap puller, switch puller, precision screwdrivers, scissors, tweezers, and a hole punch.
- Foam Types: 0.5mm PE foam (most popular), IXPE foam (anti-static), EVA, Poron, or neoprene.
Steps:
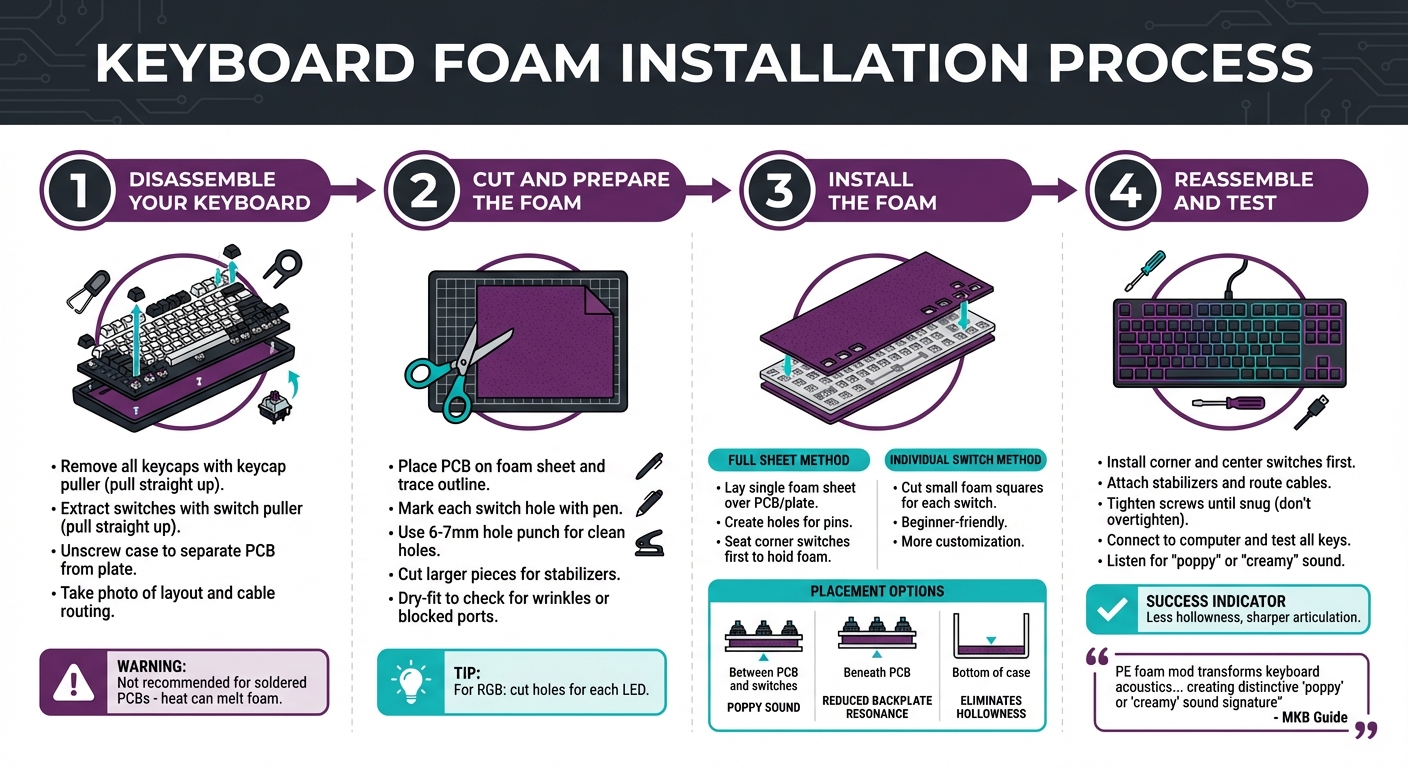
- Disassemble your keyboard, removing keycaps, switches, and the case.
- Trace and cut the foam to match your PCB layout, including holes for switches and LEDs.
- Install the foam using either the full sheet or individual switch method.
- Reassemble and test your keyboard to ensure all keys work and the desired sound profile is achieved.
Tips:
- Use 0.5mm foam to avoid interference with switches.
- For RGB lighting, cut precise holes for LEDs.
- Test your keyboard after installation to ensure proper functionality.
This simple upgrade can give your keyboard a more refined sound, often described as "poppy" or "creamy", while also reducing hollowness. Foam sheets typically cost $8–$15 and can be used for multiple keyboards.
How to PE Foam and Tape Mod your Mechanical Keyboard | KBD67lite & NK65 Sound test |
sbb-itb-3cb9615
Tools and Materials You'll Need
Before diving into the installation, make sure you have all the necessary tools and materials. Having the right equipment not only makes the process smoother but also helps avoid potential damage to your keyboard.
Required Tools
- Keycap puller: Safely removes keycaps without causing damage.
- Switch puller: Essential for extracting switches from hot-swap sockets.
- Precision screwdriver set: Needed for opening the keyboard case and accessing the PCB.
- Scissors or craft knife: Useful for cutting the foam to size (a box cutter works too).
- Hole poker: A small screwdriver, pen, or sharpened stick can help create openings for switch pins and LEDs.
- Tweezers: Handy for positioning small foam pieces with precision.
- Painter's tape: Keeps the foam in place during installation.
- Cutting mat: Protects your work surface while cutting foam.
- Pen or marker: Useful for tracing the PCB outline onto the foam.
- 6–7mm hole punch: Optional, but great for creating precise holes.
Once you’ve gathered these tools, it’s time to pick the foam that matches the sound profile you’re aiming for.
Types of Foam
- PE (Polyethylene) foam: This is a go-to option for many enthusiasts. It’s known for delivering a "poppy", "creamy", or "marbled" sound. To strike the right balance, stick with 0.5mm foam, which dampens noise without interfering with switch seating. Avoid anything thicker than 1.5mm, as it can damage switch pins or prevent proper seating.
- IXPE (Irradiated Cross-linked Polyethylene): A higher-end version of PE foam, IXPE offers better vibration dampening and is anti-static, making it a safer choice for your PCB. Standard white PE foam can generate static electricity, which might harm your board, so black IXPE foam is a safer bet.
- EVA foam and Poron: These are denser materials that absorb more sound, resulting in a deeper, muted tone.
- Neoprene: Ideal as case foam, it fills empty spaces in the case to eliminate hollowness.
If you're looking to purchase Geon keyboard foams for TKL or other sheets, KeebsForAll offers options priced between $8 and $15 per sheet, which is usually enough for multiple keyboards. On a budget? The thin white PE foam that comes with keyboard packaging can be a great cost-effective alternative.
With your tools and foam ready, you’re all set to disassemble your keyboard and start tweaking its sound.
Step-by-Step Installation Process
4-Step Keyboard Foam Installation Process
With your tools and foam ready, it’s time to modify your keyboard. This process takes patience and precision, but the improved sound quality makes it worth the effort.
Disassembling Your Keyboard
Begin by removing all keycaps using a keycap puller. Pull them straight up to avoid damaging the stems. Afterward, use a switch puller to remove the switches from the board, ensuring you pull straight up to prevent bending pins or harming the hot-swap sockets. Keep all screws in a tray so nothing gets misplaced.
Once the switches are removed, unscrew the case to separate the PCB from the plate and outer shell. Before proceeding, take a photo of your keyboard’s layout and cable routing - this will make reassembly much easier. A quick note: PE foam mods aren’t recommended for soldered PCBs, as the heat from soldering or desoldering can melt the foam and damage your board. After this, prep your foam to match your PCB layout.
Cutting and Preparing the Foam
Place your PCB on the foam sheet and trace its outline with a pen or marker for a precise fit. Use the pen to mark each switch hole for alignment. To get clean and accurate holes, a 6–7mm hole punch works best. If you don’t have one, you can use a screwdriver or even a sharpened stick as a substitute.
Cut larger foam pieces to fit under stabilizers - this prevents the foam from compressing under pressure. Before putting everything back together, dry-fit the foam to check for any wrinkles, bunching, or blocked ports. If you want to keep your RGB lighting visible, you’ll need to cut holes for each LED manually or use the individual square method, where small foam pieces are placed around the switch pins. Once the foam fits perfectly, you’re ready to install it.
Installing the Foam
There are two main ways to install the foam. The full sheet method involves laying a single foam sheet over the PCB or plate and creating holes for the pins. The individual switch method, also known as the TypingDoneWell method, requires cutting small foam squares for each switch. This approach is beginner-friendly and allows for more customization.
For the full sheet method, start by seating the corner switches to hold the foam in place against the PCB, then install the rest of the switches. Refer back to the foam thickness guidelines for the best results. You can position the foam in several ways: between the PCB and switches for a "poppy" sound, beneath the PCB to reduce backplate resonance, or at the bottom of the case to eliminate hollowness.
"PE foam mod transforms keyboard acoustics by placing thin PE foam sheet between PCB and switches, creating distinctive 'poppy' or 'creamy' sound signature." - MKB Guide
Testing and Adjusting Your Keyboard
Reassembly Tips
To anchor the foam securely, start by installing switches at the four corners and in the center. This will help keep everything aligned. Next, attach the PCB-mounted stabilizers and ensure any internal cables are routed through their designated channels. Proper cable placement is essential to avoid pinching or interference with the foam.
When reassembling the case, tighten the screws until they are snug. However, avoid overtightening, as this can damage the housing or compress the foam too much, which could result in an overly stiff typing experience.
Testing the Results
Before fully closing the case, connect the PCB to your computer and run a keyboard testing tool. This will help confirm that every key registers correctly and has a uniform bottom-out feel. Pay special attention to keys across different areas, like the alphas, modifiers, and function rows, to ensure consistency. Use the same conditions for pre- and post-mod typing tests to accurately compare the results.
Listen carefully for a "poppy" or "creamy" sound with less hollowness and sharper articulation. Proper foam installation often shifts the keyboard's sound profile toward crisper, higher-pitched clacks rather than deep, bassy tones. Additionally, you may notice a slightly firmer bottom-out due to the dampening layer.
If any problems arise during testing, check the troubleshooting table below to identify and resolve the issue.
Troubleshooting Common Issues
Here’s a quick guide to common problems and their fixes:
| Issue | Likely Cause | Solution |
|---|---|---|
| Key not registering | Bent pin or foam blocking socket | Remove the switch, straighten the pin, and ensure the foam hole is clear. |
| Case misalignment | Foam exceeds 1.0mm thickness | Switch to 0.5mm foam or manually compress the foam. |
| Inconsistent key feel | Foam is bunched or wrinkled | Disassemble, flatten the foam, and secure corners with small bits of tape. |
| Dim/No RGB lighting | Foam is opaque and covering LEDs | Cut precise openings in the foam for each SMD LED. |
| Mushy bottom-out | Foam is too soft or thick | Replace with a denser, thinner material like IXPE or 0.5mm PE foam. |
If a switch feels unusually resistant during installation, don’t force it. Remove the foam and carefully enlarge the pin holes using the appropriate tools. Also, check for bulging seams - if the case doesn’t close flush, the foam may be too thick and should be replaced with a thinner 0.5mm sheet.
Conclusion
Key Takeaways
Adding keyboard foam is a simple, reversible tweak that enhances sound quality by reducing echo and dampening vibrations. This mod creates a more satisfying, poppy sound profile while eliminating the hollow echo often found in unmodified boards. You might also notice crisper key presses, a slightly firmer feel when bottoming out, and better switch stability in hot-swap setups.
For the best results, use 0.5mm PE foam - it offers excellent dampening without interfering with electrical contacts. A single 12x12-inch sheet, priced between $5 and $15, can be used to modify 15–20 keyboards. This makes it one of the most budget-friendly upgrades for keyboard enthusiasts.
"Using the sheet of Jelly Epoch PE Foam gave the board a poppy, marbled sound signature... giving it a satisfyingly thick and creamy but distinct and full bottom-out sound." - Randall, Tech Enthusiast, Switch and Click
Keep in mind that foam compresses over time, so you’ll want to replace it when you notice the dampening effect fading. Also, when swapping switches, ensure their pins stay straight since the foam adds resistance. For more tools and parts, check out KeebsForAll.
Explore More at KeebsForAll

Looking for PE foam sheets, IXPE anti-static foam, or tools like switch pullers and precision screwdrivers? KeebsForAll has a wide range of mechanical keyboard components to suit enthusiasts at any level. Their collection provides everything you need to complete this mod and take your customizations even further.
FAQs
Will foam damage my PCB from static electricity?
Foam is a popular choice for keyboard modifications, often placed between the PCB and switches to improve sound and feel. When installed correctly, it’s generally safe and doesn’t pose a risk of static damage. To avoid any issues, make sure to ground yourself to release static electricity before handling the PCB or foam. Using anti-static tools can also add an extra layer of safety. With proper care, materials like polyethylene (PE) foam are perfectly safe to use with PCBs.
What foam placement changes the sound the most?
The foam layer that has the greatest influence on a mechanical keyboard's sound is the one placed between the PCB and the switches, often referred to as the PE foam mod. This layer works by absorbing certain frequencies, which results in a sound that's often described as "poppy" or "creamy." It also helps to minimize any hollow tones.
While other foam placements, such as case foam or plate foam, can help fine-tune resonance and reduce vibrations, the foam directly under the switches delivers the most noticeable change in both sound and vibration absorption.
Can I do this mod on a soldered keyboard?
Yes, you can modify a soldered keyboard with foam, but it takes a bit more effort. The first step is desoldering the switches, which means carefully heating the solder joints to remove them without causing damage. While this method is more involved compared to working with a hot-swappable board, it’s entirely doable if you have the proper tools and approach it with patience.