
Want to customize your mechanical keyboard without complex firmware updates? VIA makes it simple. This guide explains how to set up and manage layers on your VIA-compatible keyboard for maximum functionality.
Key Takeaways:
- What is VIA? A tool for real-time key remapping, macros, and lighting adjustments without reflashing firmware.
- How do layers work? Layers act as stacked configurations. Higher layers override lower ones unless keys are set as "transparent."
- Why use layers? They allow compact keyboards to perform like full-sized ones by adding numpads, macros, and task-specific layouts.
- Getting started: Check your keyboard's compatibility, install VIA, authorize your device, and configure layers via the Configure tab.
- Advanced features: Assign dual-purpose keys, create macros, and use layer-switching methods like MO, TG, and OSL for tailored setups.
Quick Setup Steps:
- Confirm your keyboard is VIA-compatible at caniusevia.com.
- Install the VIA Web or Desktop App.
- Authorize your keyboard in VIA and upload its JSON definition file if needed.
- Use the Configure tab to remap keys and manage layers.
- Test and save your settings directly to the keyboard’s memory.
With VIA, you can create efficient, task-specific layouts and save them instantly - no firmware reflashing required. Let’s dive into the details.
How to Install/Use VIA Configurator (App Tutorial)
sbb-itb-3cb9615
Setting Up VIA for Layer Configuration
Getting VIA set up with your keyboard is a quick process that takes just a few minutes.
Checking if Your Keyboard Supports VIA
VIA supports over 1,400 keyboards, but not every mechanical keyboard is ready to work with it right away. To confirm compatibility, visit caniusevia.com and check the official list. If you're buying a new keyboard, make sure it’s labeled as VIA-compatible.
Even if your keyboard is listed as supported, it needs firmware flashed with VIA support enabled. VIA identifies keyboards using unique Vendor ID (VID) and Product ID (PID) values, which are defined in the keyboard’s info.json file. If VIA doesn’t automatically detect your keyboard, you may need to upload the JSON definition file provided by the manufacturer. This can be done through the Design tab in VIA. Once you’ve confirmed compatibility, you can proceed to download VIA.
Installing and Opening VIA
VIA is available as both a Web App and a Desktop App. The Web App is the preferred option because it runs directly in your browser and always stays up to date. To use it, open a Chromium-based browser like Chrome, Edge, or Opera, and go to caniusevia.com. Note that Firefox isn’t supported, as it lacks WebHID compatibility.
If you’d rather use the Desktop App, you can download it from the official VIA releases page on GitHub. It’s available for Windows, macOS, and Linux. For the best results, open VIA before connecting your keyboard to ensure smooth detection.
Authorizing Your Keyboard in VIA
After opening VIA, connect your keyboard via USB. You’ll need to authorize the connection for VIA to communicate with your keyboard’s firmware. Click the "Authorize device +" button, and a browser popup will list all connected HID-compatible keyboards. Select your keyboard and click "Connect."
"VIA works by communicating with the firmware that is running on the device and sending it commands across USB." - caniusevia.com
Once authorized, the Configure tab will activate, showing your keyboard’s layout and current layers. If your keyboard doesn’t appear in the authorization list, go to the Settings tab, enable "Show Design tab," and manually upload the JSON definition file provided by the manufacturer. After connecting, use the Key Tester tab to ensure all keys are registering correctly. Once this is complete, you’re ready to start customizing your layers.
Configuring Layers in VIA
Using the Configure Tab
The Configure tab is your go-to spot for customizing your keyboard layers. Once your keyboard is authorized, you'll see a visual layout of your keyboard. At the top-left corner, you can select the layer you want to modify (0–3). Layer 0 is your main typing layer, while Layers 1–3 are for additional functions. Most VIA-compatible keyboards allow up to 4 layers due to EEPROM space limitations.
To customize, simply click on a key to highlight it and remap it. At the bottom of the screen, you'll find seven categories for key functions: Basic, Lighting, Media, Macro, Layers, Special, and Other. As soon as you make changes, they are instantly saved to your keyboard's EEPROM. This means your settings stay intact even if you unplug your keyboard or connect it to another device. After selecting your layer and highlighting the keys, you can begin assigning specific functions.
Assigning Functions to Keys on Each Layer
To assign a new function to a key, click the key and choose the desired function from the available categories. For example, you can assign arrow keys or media controls to Layer 1 by selecting options from the Basic or Media categories.
Keys marked as transparent (KC_TRNS) pass control to the layer below. If you want to access a secondary layer, you’ll need to assign a "layer-access" key on your base layer - popular choices include the Fn key or Right Alt. Once you've finished remapping, use the Key Tester to ensure everything works as expected.
Using Tap/Hold and Momentary Functions
VIA also supports advanced key functions like dual-purpose keys, which can perform different actions depending on whether they're tapped or held. For example, the MO (Momentary) function activates a layer only while the key is held down, much like how the Shift key works. The LT (Layer-Tap) function allows a key to act as a regular key when tapped, but as a layer switcher when held. A common setup might involve assigning the Spacebar to type a space when tapped but activate Layer 1 when held.
Other options, such as TG (Toggle) and OSL (One-Shot Layer), let you switch layers with a single tap or press. The TT (Tap-Toggle) function combines momentary and toggle behaviors - it works like MO when held but toggles the layer if tapped multiple times. These advanced functions can be found in the Layers and Quantum categories. For keys like MO, which may not show up in the standard Key Tester, use the Test Matrix mode to confirm their functionality.
These features give you the flexibility to create a layout that suits your needs, making your keyboard as dynamic as you want it to be.
Advanced Layer Features
VIA Layer Switching Methods Comparison Guide
Creating Macros for Specific Layers
VIA allows you to create macros and tie them to specific layers, making repetitive tasks much easier. Head over to the Macro tab, where you can choose between two options: Macro Recorder (captures actions in real-time) or Keycode Entry (lets you manually input QMK codes). If your macro involves complex key combinations, like Ctrl+Shift+Esc, the Keycode Entry option provides better control over timing and modifier behavior.
Once you've created a macro (e.g., M0, M1), go to the Configure tab, select the target layer, and assign the macro to a key. For quick access, assign a MO function to a convenient key to activate the macro layer easily. Since macro keys don’t output standard characters, you can use the Test Matrix mode in the Key Tester tab to ensure the physical switch is working properly.
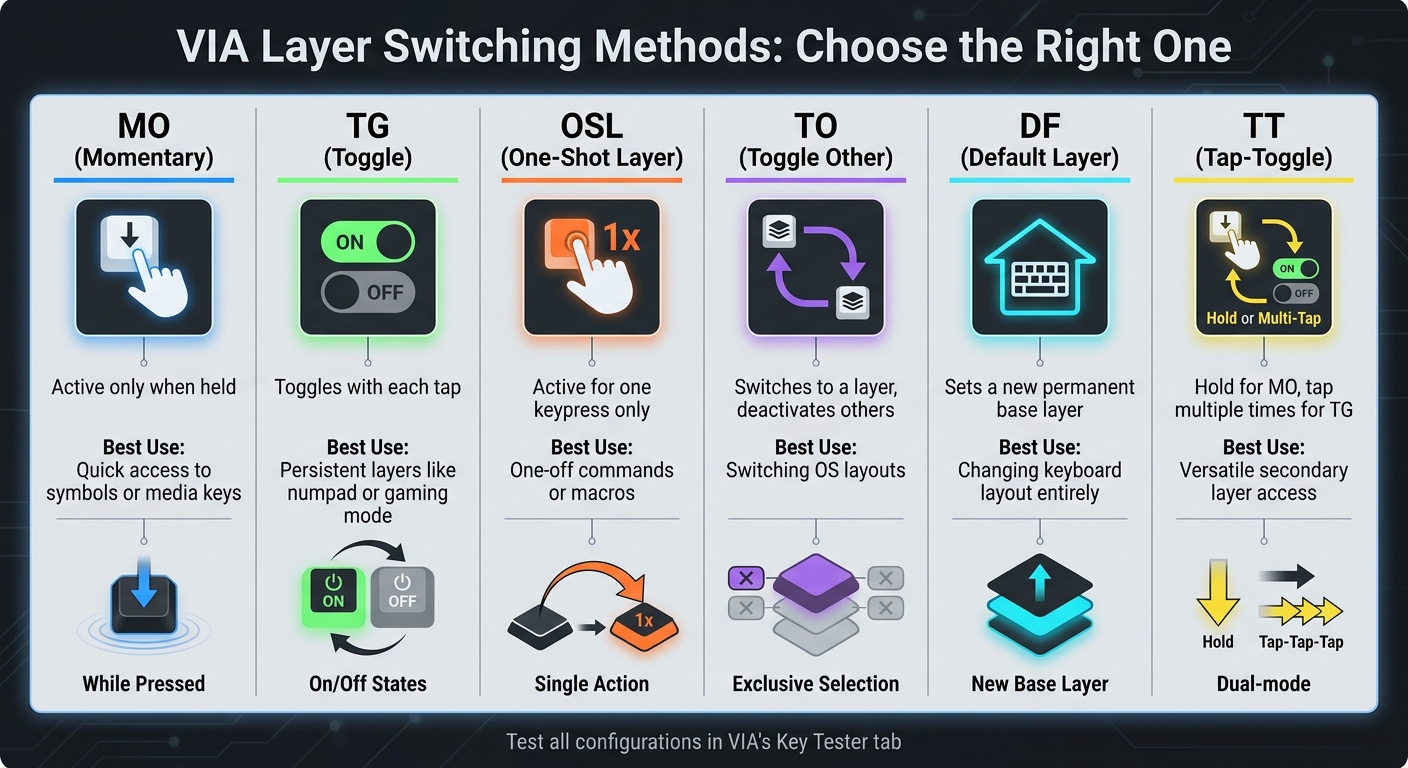
Layer Switching Methods and When to Use Them
VIA offers several ways to handle layer switching, each with its own strengths depending on your needs:
- MO (Momentary): This activates a layer only while you’re holding the key. It’s great for quick access to symbols or media controls.
- TG (Toggle): Tap once to activate a layer, and tap again to deactivate it. This method is ideal for layers like a dedicated numpad or gaming mode.
- OSL (One-Shot Layer): Activates a layer for just one keypress. It’s perfect for triggering a single macro or command without needing to hold the key.
- TO (Toggle Other): Switches to a specific layer and turns off all others. This is useful when moving between OS layouts, like switching from Windows to macOS.
- DF (Default Layer): Changes the base layer (Layer 0). This is handy for switching the entire keyboard layout, such as from QWERTY to Colemak.
- TT (Tap-Toggle): A hybrid option - acts like MO when held but toggles the layer if tapped multiple times. This gives you flexible access to secondary layers.
Here’s a quick overview of these methods:
| Method | Behavior | Best Use Case |
|---|---|---|
| MO(layer) | Active only when held | Quick access to symbols or media keys |
| TG(layer) | Toggles with each tap | Persistent layers like numpad or gaming mode |
| OSL(layer) | Active for one keypress only | One-off commands or macros |
| TO(layer) | Switches to a layer, deactivates others | Switching OS layouts |
| DF(layer) | Sets a new permanent base layer | Changing the keyboard layout entirely |
| TT(layer) | Hold for MO, tap multiple times for TG | Versatile secondary layer access |
After deciding which method suits your needs, test it thoroughly to ensure it works as expected.
Testing Your Layer Configurations
It’s important to confirm that all advanced layer keys - like MO, TG, and OSL - function correctly. Use the Key Tester tab to check their behavior. In Standard mode, the virtual layout highlights keys to confirm HID output. However, for layer-switch keys (like MO or TG), you may need to switch to Test Matrix mode for more precise verification.
While testing, keep the Configure tab open. The active layer is displayed in the top-left corner, allowing you to see if your layer-switch key is functioning as intended. If a key doesn’t respond, enable Test Matrix mode to check whether the physical switch or PCB socket is working. This is particularly useful when testing bare PCBs before soldering. You can use conductive tweezers to bridge switch pins and confirm that every position on the board is operational.
Saving and Managing Layer Configurations
Saving Configurations to Your Keyboard
One of the great features of VIA is its ability to instantly update your keyboard's keymap and save changes directly to the keyboard's memory. Every tweak you make is immediately stored in the keyboard's EEPROM, so there’s no need for extra steps.
"The changes you make using VIA remain persistent on the keyboard, so even when you unplug and replug your keyboard back in, the keymap settings still remain." - Keebio Documentation
This means your custom layers stay intact through power cycles and reconnections. However, these settings are tied to that specific keyboard. If you want to use the same setup on another keyboard or create a backup just in case, you’ll need to export your configuration file. Backing up your setup is a smart way to safeguard your work.
Loading and Backing Up Configurations
Although VIA saves your changes automatically, it also provides tools for manual backups and restores. In the Configure tab, you’ll find options to export and import keymaps as JSON files. Exporting your keymap creates a backup that you can store for future use or transfer to another device.
When restoring a configuration, simply upload your saved JSON file, and VIA will update your keyboard’s EEPROM instantly. If VIA doesn’t recognize your keyboard right away, you may need to enable the Design tab in Settings and upload the appropriate layout definition file before proceeding.
"VIA should automatically save the new keys, but for a sanity check it is always good to confirm the keymap by going to the 'Key Tester' tab." - P K, LumeKeebs
After loading a configuration, always double-check your layers in the Key Tester tab to ensure everything is functioning as expected. If something isn’t right, you can reset your keyboard to its factory defaults and start over.
Resetting Layers to Default Settings
If your configuration becomes corrupted or you want a clean slate, VIA offers a reset feature called Bootmagic Lite. To reset your keyboard, unplug it, hold down the Esc key, and reconnect it while continuing to hold the key. This process clears all custom settings - including layers, macros, and remapped keys - and restores the default firmware settings.
This reset option is especially helpful if you experience issues like "garbage keycodes" or other unexpected behavior after making changes. Just remember, resetting will erase all your customizations, so it’s a good idea to back up your configuration as a JSON file beforehand if you want to preserve your work.
Conclusion
Setting up layers in VIA transforms your mechanical keyboard into a customized productivity powerhouse. The steps are simple: confirm your keyboard works with VIA, enable it through the web or desktop app, pick your desired layer in the Configure tab, and assign specific functions to each key.
The beauty of layered key mapping lies in its versatility. For instance, a standard 75% keyboard with 81 keys can hold up to 324 unique key assignments across four layers. This opens the door to creating tailored setups for activities like gaming, coding, or office tasks. Features like MO (Momentary Layer) and TG (Toggle Layer) make it easy to streamline your workflow. Once your setup is complete, take time to test it thoroughly and save your configuration for future use.
Always use the Key Tester tab to verify your mappings before wrapping up, and don’t forget to export your configuration as a JSON file for safe keeping. If you’re looking for reliable VIA-compatible keyboards, check out options like the Freebird series from KeebsForAll. These keyboards offer hot-swappable switches and multi-layout support, making them ideal for experimenting with different layer setups.
With VIA’s flexibility, you can tweak your keyboard layout anytime - no firmware reflashing required - ensuring your keyboard adapts to your needs effortlessly.
FAQs
Why isn’t VIA detecting my keyboard?
If VIA isn't detecting your keyboard, it might be due to the firmware not being set up to support VIA. Here's what you should check:
-
Make sure the
viakeymap directory is created. -
Confirm that
rules.mkincludesVIA_ENABLE = yes(written in lowercase). - Flash the firmware with these settings applied.
- Double-check that the keyboard's JSON definition is correctly configured.
- Ensure the firmware is updated to the latest version.
- Verify the keyboard is securely connected via USB.
These steps should help resolve the issue and get your keyboard working with VIA.
How do I add more than four layers?
VIA lets you work with up to 32 layers, but its interface usually only gives access to four. If you want to go beyond that, you’ll need to tweak the firmware by editing the keymap.c file in QMK. To do this, define extra layers using the LAYOUT_*() macro specific to your keyboard. Once that’s set, compile and flash the firmware to unlock full control over those additional layers.
How can I recover if my keymap gets messed up?
If your keymap isn’t working correctly, you can restore it to the default settings. In VIA, you can either reload the default keymap or use the reset option, provided your firmware supports it. If the problem continues or the keymap becomes corrupted, reflashing the firmware with the original or a clean keymap should resolve the issue and bring everything back to normal.