
USB-C Cable Problems and PCB Power Loss
[ Back to Mechanical Keyboards 101 ]USB-C cables can make or break your mechanical keyboard's performance. If your keyboard disconnects, RGB lights flicker, or it fails to power on, your USB-C cable or power delivery setup might be the issue. Here's why:
- USB-C cables vary wildly in quality. Two identical-looking cables may perform completely differently. Some handle high power and data transfer, while others fail at basic tasks.
- Power problems are common. Thin wires, long or coiled cables, or missing e-marker chips can cause voltage drops, disconnects, and RGB malfunctions.
- PCB design matters. Poor USB-C port soldering, missing resistors, or unoptimized power circuits can amplify these issues.
The fix? Use high-quality, USB-IF certified cables, keep ports clean, and ensure your PCB design and soldering are solid. Read on for troubleshooting steps and prevention tips to keep your keyboard running smoothly.
How USB-C Power Delivery Works in Keyboard PCBs
USB-C Power Delivery Basics
USB-C doesn’t just deliver power automatically - it first negotiates how power is distributed. This happens through two CC pins (CC1 and CC2), also known as the Configuration Channel. These pins handle the communication needed to determine which device supplies power and which one receives it before any electricity flows.
When you plug in custom mechanical keyboards, the PCB signals its power needs by using a 5.1 kΩ pull-down resistor on each CC pin. This tells the host device to activate 5V on the VBUS line. This process is a big shift from older USB-A connections, where 5V was always present as soon as you plugged in.
"If CC is wrong, everything else becomes random: ports that do not turn on, charging in only one orientation, or disconnects under load." - Nodeloop
PCB Power Implementations Compared
Keyboard PCBs don’t all handle power the same way. Many basic designs stick to a simple setup, using two discrete 5.1 kΩ resistors on the CC pins to request 5V from the host. This works fine for most keyboards that draw less than 500mA.
More advanced designs, however, take things further. Some use dedicated USB-PD sink controllers like the STUSB4500, while others route the CC lines to the microcontroller’s ADC pins. This allows the firmware to measure how much current the host is offering. For RGB-heavy keyboards, this is especially useful. By checking the CC voltage, the keyboard can confirm whether 1.5A or 3.0A is available before enabling full LED brightness, which helps avoid brownouts.
| CC Pin Voltage | Available Current | Typical Source |
|---|---|---|
| 0.2V – 0.66V | Standard USB (500mA/900mA) | Legacy PC ports / A-to-C cables |
| 0.66V – 1.23V | 1.5A | Modern laptops / hubs |
| 1.23V or higher | 3.0A | USB-C wall chargers |
One critical design rule: never short CC1 and CC2 together. Each pin must have its own independent resistor. Shorting them can cause compatibility issues, especially with E-marked cables. This exact problem affected early Raspberry Pi 4 models, requiring a hardware revision to fix it.
These differences in PCB design make it crucial to choose high-quality cables.
How Cable Quality Affects Power Delivery
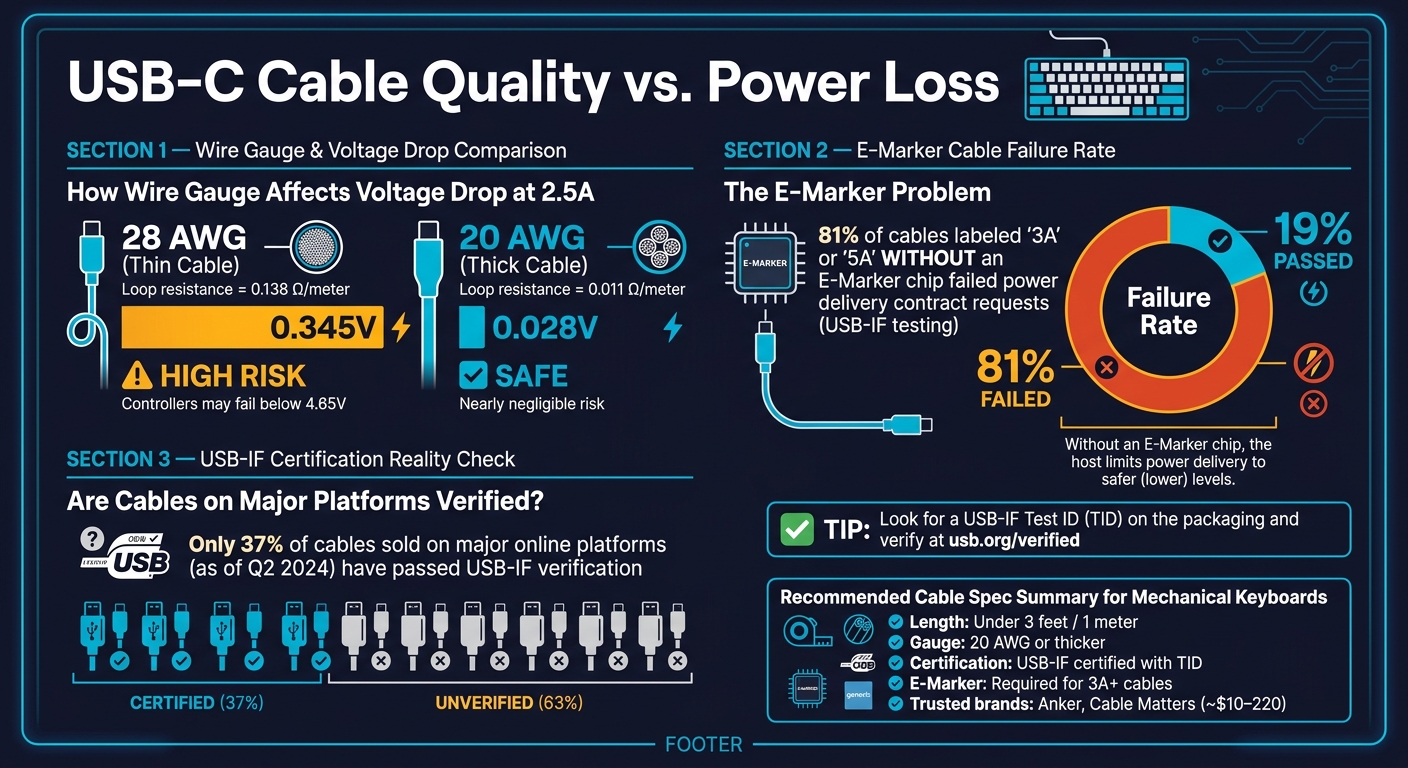
Beyond PCB design, the quality of the cable plays a major role in power delivery performance. Cable resistance can cause voltage to drop before it even reaches the keyboard PCB. For example, cables with thin 28 AWG conductors have higher resistance - about 0.138 Ω of loop resistance per meter. At 2.5A, this results in a 0.345V drop, which can cause high-power controllers to fail if the voltage dips below 4.65V.
Thicker cables, such as those with 20 AWG conductors, reduce resistance significantly - down to just 0.011 Ω. At the same 2.5A load, the voltage drop is only 0.028V, which ensures stable performance even for keyboards with heavy RGB lighting.
"High current at 5V stresses cables and connectors. If possible, negotiate a higher voltage and convert locally to reduce current, or lower peak loads and verify the source's advertised current." - nodeloop.org
For cables rated to handle more than 3A, an E-Marker chip is required. This chip, embedded in the connector housing, ensures the cable can handle higher currents safely. Without it, the host device limits power delivery to safer levels. Alarmingly, USB-IF testing found that 81% of cables labeled as "3A" or "5A" without E-Marker chips failed power delivery contract requests. If your cable lacks this chip, it’s likely not delivering the power it claims.
Understanding these details can help you troubleshoot and resolve power delivery issues in your keyboard PCB effectively.
sbb-itb-3cb9615
Identifying Signs of USB-C Cable Problems
Signs of Cable-Related Power Problems
After understanding USB-C power delivery, it’s time to focus on spotting issues caused by faulty cables. Diagnosing these problems can be tricky since their symptoms often resemble PCB failures. However, by paying attention to specific signs, you can narrow down whether the cable is the culprit.
The most apparent clue? A keyboard that simply refuses to power on. But before blaming the PCB, check the cable first. Other signs include RGB lighting that flickers or dims as brightness increases, sudden disconnects and reconnects, or an "Unknown Device" error flagged by your computer. A less obvious indicator is a keyboard that powers on but isn’t recognized by the system - this often points to a charge-only cable that lacks data wiring. Additionally, if the keyboard resets or disconnects when the cable is moved, it might signal a break in the internal wiring.
"RGB takes a considerable amount of power to run... the device [may disconnect] when RGB is turned on." - CannonKeys
These observations are essential for guiding the next steps in troubleshooting.
What Causes These Symptoms
Each symptom ties back to specific cable-related problems. For instance, thin or overly long cables can create high resistance, leading to voltage drops. This can push controllers below their operating range, causing RGB lights to dim or flicker. As noted earlier, thinner cables (like 28 AWG) are more prone to resistance issues, and longer or coiled cables make the problem worse.
Frequent disconnects or resets often result from physical wear. Internal wires are most likely to break near the strain relief - the reinforced section where the cable meets the connector - because that area undergoes repeated bending. If a cable lacks proper data wiring, it can fail the USB-C handshake, triggering an "Unknown Device" error. Without this handshake, the host may default to a minimal power state, which many keyboards can’t operate on. This leaves the device unrecognized by the operating system.
The table below highlights how to differentiate cable issues from PCB or port failures:
Symptoms and Causes
| Symptom | Likely Cable Cause | Likely PCB/Port Cause |
|---|---|---|
| Keyboard won't power on | Broken internal wiring or no proper PD support | Damaged port pins or a blown fuse on the PCB |
| Device not recognized by the OS | Charge-only cable (no data wiring) or failed handshake | Damaged ESD protection diodes or missing resistors |
| RGB flickers or dims under load | High resistance in thin or long cables | Poor voltage regulation or filtering on the PCB |
| Disconnects or resets when moved | Frayed wires near the strain relief | Loose USB-C housing or cold solder joints |
These details provide a clear roadmap for pinpointing and addressing USB-C cable problems.
Step-by-Step Troubleshooting for USB-C Power Loss
Basic Cable and Port Checks
If you're dealing with USB-C power issues, start with the simplest checks: your cable and port. Swap out your current cable for a short, basic USB-C cable. Long or coiled cables can sometimes cause voltage drops, which might be the root of the problem. If your keyboard powers on with the replacement, then the original cable is the issue.
Next, test a different port on your computer. On some devices - like Apple Silicon Macs - not all USB-C ports deliver the same power. Ports that look identical might vary in power output. If switching ports resolves the issue, the problem lies with the port, not the cable or the PCB.
For a more precise check, use a USB power meter to confirm a stable 5V output. A healthy USB connection should maintain 5V consistently; any dips suggest insufficient power delivery.
Once you've ruled out cable and port issues, it's time to check for physical or internal damage.
Checking Cables and Connectors for Damage
Inspect the connectors closely. USB-C connectors are small but complex, with 24 tiny pins packed into a compact oval shape. Even minor issues like debris or a bent pin can cause intermittent failures, which might be mistaken for PCB problems. Use a magnifying glass to examine both the cable plug and the keyboard's port. Dust or lint can often be cleared out with a can of compressed air.
If the cable only works when flipped, it’s a strong indicator of a damaged pin. To get a more accurate diagnosis, use a digital multimeter in continuity mode along with a USB-C breakout board. These boards make it easier to access individual USB-C pins, which are often too small for standard multimeter probes. Focus on testing the Ground (GND), Power (VBUS), and Configuration Channel (CC) pins.
"If the multimeter shows numbers but does not beep, you have high resistance. The wire is likely too thin or damaged." - TMG Team
Here’s a quick guide to interpreting your multimeter results:
| Multimeter Result | Diagnosis | Impact on Keyboard |
|---|---|---|
| Solid beep (all pins) | Healthy cable | Cable is fine; focus on the port or PCB |
| No beep (VBUS/GND) | Broken internal wire | No power; keyboard won't turn on |
| Numbers but no beep | High resistance | Voltage drops; may cause flickering LEDs or disconnects |
| No beep (CC pin) | Handshake failure | Device not recognized or draws minimal power |
If the cable and connectors check out, move on to testing the PCB directly.
Testing Power Delivery at the PCB Level
When the cable and port seem fine, the problem might be with the PCB. Start by gently pressing on the USB-C port to see if it feels loose. Even slight movement can indicate loose solder joints, which can lead to random disconnections. For keyboards with a daughterboard connected via a JST cable, make sure the cable is firmly seated and that none of the JST header pins are bent or unsoldered.
If you're using macOS, you can run system_profiler SPUSBDataType in Terminal to check the negotiated power. If a USB 3.x-compatible keyboard PCB shows "Up to 480 Mb/s", the cable or port might be throttling the connection. Additionally, running system_profiler SPPowerDataType will show the "Current Available" power being delivered to the device.
Finally, check for a physical toggle switch on the PCB, if one exists. Some PCBs have a switch that toggles between normal use (0) and bootloader/DFU mode (1). If it’s set to 1, the keyboard may appear powered but won’t function as an input device.
Fixes for USB-C Cable and PCB Power Problems
USB-C Cable Quality vs. Power Loss: AWG, Voltage Drop & E-Marker Facts
Once you've identified the cable or port as the source of the problem using the earlier diagnostic steps, here are some specific fixes you can try.
Choosing Better Cables
Switching to a higher-quality cable can make a big difference. The wire gauge plays a major role in maintaining stable power delivery. For example, a 1-meter cable with 28 AWG conductors can create enough resistance to cause a keyboard to drop below its operating threshold at 2.5A. On the other hand, a 20 AWG e-marked cable minimizes resistance, resulting in a nearly negligible voltage drop.
Cable length is another crucial factor. For keyboards - especially those with RGB lighting - it's best to stick to cables under 3 feet (roughly 1 meter). Longer cables increase resistance and can amplify power issues. Avoid passive extension cables entirely, as they can disrupt the Power Delivery communication path.
When buying a cable, look for USB-IF certified options with a Test ID (TID) printed on the packaging. As of Q2 2024, only 37% of cables sold on major online platforms have passed USB-IF verification. Before making a purchase, cross-check the TID on the official usb.org/verified database. Reliable brands like Anker or Cable Matters typically sell quality cables in the $10–$20 range, which is a small investment compared to the hours you'd spend troubleshooting.
"Marketing labels are unenforceable. Only e-marker chips provide machine-verifiable current ratings." - Leo, Smart Home Systems Engineer
If upgrading your cable doesn't fix the issue, the problem may lie with the PCB or connectors.
Fixing PCB and Connector Problems
If the cable isn't the issue, the next step is to inspect the PCB and connectors. A loose USB-C port is a common problem. If the port feels even slightly wobbly, the solder joints underneath are likely weakened. To fix this, reflow the solder joints: apply a soldering iron tip to each joint until the solder melts, hold it there for a second, and then slowly remove the iron. Add fresh solder if the joint looks thin or uneven.
For JST headers connecting a Geon Unified Daughterboard, check for bent pins in the female connector before assuming the header needs to be replaced. If a header has snapped off the PCB but the pads are still intact, you can re-solder it. If the pad itself has been pulled away, you can bridge the connection by soldering a thin wire from the pin to the nearest functional point in the circuit.
| Component | Common Damage | Recommended Fix |
|---|---|---|
| USB-C Port | Loose or wiggling | Reflow solder joints |
| JST Header | Snapped off PCB | Resolder or bridge with a thin wire |
| PCB Pad | Pulled/missing | Bridge to adjacent functional node |
| Solder Joint | Cold or starved | Reflow and add fresh solder |
Adding Protection for Higher-Power Keyboards
If your keyboard has heavy RGB lighting or wireless features, addressing voltage drop issues can help prevent future power problems. Adding electrolytic capacitors (470–1,000 µF) near the power input can buffer voltage spikes when LEDs activate or a wireless chip initializes. This is especially helpful for builds using microcontrollers like the ESP32, which can draw 400–500 mA during Wi-Fi startup.
On the software side, reducing RGB brightness or turning off unused features like Bluetooth can lower the overall current draw and reduce the risk of brownouts. Always connect your keyboard directly to a computer's USB port. Avoid using hubs, docking stations, or keyboard passthroughs, as these often limit the available current below what high-power keyboards require.
"The USB cable used to deliver power from a USB power delivery (PD) source must be rated to the maximum wattage the cable is to deliver." - USB Implementers Forum (USB-IF)
How to Prevent USB-C Power Problems
Design Tips for Keyboard Builders
A well-designed PCB can prevent many power-related headaches. Start by ensuring that CC1 and CC2 each have a 5.1 kΩ Rd resistor. These resistors help the host device detect the keyboard properly and deliver power no matter how the USB-C plug is oriented. Without them, your keyboard might only work when plugged in one way - or not at all.
Another critical point is managing inrush current. If you place large bulk capacitors directly on VBUS, some laptop ports might interpret this as a short circuit and shut down immediately. To avoid this, limit capacitance at the connector and position bulk capacitors behind a load switch or eFuse. Test your design early with a laptop port, as laptops tend to enforce current limits more strictly than wall chargers.
For extra safety, add TVS diodes near the USB-C connector. Ensure they have a short, wide return path to ground using multiple vias. Keep CC traces short and away from noisy switch nodes to avoid intermittent power issues.
By following these steps, you not only improve your keyboard's performance but also make it easier for users to handle without running into common problems.
Day-to-Day Tips for Keyboard Users
Even with a well-designed keyboard, users play a role in keeping USB-C power problems at bay. Start by being mindful of how you insert your cables. Push them straight into the port - wiggling or applying side pressure can damage solder joints and loosen the port over time. If a direct connection is awkward, consider using a right-angle adapter to minimize strain.
Keep your USB-C port clean. Dust and debris can accumulate quickly, leading to poor connections. Shine a flashlight into the port periodically to check for buildup. Use compressed air or a wooden toothpick to gently clean it. For stubborn grime, a lint-free swab lightly dampened with 90%+ isopropyl alcohol works well - just make sure the port is completely dry before reconnecting. Avoid using metal tools that could short the pins.
When selecting cables, prioritize USB-IF certified options with clear wattage ratings. Thicker cables usually indicate better copper conductors, which provide more stable power delivery. This is especially important for avoiding power fluctuations.
Preventive Maintenance Summary
Combining smart design with regular maintenance ensures your keyboard stays free of USB-C power troubles.
| Best Practice | Who It's For | Benefit |
|---|---|---|
| 5.1 kΩ Rd resistors on CC1/CC2 | Builders | Supports dual-orientation power delivery |
| Control VBUS capacitance via a load switch | Builders | Prevents inrush current from tripping host port protection |
| TVS/ESD protection near the connector | Builders | Protects internal components from electrostatic discharge |
| Test design with a laptop port | Builders | Confirms design meets laptop current limits |
| USB-IF certified, e-marked cables | Builders & Users | Ensures reliable power negotiation |
| Insert the cable straight | Users | Protects solder joints and maintains connection |
| Clean ports regularly with non-metal tools | Users | Avoids debris buildup that causes poor connections |
| Use a rear motherboard USB port | Users | Offers more stable power than front-panel or hub ports |
For more detailed advice and high-quality keyboard components, check out KeebsForAll.
Conclusion: Keeping USB-C Power Delivery Stable
Ensuring stable USB-C power delivery boils down to three key factors: the quality of the cable, the construction of the PCB, and regular maintenance. A problem in any of these areas can lead to issues like disconnects, LED malfunctions, or even an unresponsive keyboard.
As Alan West aptly puts it, "USB-C is a connector shape, not a capability promise." Just because a plug fits snugly doesn’t mean the cable is doing its job. Factors like internal wiring quality, the presence of an e-marker chip, and well-designed PCBs are critical to delivering reliable power.
Start by checking the cable’s condition, then test different ports, and finally inspect the PCB. This is especially important for high-power RGB keyboards, where resistance from coiled cables can cause power drops. Taking these steps highlights the importance of using high-quality cables and durable PCB designs.
Internal wire breaks often occur at the strain relief - the point where the cable meets the connector - even if the outer jacket looks fine. If your cable only works when flipped, it’s time to replace it.
Ultimately, maintaining stable USB-C power means paying attention to both hardware quality and how you use it. Spending $10–$20 on a USB-IF certified cable is a small price compared to troubleshooting or replacing a damaged PCB port. Combine that with clean ports and proper cable handling, and you’ll avoid many common USB-C power issues. These simple practices are essential for builders and users alike.
FAQs
How can I tell if my USB-C cable is “charge-only”?
You can tell if a USB-C cable is “charge-only” by checking for the absence of data transfer wires. These cables don’t include the D+ and D- pins that enable data transfer.
To verify, grab a multimeter and test the continuity between the data pins on both ends of the cable. If there’s no continuity or the resistance is high, it’s a charge-only cable. Sometimes, visual clues like fewer or shorter pins can also give it away.
What cable length and wire gauge should I use for an RGB keyboard?
For an RGB keyboard, go with a cable that's between 3 and 6 feet long and has a wire gauge of at least 24 AWG. This combination provides steady power for features like RGB lighting while keeping the cable flexible and easy to manage.
When do I need an e-marked USB-C cable for my keyboard?
You’ll need an e-marked USB-C cable if your keyboard or device requires a certified cable to handle reliable power delivery, especially for high-power or fast-charging scenarios. These cables are designed to ensure proper power transfer and meet USB Power Delivery standards, which is critical for devices that need consistent and efficient power.