
Keyboard Not Responding After Flashing Firmware
[ Back to Mechanical Keyboards 101 ]When your keyboard stops working after flashing firmware, it’s usually due to three main issues: corrupted firmware, incorrect firmware installation, or bootloader/driver problems. These can occur if the process is interrupted, the wrong firmware is used, or the computer fails to recognize the keyboard properly. Here's how to fix it:
- Check Hardware Basics: Test a different USB cable and connect directly to a USB port (not a hub).
- Enter Bootloader Mode: Use the reset button or specific key combinations to re-enable flashing mode.
- Flash Correct Firmware: Ensure the firmware matches your keyboard's model and microcontroller (e.g., ATmega32U4, RP2040).
- Reset EEPROM: Clear corrupted settings stored in memory if the keyboard remains unresponsive.
- Restore Factory Firmware: Use the manufacturer's recovery tools if other fixes fail.
Prevent future issues by verifying firmware compatibility, maintaining a stable connection during flashing, and backing up your settings beforehand. These steps can save you from turning your keyboard into an unresponsive device.
Flashed Wrong Firmware? Apollo 87HL-T-SC 7U PCB (FIX)
sbb-itb-3cb9615
Why Keyboards Stop Working After Firmware Flashing
When a keyboard stops responding after a firmware flash, it’s usually due to one of three common issues: corrupted firmware, an incorrect firmware version, or problems with the bootloader or drivers. Identifying the root cause is key to resolving the issue efficiently, as each problem requires a different approach.
Corrupted Firmware from Interrupted Flashing
Interruptions during the flashing process can lead to corrupted firmware, rendering the keyboard unusable. If the keyboard loses power or is disconnected during the flashing phase, the microcontroller may not receive complete instructions, causing it to malfunction.
"It is very important that you do not unplug the keyboard or otherwise interrupt the flashing process while the firmware is being written." - QMK Firmware Documentation
This isn’t limited to the main firmware. The EEPROM, which stores persistent settings like custom keymaps and layer configurations, can also become corrupted. As noted in KEEBD Documentation, "Sometimes, if you've flashed many different keymaps or had power interruptions during flashing, the EEPROM (where persistent settings are stored) can become corrupted. This can lead to erratic behavior, including stuck keys".
Wrong Firmware Version Installed
Firmware is designed for specific microcontroller units (MCUs) and keyboard layouts. Flashing firmware meant for a different MCU or hardware revision - for example, installing firmware for a Planck Revision 5 on a Revision 6 keyboard - will prevent the keyboard from functioning. The mismatched code won’t be able to properly interact with the keyboard’s physical circuits.
A notable example occurred in October 2020, when ZMK Firmware developers identified a critical issue affecting nRF52840-based boards like the nice!nano. The firmware’s settings system was configured to use flash memory starting at 0xF8000, overlapping with the Adafruit nRF52 Bootloader’s reserved space at 0xF4000. This overlap caused the firmware to erase parts of the bootloader when saving settings, leaving keyboards stuck in bootloader mode. The developers resolved the issue by moving the settings partition back by 48KB to 0xEC000.
One telltale sign of incorrect firmware is a bootloader loop, where the device is recognized only as a flashing device and not as a functioning keyboard. Tools like QMK Toolbox may also show errors when verifying the written data against the source. If these firmware-related issues are ruled out, the next step is to investigate bootloader or driver problems.
Bootloader or Driver Problems
Sometimes, even when the firmware flash is successful, the keyboard may fail to communicate with the computer due to bootloader or driver issues. For example, on Windows, the operating system might assign an incorrect driver to the keyboard’s bootloader, preventing flashing tools from detecting it. Running QMK Toolbox as an administrator or using the "Install Drivers" option typically resolves this.
Some keyboards have a PCB toggle switch labeled 0/1 that controls bootloader mode. If this switch remains set to '1' after flashing, the keyboard stays in DFU (Device Firmware Update) mode and won’t function normally. Additionally, controllers like the Pro Micro, which use Caterina bootloaders, only stay in flashing mode for a few seconds after being reset. This creates a very narrow window for successful flashing.
Hardware issues can also play a role. Using low-quality cables, overly long coiled cables, or USB hubs may prevent the keyboard from receiving adequate power to complete the flashing process or boot correctly afterward. These communication challenges often signal deeper hardware-related problems, which will be explored in the upcoming repair guide.
How to Fix an Unresponsive Keyboard
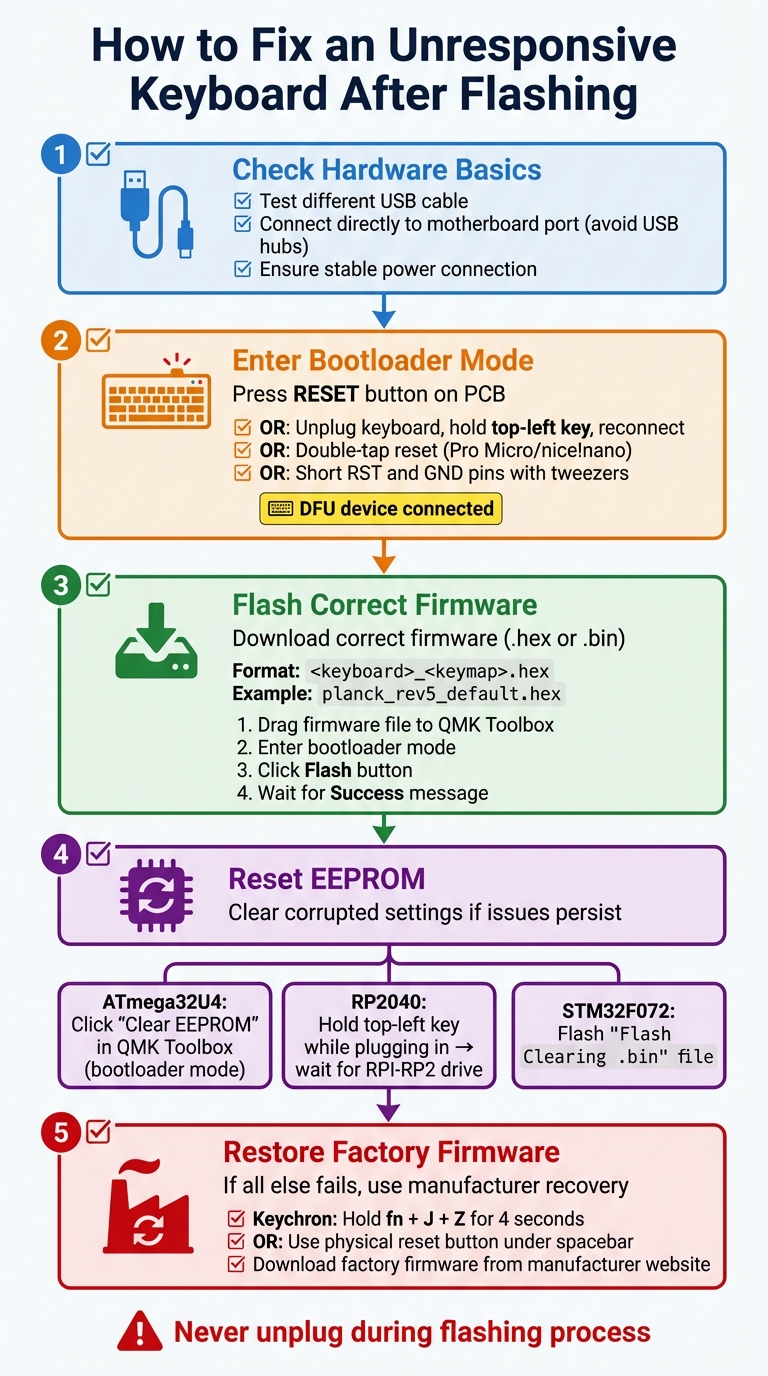
5-Step Guide to Fix Keyboard Not Responding After Firmware Flash
When dealing with an unresponsive keyboard, it’s best to work through potential fixes step by step. Start with straightforward hardware checks before diving into firmware-related solutions.
Check Your Cable and USB Port
Begin by testing the basics. Swap out your cable and connect your keyboard directly to a motherboard USB port instead of using a USB hub. USB hubs can sometimes cause power inconsistencies, which might disrupt communication between your keyboard and computer.
Enter Bootloader Mode Again
Accessing bootloader mode is crucial for reflashing your keyboard. Open QMK Toolbox and keep it running - you’ll know your device is recognized when you see a yellow message like *** DFU device connected.
To enter bootloader mode:
- Press the RESET button on your keyboard’s PCB.
- If there’s no reset button, unplug the keyboard, hold the top-left key, and reconnect it.
- For Pro Micro or nice!nano controllers, double-tap the reset button.
- If none of the above options work, use metal tweezers to short the RST and GND pins on the controller.
If your device still isn’t detected, enable "Show All Devices" from the Tools menu in QMK Toolbox. This may reveal your keyboard under a different name.
Flash the Correct Firmware
Make sure you download the correct firmware file for your keyboard model and revision. The file should follow a format like <keyboard>_<keymap>.hex or .bin (e.g., planck_rev5_default.hex).
Here’s how to flash the firmware:
- Drag the firmware file into the "Local file" box in QMK Toolbox.
- Put your keyboard into bootloader mode (as described above).
- Confirm the yellow console text showing the connection, then click the Flash button.
- Wait for the "Success" message before unplugging your keyboard.
For RP2040-based keyboards, the process is slightly different. Drag and drop the .uf2 firmware file onto the RPI-RP2 drive as instructed. If issues persist after flashing, you may need to reset the EEPROM.
Reset the EEPROM
If your keyboard still acts up - like showing phantom keypresses or staying unresponsive - the EEPROM might hold corrupted settings. Resetting it can resolve these problems:
- ATmega32u4-based boards: While in bootloader mode, click the Clear EEPROM button in QMK Toolbox.
-
RP2040 keyboards: Hold the top-left key while plugging in the USB cable. Wait for the
RPI-RP2drive to appear, then unplug and reconnect the keyboard. - STM32F072 boards: Flash a specific "Flash Clearing .bin" file, as these boards use flash memory to emulate EEPROM.
Keep in mind that VIA software might still prioritize older EEPROM settings over the newly flashed firmware. This could require additional adjustments if issues persist.
Restoring Factory Firmware
When your keyboard refuses to respond to standard troubleshooting, returning it to factory firmware might be the reset you need. This process clears out any corrupted custom configurations, giving you a fresh start. If all else fails, reverting to factory firmware can often revive your device.
Using Official Recovery Tools
Most keyboard manufacturers offer original firmware files on their websites, usually in .hex or .bin formats. For instance, Keychron V and Q series keyboards have a built-in reset function. Simply hold fn + J + Z for four seconds to restore the factory settings. If key combinations don’t work, look for a hidden physical reset button - often located under the spacebar. Press this button while connecting the USB cable to enter DFU mode.
Once in DFU mode, download the factory firmware from the manufacturer’s support page. Open QMK Toolbox, drag the firmware file into the "Local file" box, and ensure your keyboard is in bootloader mode using the reset button. When you see the yellow connection message, click Flash. After the process completes, your keyboard should be back to normal.
Using QMK Recovery Options
If your keyboard runs on QMK firmware, there are additional recovery methods to consider. Before flashing factory firmware, you may need to clear the EEPROM to eliminate persistent settings that could cause issues like phantom keypresses or glitches. The exact process depends on your keyboard's microcontroller:
- ATmega32U4-based boards: Use QMK Toolbox in DFU mode and click the "Clear EEPROM" button.
-
RP2040 keyboards: Unplug the keyboard, hold the top-left key, and reconnect it. The device will appear as a drive named
RPI-RP2, allowing you to drag and drop the firmware file directly onto it. - STM32F072 boards: These require a specific "Flash Clearing .bin" file since the chip uses flash memory to emulate EEPROM.
Be cautious when selecting firmware files. Avoid those labeled _bootloader.hex or _production.hex unless your manufacturer specifically instructs you to use them - these files aren’t intended for standard recovery flashing. If QMK Toolbox doesn’t recognize your device, check your system’s bootloader drivers. Use Windows Device Manager or macOS System Information to confirm the drivers are correctly installed.
Preventing Firmware Flashing Problems
Avoid turning your keyboard into a paperweight by taking a few simple precautions before flashing firmware. These steps, combined with troubleshooting methods, can help you steer clear of issues like corrupted firmware or bootloader errors.
Verify Firmware Compatibility First
Firmware is very specific to your keyboard's Printed Circuit Board (PCB) and its Micro-Controller Unit (MCU). Using the wrong firmware can permanently damage your keyboard. Think of the MCU as your keyboard's "brain", and the firmware must be tailored to that specific chip. For instance, firmware for an ATmega32U4 chip won't work on an STM32 board.
Start by checking your PCB's printed name and revision (e.g., "Rev 5"). Then, connect your keyboard in DFU mode and open QMK Toolbox. The yellow status message will display your MCU model. Make sure this matches the firmware file name, which usually looks like <keyboard>_<keymap>.{bin,hex} (e.g., planck_rev5_default.hex).
"Using the freebird60 firmware on a PCB that doesn't support it might lead to you bricking that PCB." - Cansu Sener, KeebsForAll
For those using the command line, running qmk doctor can catch configuration issues before they cause problems. If your PCB isn't listed in typical firmware databases, reach out to the manufacturer or seller to get the correct file.
Keep a Stable Connection While Flashing
Interrupting the flashing process can corrupt your keyboard, so it's crucial to maintain a stable connection. Always plug directly into a USB 2.0 port to reduce power instability - USB hubs and USB 3.0 ports can sometimes cause compatibility issues.
Use a reliable cable that supports stable data transmission. If you're using a laptop, keep it plugged in to prevent interruptions like sleep mode. Before hitting "Flash", double-check that QMK Toolbox shows a "DFU device connected" message.
Back Up Your Keyboard Settings
Protect your configurations by creating backups before making any changes. Export your keymap as a JSON file using QMK Configurator. This way, you can easily restore your layout without starting from scratch. Save your current working firmware file (.hex or .bin) in a labeled folder with the date and version number.
If you're using VIA, use the "Save Layout" feature to back up real-time keymap adjustments stored in EEPROM. Also, make a note of any custom settings like DEBOUNCE or TAPPING_TERM from your config.h file. These backups allow you to quickly return to a functional setup if anything goes wrong.
Conclusion
Flashing firmware doesn’t have to be complicated. The trick lies in knowing how to access bootloader mode. This might involve using reset buttons, shorting the RESET and GND pins, or specific key combinations like holding Space and B while connecting your device. Always double-check that the firmware matches your PCB and MCU to avoid compatibility issues.
When flashing, make sure to use a reliable USB data cable and maintain a stable power supply throughout the process. Interrupting power can lead to incomplete flashes or other problems.
If you encounter issues, try restoring backups or testing with precompiled firmware. Keeping backups of your firmware files and keymap configurations ensures you can quickly recover if something goes wrong. Testing precompiled firmware from trusted sources can also help identify whether the issue stems from hardware or custom code.
For additional support and high-quality components, you might want to explore options like KeebsForAll. They offer PCBs such as the Freebird60, which come pre-flashed and ready to assemble. Plus, their Discord community provides real-time help for hardware-specific challenges that general guides might not cover.
FAQs
How do I know which MCU my keyboard uses?
To figure out your keyboard's microcontroller unit (MCU), start by inspecting the PCB for any identifying labels or markings. If that's not an option, check the keyboard's documentation for details. Some widely used MCUs include ATmega32u4, STM32, and RP2040. Another method is to connect your keyboard to your computer and use tools like QMK Toolbox, which can help detect the MCU type. It's important to know this because the process for flashing firmware depends on the specific microcontroller.
What if my keyboard won’t show up in QMK Toolbox at all?
If your keyboard isn’t showing up in QMK Toolbox, the problem might be related to drivers or the device not being detected. Start by reinstalling the drivers through the Tools tab in QMK Toolbox - just click Install Drivers.... Make sure your keyboard is in bootloader mode. You can do this by using a reset button, connecting header pins, or pressing the required key combination.
If the issue persists, double-check your USB connection. Try switching to a different port or look for any potential driver conflicts that might be causing the problem.
Can flashing the wrong firmware permanently brick my PCB?
Flashing the wrong firmware onto your PCB can make it completely non-functional. To avoid this, double-check that the firmware is compatible with your hardware. Always follow the flashing instructions step by step. Taking the time to prepare properly can save you from major headaches later.