
Ultimate Guide to Keyboard Cleaning Tools
[ Back to Mechanical Keyboards 101 ]Mechanical keyboards get dirty fast - dust, crumbs, and oils build up daily, affecting performance and hygiene. Cleaning your keyboard regularly can prevent jamming keys, improve typing, and extend its lifespan. Here's what you need:
- Weekly Maintenance: Use compressed air ($6–$15) and soft brushes ($5–$15) to remove surface debris.
- Monthly Deep Cleaning: Keycap and switch pullers ($5–Keycap pullers ($5–$12)2), isopropyl alcohol (70%+), microfiber cloths, and cotton swabs help clean keycaps and switches safely.
- Advanced Tools: For enthusiasts, switch lubricants like Krytox 205g0 ($7.95) and ultrasonic cleaners ($60–$90) ensure thorough cleaning and smooth performance. If you're deep-cleaning, you might also want to lube your switches for the ultimate typing feel.
- Keycap Soaking: Dish soap or denture tablets clean and sterilize keycaps effectively, with soaking times ranging from 10 minutes to 6 hours.
Pro Tip: Match your tools to your keyboard type (hot-swappable or soldered) and switch style (linear, tactile, or clicky) for better results. Regular cleaning keeps your keyboard responsive and reduces germs - studies show keyboards can harbor five times more bacteria than a toilet seat!
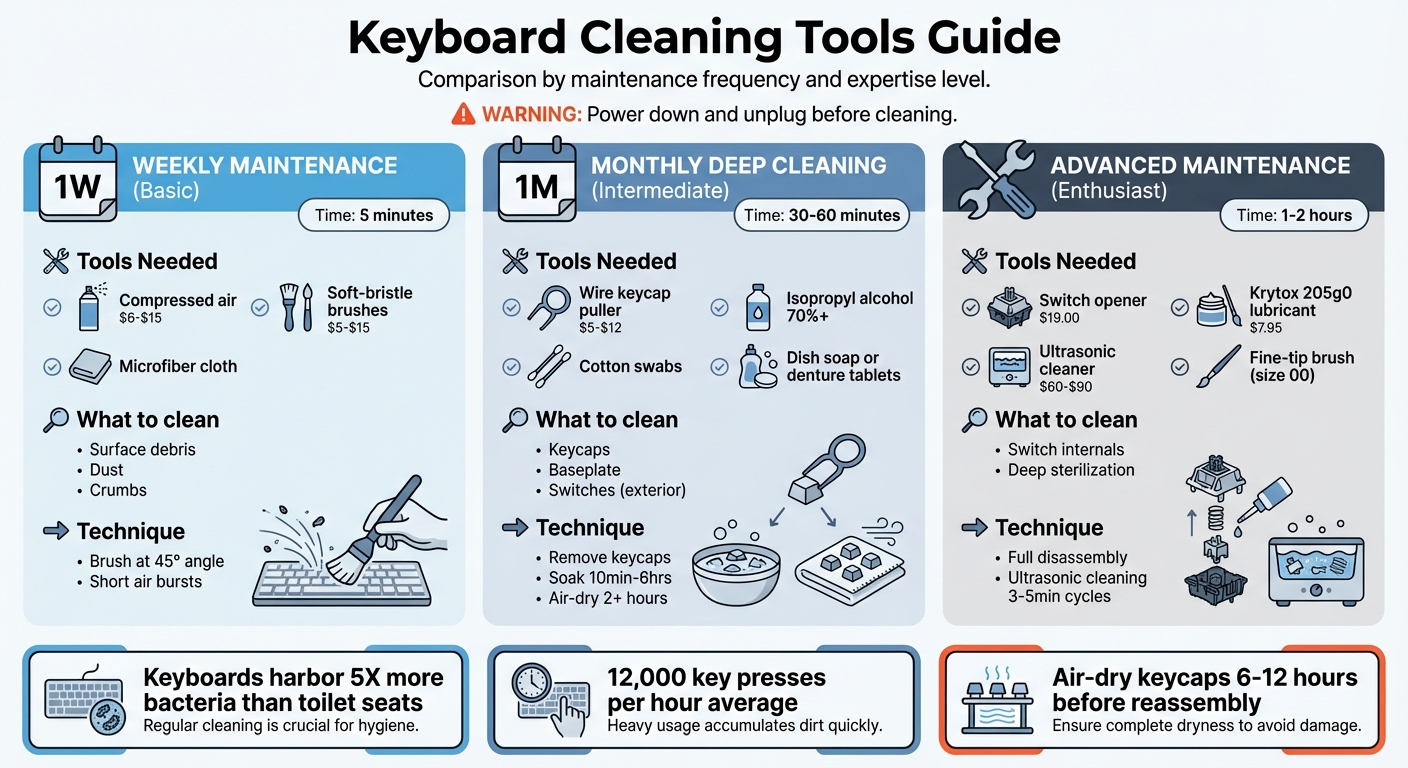
Keyboard Cleaning Tools Comparison: Weekly, Monthly, and Advanced Maintenance
How to Clean a Keyboard Properly (Remove the Keycaps)
sbb-itb-3cb9615
Basic Cleaning Tools
To keep your keyboard in good shape, you'll need a few key tools. Start with a wire keycap puller - an essential for safely removing keycaps. These pullers use thin metal loops to grip the edges of keycaps, letting you pull them straight off without harming the switch stems or the keycap itself. As How-To Geek explains, "Wire keycap pullers are generally preferred over plastic ones because they don't scratch the sides of the keycaps". While plastic ring pullers often come free with keyboards, upgrading to a wire keycap and switch puller (priced around $5–upgrading to a wire puller (priced around $5–$12) is worth it.2) is worth it. Wire pullers also handle larger keys like the spacebar with ease, unlike fixed-width plastic versions. Here's a breakdown of tools you'll need for effective cleaning.
Keycap Pullers
Wire keycap pullers not only protect your keycaps from scratches but also make removal quick and hassle-free. They’re a small but smart investment for anyone serious about keyboard maintenance.
Brushes and Compressed Air
Soft-bristle brushes are perfect for removing dust, crumbs, and hair from between switches and across the keyboard’s surface. If you’re cleaning near the PCB, opt for anti-static (ESD-safe) brushes to avoid electrical damage. Brush sets usually cost between $5 and $15 and can handle most surface debris.
For deeper cleaning, compressed air is your go-to tool. It can reach into tight spaces and inside switch housings where brushes can’t. Disposable cans are priced at $6–$15 but should be used carefully to avoid freezing effects. Alternatively, electric air blowers are a more sustainable option, costing $35–$70 as a one-time purchase. When using compressed air, tilt your keyboard at a 45° angle and shake it gently to loosen debris before starting. Stick to short bursts to prevent pushing dirt further into the switches or causing moisture issues.
Microfiber Cloths and Cotton Swabs
Microfiber cloths are ideal for wiping down keycap surfaces and the keyboard case without leaving scratches or lint. They’re excellent for cleaning off fingerprints and skin oils. For smaller, hard-to-reach areas, cotton swabs are incredibly useful. They can clean between switches and inside keycap stems where grime tends to build up. Both tools are gentle on all keyboard materials, but always power down your keyboard before cleaning.
Isopropyl Alcohol for Disinfecting
For disinfecting, isopropyl alcohol (IPA) with a concentration of 70%–99% is the gold standard. XDA-Developers notes, "Isopropyl alcohol with a concentration of 70% or higher is ideal for disinfecting without damaging most electronics". It’s highly effective at breaking down grime, removing skin oils, and killing bacteria - a big deal when you learn that keyboards can be five times dirtier than a toilet seat.
To use, apply the alcohol to a cloth or swab rather than directly onto the keyboard to avoid over-saturation. While PBT keycaps can handle alcohol well, be cautious with ABS keycaps, as high concentrations may cause discoloration or damage over time. After cleaning, let your keyboard air-dry for at least two hours before reassembling and powering it back on.
Advanced Cleaning Tools and Techniques
If you want your keyboard to perform and look like it's brand new, advanced cleaning methods can make a big difference. While these techniques take more time and may require some specialized tools, the results are absolutely worth it.
Switch Lubricants and Maintenance Tools
Once you’ve tackled basic cleaning, advanced tools can help maintain your keyboard’s performance over time. Take switch lubricants, for example. Products like Krytox 205g0 are excellent for keeping switches smooth and consistent after a deep clean. When you disassemble switches to remove old debris or lubricant, applying fresh lube ensures they feel and perform like they should. Krytox 205g0 is a go-to option for both linear and tactile switches and starts at $7.95.
To make disassembly easier, tools like the KFA Switch Opener ($19.00) can save time while protecting your switches from damage. For enthusiasts looking for reliable tools, KeebsForAll offers a curated selection designed with the mechanical keyboard community in mind.
Soaking Solutions for Keycaps
When your keycaps need more than a quick wipe, soaking them can provide a deep clean. Two effective options are dish soap and denture tablets.
- Dish soap is easy to find and gentle on most plastics. Simply soak the keycaps in lukewarm water with a few drops of dish soap for 10–30 minutes.
- Denture tablets, on the other hand, not only clean but also sterilize. According to Das Keyboard, "Denture tablets are an ideal keycap cleaner. They remove oils, sterilize, and leave little to no residue." However, this method requires a longer soak - at least six hours.
A few tips: Always use lukewarm water, as hot water can warp ABS keycaps. After soaking, let the keycaps air-dry completely for 6–12 hours with the stems facing up to prevent moisture from getting trapped.
| Method | Advantages | Disadvantages |
|---|---|---|
| Dish Soap | Easy to find, gentle on plastics, lifts oils effectively. | May require extra scrubbing for tough grime. |
| Denture Tablets | Cleans and sterilizes, leaves no residue, great for removing oils. | Requires a long soak (6+ hours). |
For an even deeper clean, ultrasonic cleaning can be a game-changer.
Ultrasonic Cleaners
Ultrasonic cleaners take cleaning to the next level, especially for disassembled parts like switch housings, stems, and springs. These devices use high-frequency vibrations to create tiny bubbles that scrub away grime from every nook and cranny.
To use one, fully disassemble your switches and place the components in warm water with a drop of dish soap. Run the cleaner for a 3–5 minute cycle, stirring every couple of minutes to ensure even cleaning. Once done, dry the parts thoroughly before reassembling.
Household ultrasonic cleaners typically cost between $60 and $90. While effective, there are a few things to keep in mind:
- You must completely disassemble switches, as water trapped inside can cause damage.
- High-frequency vibrations might loosen dye-sublimated legends or crack thin ABS stems.
How to Choose the Right Cleaning Tools
When it comes to picking the right cleaning tools, your keyboard's design and how often you use it are key factors. These details help you choose tools that fit your specific maintenance needs.
Tools for Different Keyboard Types
The type of keyboard you have plays a big role in determining the tools you'll need. For hot-swappable keyboards, removing switches is simple since soldering isn’t required. In this case, you’ll want to have disassembly tools handy for deep cleaning or repairs.
For soldered keyboards, things get a bit trickier. Accessing switches requires desoldering equipment, which is a more advanced process. If you’re not comfortable with soldering tools, it’s better to stick to basic maintenance like removing keycaps and surface cleaning.
The type of switches your keyboard uses also affects your choice of lubricants:
- Linear switches work best with thicker lubricants like Krytox 205g0 (starting at $7.95). Apply it sparingly to the stem sides and housing rails.
- Tactile switches need lighter lubricants such as Tribosys 3203 to maintain the tactile bump. Avoid putting lubricant directly on the bump to preserve its feel.
- Clicky switches shouldn’t be lubricated at all, as it can interfere with their click mechanism.
Whether you’re working on a compact 60% keyboard or a full-sized one, the tools stay the same. However, the time required increases with the keyboard’s size. Lubricating an entire keyboard usually takes 1–2 hours, no matter your skill level.
Tools for Different Cleaning Schedules
Your cleaning habits also influence the tools you’ll need. For weekly maintenance, keep it simple with a soft-bristle brush, a microfiber cloth, and compressed air. Use the brush at a 45° angle to sweep away crumbs and dust. This quick five-minute routine keeps your keyboard clean without requiring disassembly.
For monthly deep cleaning, you’ll need a keycap puller, 70% isopropyl alcohol, and cotton swabs. After removing the keycaps, clean the baseplate with alcohol-dampened swabs. Wash the keycaps with soap and warm water, then let them air-dry for at least two hours before putting them back.
If you’re up for occasional advanced maintenance, invest in specialized tools like a switch opener, a fine-tip brush (size 00 or smaller), and high-quality lubricants. This level of care can improve the typing experience and reduce spring noise. Just remember: less is more when it comes to lubrication. A thin, barely visible layer is all you need to avoid making switches feel sluggish.
Here’s something to consider: office keyboards can harbor five times more bacteria than a toilet seat, thanks to crumbs, skin oils, and germs. Your cleaning schedule should match how often you use your keyboard and the environment it’s in. Using the right tools not only keeps your keyboard performing well but also increases its lifespan.
Conclusion
Taking care of your keyboard isn't just about keeping it looking good - it’s about preserving its performance and durability. Regular cleaning not only protects your investment but also ensures your keyboard functions smoothly. Think about it: with the average adult typing around 200 characters per minute and making roughly 12,000 key presses in an hour, it's easy to see how grime and debris can build up quickly.
Using the right tools is key. Items like wire keycap pullers, soft brushes, and suitable cleaning solutions help you clean effectively without risking damage. It’s also crucial to match your cleaning methods to your keyboard's materials. For example, using the wrong cleaner on your keycaps or legends can lead to permanent damage.
Specialized vendors like KeebsForAll offer tools that make maintenance easier and safer. Whether it’s a wire keycap puller ($5–$15), a full cleaning kit ($15–$35), or advanced options like the KFA Switch Opener ($19.00) and Krytox 205g0 lubricant (starting at $7.95), these tools can elevate your typing experience. They ensure smooth, quiet operation while protecting your keyboard from wear and tear.
Routine cleaning doesn’t just improve performance - it also tackles hygiene concerns by reducing germs and contaminants. Simple practices, like using a dust cover when your keyboard is idle, can keep debris at bay and make deep cleaning less frequent. With the right tools and regular maintenance, your keyboard will stay reliable and responsive for years to come.
FAQs
What’s the safest way to clean sticky keys?
To clean sticky keys without causing damage, start by carefully removing the keycaps using a keycap puller. Soak the keycaps in warm water mixed with mild soap or isopropyl alcohol, then gently scrub them with a soft brush to remove any residue. For the keyboard base, use compressed air to blow away dust and debris, and wipe the surface gently with a damp microfiber cloth. Before reassembling, make sure all components are completely dry to prevent any issues.
Can I use water or IPA on my keycaps without damage?
It's best to avoid using water or isopropyl alcohol (IPA) directly on your keycaps, as these substances can potentially cause damage. Instead, a safer option is to soak the keycaps in a solution of mild soapy water. Once cleaned, ensure they are completely dry before putting them back on the keyboard. Be cautious not to let water or IPA come into contact with the keyboard's electronic components, particularly if the keyboard hasn't been fully disassembled and properly dried.
When is switch lubing worth doing?
Switch lubing can make a noticeable difference if you're after smoother key presses, quieter operation, extended switch durability, and a more uniform feel. Since most switches come from manufacturers without any lubrication, adding lube yourself can greatly improve your typing or gaming experience.