
VIA is a free tool that makes customizing your mechanical keyboard simple. It eliminates the need for complex firmware programming, allowing you to remap keys, create macros, and control RGB lighting in real time. VIA is compatible with Windows, macOS, and Linux and supports hundreds of keyboards.
Key Points:
- What It Does: VIA allows you to remap keys, set up multiple layers, program macros, and adjust RGB lighting.
- Supported Keyboards: Only VIA-enabled keyboards work. Check compatibility at caniusevia.com.
- How It Works: Changes are saved directly to your keyboard’s memory, so they persist across devices.
- Software Options: Use the web app (usevia.app) or download the desktop version from GitHub.
Getting Started:
- Confirm your keyboard supports VIA.
- Download the VIA app or use the web version.
- Connect your keyboard via USB.
- Load your keyboard’s keymap file if it’s not auto-detected.
With VIA, you can quickly personalize your keyboard’s layout and lighting without needing advanced technical skills.
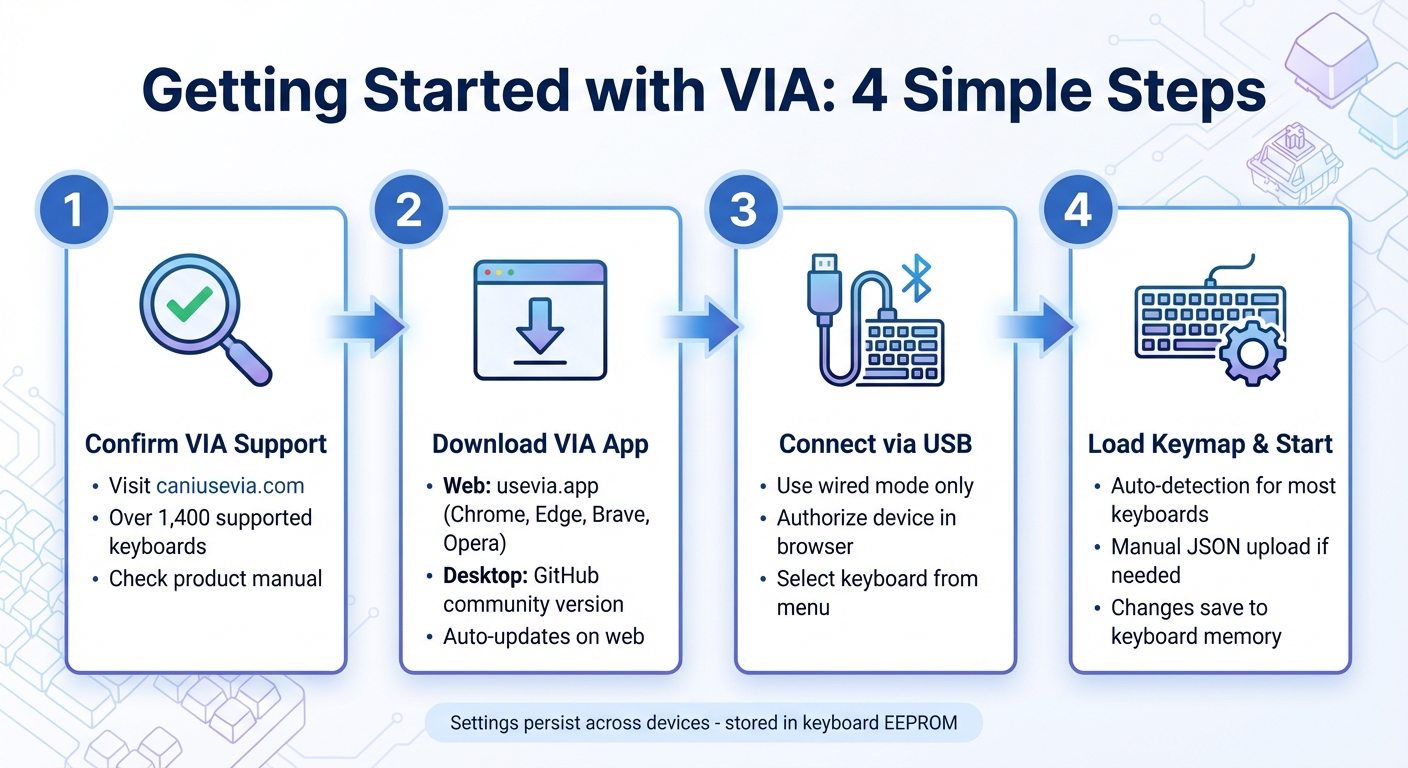
VIA Keyboard Setup Process: 4-Step Guide for Beginners
How to Install/Use VIA Configurator (App Tutorial)
sbb-itb-3cb9615
Checking if Your Keyboard Supports VIA
Before diving into customization, you need to confirm if your keyboard supports VIA. Only keyboards with firmware compiled for VIA will work with the software.
The easiest way to check is by visiting the official compatibility list at caniusevia.com. As of March 3, 2026, this list includes over 1,400 keyboard models. Simply search for your keyboard's brand and model.
KFA Freebird VIA-compatible keyboard kits
For KFA Freebird keyboards, these keyboard kits are VIA-compatible:
For other keyboards, confirm support on the product page, in the manual, or in the official VIA compatibility list before loading a keymap.
What VIA-Enabled Keyboards Mean
A VIA-enabled keyboard has firmware built with the VIA_ENABLE = yes flag. This means you can change your keymap directly through the VIA Configurator software without reflashing the firmware. The keyboard stores your custom keymaps and settings in its EEPROM memory.
"VIA is a feature in QMK that lets you change your keymap on your keyboard without needing to reflash firmware." - Keebio
When you connect a VIA-enabled keyboard, the software identifies it using unique USB identifiers - Vendor ID (VID) and Product ID (PID) - embedded in the firmware. If the keyboard is configured correctly, VIA will detect it automatically and display your current keymap layout.
Finding and Downloading Keymap Files
Most VIA-compatible keyboards are recognized as soon as you plug them in. However, if your keyboard doesn't show up in the VIA software, you may need to manually load a JSON keymap file. This file contains details about your keyboard's layout, such as key positions, rotary encoders, and RGB lighting zones.
For KeebsForAll Freebird keyboards, these JSON files are available on their product support pages at keebsforall.com. Look for files labeled "VIA keymap" or "keyboard definition." Alternatively, you can find keymap files on GitHub.
To manually load a JSON file, open the VIA software, go to the Settings section, and enable the "Show Design tab." Once this tab appears, you can drag and drop your keyboard's JSON file into it. This step is necessary if your keyboard isn't automatically detected.
Once you've confirmed compatibility and loaded the keymap file (if needed), you're ready to install the VIA software and start customizing.
Downloading and Installing VIA Software
Once you've confirmed your keyboard is compatible with VIA, here's how you can get started with the software.
Getting the Official VIA App
The official VIA app is a web-based tool you can access at usevia.app. To use it, open the site in a Chromium-based browser like Google Chrome, Microsoft Edge, Brave, or Opera. Note that browsers like Firefox and Safari won't work because VIA relies on the WebHID API, which these browsers don't support.
"VIA is a powerful, open-source web-based interface for configuring your QMK-powered mechanical keyboard. It allows you to customize your keymaps, create macros, and adjust RGB settings... on the fly, without needing to recompile or flash your keyboard's firmware." - the-via/app GitHub Repository
One of the best parts of the web app? It updates automatically whenever new features are rolled out, so you never need to worry about manual updates.
Prefer working offline? A desktop version, maintained by the community, is available for download at github.com/cebby2420/via-desktop. Keep in mind, though, that this version isn't officially supported by the VIA team. Even with the desktop app, you'll need an internet connection because it functions as a wrapper for the web version.
Installing VIA on Your Computer
If you're using the web version, there's no need to download anything. Simply visit usevia.app, and your browser will ask for permission to access HID (Human Interface Device) devices. Make sure to grant this permission so VIA can detect your keyboard. Click "Authorize device +", then select your keyboard from the menu that appears to establish the connection.
For those opting for the desktop version, installation is straightforward. Download the app for Windows, macOS, or Linux, run the installer, and follow the instructions. macOS users should note a key difference: the Win/GUI key in VIA corresponds to the Cmd/Command key on macOS, while Alt maps to the Opt/Option key.
Once everything is set up, you can load your keyboard's keymap JSON file to begin customizing your setup.
Connecting Your Keyboard and Loading VIA
Connecting Your Keyboard via USB Cable
Start by connecting your keyboard using a USB cable. If your keyboard supports wireless options like Bluetooth or 2.4GHz, make sure it's switched to wired mode, as VIA doesn't work with wireless connections. For more on how these features work, check out our Mechanical Keyboards 101 guide.
To confirm the keyboard is working, type a few characters in a text editor. Then, open the VIA web app at usevia.app using a Chromium-based browser. Once prompted, authorize the device, pick your keyboard from the pop-up menu, and click "Connect."
In the "Configure" tab, you'll see a visual layout of your keyboard. Click any key on the layout - if it pulses or flashes slowly, it means VIA is successfully communicating with your keyboard. For further confirmation, switch to the "Key Tester" tab and press some physical keys. If the corresponding keys on the screen light up, VIA recognizes your keyboard.
If your keyboard isn’t detected right away, you’ll need to load its keymap file manually.
Loading Your Keyboard's Keymap File
When VIA doesn't automatically recognize your keyboard, you can load its keymap file to get it working.
Most modern keyboards are pre-configured in VIA’s database, so they’re recognized instantly. If your keyboard shows up immediately, you’re ready to start customizing without needing extra files.
But if VIA stays stuck on "Searching for devices…", you’ll need to manually upload a keyboard-specific JSON file. First, go to the "Settings" tab (gear icon) and toggle the "Show Design tab" option to ON. This will add a "Design" tab (paintbrush icon) to the interface. From there, click "Load" (or "Load Draft Definition") and select the .json file you downloaded from your keyboard manufacturer’s website. You can also drag and drop the file directly into the window. Once it’s loaded, check the layout in the "Configure" tab to ensure everything is set up correctly.
Customizing Your Keyboard with VIA
With your keyboard connected and the keymap ready, it’s time to fine-tune its functionality to match your preferences with our mechanical keyboard guides.
Remapping Keys and Setting Up Layers
As soon as VIA detects your keyboard, you can start tweaking its setup. At the top of the interface, you’ll see your keyboard layout, and below that, a collection of assignable key functions. To remap a key, simply click on it in the layout and choose a new function from categories like Basic, Media, Macro, Layers, or Lighting.
"VIA allows you to change key settings in real-time. It is the gold standard for keyboard customization." - NPK Club
VIA keyboards come with support for up to 4 layers by default. For example, you can assign a key as MO(1) on Layer 0 to temporarily activate Layer 1 while holding that key. This is especially handy for adding extra functionality without losing your primary layout.
Want to automate repetitive tasks? Use the Macro tab to record a sequence of key presses. Once saved, you can assign the macro (like M0 or M1) to any key on your keyboard. Test your setup in the Key Tester tab to make sure everything functions smoothly.
Once you’ve configured keys and layers, take it a step further by customizing your keyboard’s RGB lighting.
Configuring RGB Lighting
If your keyboard features RGB lighting, click the lightbulb icon in the Lighting section to access brightness, color, and effect settings. Choose from options like static colors, breathing effects, rainbow waves, or even reactive patterns that respond to your typing. You can also assign lighting controls - such as RGB_TOG, RGB_MOD, or RGB_VAI/RGB_VAD - to a function layer, keeping your main layout uncluttered.
Best of all, any changes you make to the lighting are saved directly to your keyboard’s memory. This means your settings will stay intact, even if you unplug your keyboard.
Saving Your Settings and Fixing Common Problems
Saving Your VIA Settings
When you customize your keyboard using VIA, your changes - like keymaps, layers, and lighting - are automatically saved to the keyboard's EEPROM. This ensures that your settings stay intact, even if you unplug the keyboard or connect it to a different computer. To create a backup of your layout, head to the Configure tab, select Save + Load, and click "Save." This will download a .json file containing your current configuration. If you ever need to reset or restore your keyboard, simply reload this file.
If you run into problems after saving your settings, check out the troubleshooting tips below.
Fixing Common VIA Problems
If your keyboard isn't working as expected after saving your settings, here are some steps to try:
- Check the connection: Make sure your keyboard is plugged in before opening VIA. For the web app, use a supported browser and click "Authorize device +."
-
Manual detection: If VIA doesn't recognize your keyboard, enable the Design Tab in Settings and load the keyboard's
.jsondefinition file. This step is only required if the app fails to detect your keyboard automatically.
Sometimes, after flashing new firmware, you might notice issues like unresponsive keys or outdated keycodes. This happens when the keyboard reads old data from the EEPROM instead of the updated firmware. To fix this, clear the EEPROM by holding the Bootmagic key (usually Escape or the top-left key) while connecting the keyboard via USB. This resets the keyboard to its factory settings and resolves any synchronization issues.
For problems with individual keys, go to the Key Tester tab and toggle Test Matrix. This tool lets you check if the physical key locations align with VIA's assignments, helping you identify and fix any mismatches.
Wrapping It Up
By diving into VIA's features, you've opened the door to a whole new world of keyboard customization. With real-time remapping and the ability to save settings directly to your device, VIA transforms your keyboard into a highly personalized tool.
Once you’ve got the basics down, you can start exploring advanced options like Layer-Tap functions or Mouse Keys, which push your keyboard's capabilities even further. If you’re ready to take things to the next level, you can venture into the QMK build environment for even more control over your setup.
Thinking about upgrading your gear? VIA-compatible hardware can make customization even easier. KeebsForAll offers excellent options like their Freebird series, which features hot-swappable PCBs and multi-layout support - perfect for experimenting with different configurations.
VIA’s user-friendly interface makes it easy to start small and gradually build more intricate setups. Simple remaps, instant feedback, and tools like the Key Tester tab ensure a smooth learning curve. Whether you're a beginner or an enthusiast, VIA empowers you to create a keyboard layout that works exactly the way you want.
FAQs
Why won’t VIA detect my keyboard?
If VIA isn’t detecting your keyboard, it might be due to one of two common issues: firmware incompatibility or lack of support. First, confirm that your keyboard is running the latest VIA-compatible firmware. Then, double-check that your keyboard is officially supported by VIA.
To enable VIA support in your firmware, make sure you’ve created a via keymap directory and added VIA_ENABLE = yes to the rules.mk file. These steps are essential for ensuring proper compatibility.
Where do I get the right VIA JSON file?
If you're looking for the correct VIA JSON file, start by checking official sources, community forums, or your keyboard manufacturer's website. For keyboards not included in the official VIA database, you have the option to either create a custom JSON file or download one tailored to your specific model. To load the file into VIA, open the software, enable the design tab in the settings, and use the 'Load' option to import it.
Will my keymap work on another computer?
If your keymap was set up using VIA and the keyboard's firmware is compatible with it, it should work seamlessly on another computer. VIA makes it easy to transfer your custom layout without needing to reflash the firmware. However, if your keymap was created for specific firmware or hardware, you might need to either import it or recreate it - especially if the firmware version on the new device is different.