
Stabilizer Rattle in Budget vs. Custom Keyboards
[ Back to Mechanical Keyboards 101 ]If you've ever been annoyed by the rattling sound from large keys on a mechanical keyboard, you're not alone. Stabilizer rattle is a common issue, especially in budget keyboards, but custom builds offer solutions. Here's a quick breakdown:
- What causes rattle? Poor stabilizer design, loose parts, and lack of proper lubrication.
- Budget keyboards: Use plate-mounted stabilizers prone to wobbling and inconsistent factory lubrication. Fixes like lubing and mods can help but require regular maintenance.
- Custom keyboards: Feature screw-in stabilizers, better materials, and precise tuning, offering quieter and smoother performance with less upkeep.
Key takeaway: Budget boards can improve with tuning kits ($10–$15), while custom builds ($250+) deliver a premium typing experience with minimal noise.
Modding A Budget Keyboard? Use These Stabilizers!
sbb-itb-3cb9615
What Causes Stabilizer Rattle?
Stabilizer rattle isn’t a random occurrence - it has specific causes. Recognizing these causes is key to fixing or preventing rattle. Below, we’ll dive into the three main stabilizer types and how they contribute to rattle.
Types of Stabilizers
There are three primary types of stabilizers, each with a unique impact on rattle:
- Plate-mounted stabilizers: These clip into the keyboard’s plate using a friction fit. Found on most budget keyboards under $100, they’re prone to wobble if there’s any gap between the stabilizer housing and the plate. That friction fit is their main weak point.
- PCB-mounted clip-in stabilizers: These attach directly to the PCB, offering better stability. However, they can pop out when removing keycaps, which can be frustrating during maintenance.
- Screw-in stabilizers: The premium option. These are secured to the PCB with screws, ensuring the housing stays firmly in place. This design minimizes movement and significantly reduces rattle.
While the stabilizer type influences rattle potential, much of the issue comes from how internal components interact.
Main Sources of Rattle
The biggest contributors to stabilizer rattle are component play and lubrication problems. The most common issue is wire play, where the metal stabilizer wire shifts within the plastic housing slots. This movement, especially noticeable during bottom-out or key release, creates that sharp metallic ticking noise. Loose manufacturing tolerances can worsen this by leaving extra room for the wire to move around.
Another major factor is lubrication - or the lack of it. Without proper lubrication, metal-on-plastic friction occurs with every keystroke, amplifying noise. Many budget keyboards use silicone-based grease, which tends to dry out or shift after 6 to 12 months of heavy use.
"Stabilizers are often the most impactful single mod for keyboard sound quality." - MKB Guide
To address wire-related noise, thick dielectric grease (like Permatex) is effective at eliminating the metallic ticking. For stem sliders, a thinner fluorinated grease like Krytox 205g0 is better, as it prevents a sluggish or mushy typing feel.
How Case Design Affects Rattle
The keyboard case itself plays a big role in how vibrations are handled. Hollow plastic cases with thin walls tend to amplify vibrations, turning minor mechanical noise into a loud, hollow rattle. On the other hand, metal cases are denser and don’t resonate high-frequency noise as much.
The plate material also affects sound. Polycarbonate (PC) plates, for example, are less stiff and act as a low-pass filter, producing a deeper, more muted sound. In contrast, metal plates can amplify high-frequency clacks if the stabilizers aren’t properly fitted. Adding Poron case foam can help here, as it targets the 1–2 kHz frequency range where hollow reverb and pinging noises often occur.
"If the switches are the heart of the keyboard, the stabilizers (stabs) are the soul. This is where budget boards almost always fail." - ATTACKSHARK
Stabilizer Rattle in Budget Pre-Built Keyboards
Common Stabilizer Problems in Budget Boards
Keyboards in the $50–$70 price range often come with plate-mounted, clip-in stabilizers that rely on a friction fit. However, even a minor gap between the stabilizer housing and the plate can cause wobbling, leading to unwanted noise.
The factory lubrication process, which is often automated, isn’t always reliable. Nozzle clogs can leave some stabilizers under-lubed, and even when lubrication is applied, manufacturers usually focus on greasing the wire while ignoring the housing walls - where most of the friction occurs. To make matters worse, budget models typically use silicone-based greases or thin oils. These may be cost-effective, but they tend to dry out or migrate away from friction points within 6 to 12 months of regular use.
"Budget manufacturers almost exclusively use silicone-based greases or thin oils. While these are cost-effective, they lack the stability of enthusiast favorites like Krytox 205g0." - ATTACKSHARK
Loose manufacturing tolerances in budget keyboards further contribute to excessive stabilizer play. Thankfully, there are affordable ways to address these issues.
Low-Cost Fixes for Budget Keyboard Stabilizers
With a $10–$15 tuning kit, you can improve stabilizer performance significantly - by as much as 90%. Here are some simple, budget-friendly methods to enhance stabilizers:
- Lube the stabilizers: Use dielectric grease (brands like Permatex or Super Lube work well) to lube the stabilizer housing. For best results, disassemble the stabilizers and apply Krytox 205g0 to the stems and housing walls. Use a thicker dielectric grease specifically at the points where the wire makes contact.
- Clip and band-aid mod: For a cleaner keystroke, cut off the small stabilizer legs. Combine this with the band-aid mod by placing a small piece of fabric medical tape on the PCB under the stabilizer to reduce impact noise.
- Holee mod: If metallic ticking persists, insert small strips of adhesive fabric inside the stabilizer stem where the wire touches. This creates a cushioned surface to absorb the impact.
"If your board costs under $60, a plate-mount tuning kit is usually a smarter investment than attempting a screw-in conversion that might not physically fit." - ATTACKSHARK
Keep in mind that premium screw-in stabilizers are typically not compatible with most budget keyboards due to clearance issues. Instead, focusing on tuning the stabilizers that come with the board is usually the most practical and effective approach.
Stabilizer Rattle in Custom Mechanical Keyboards
Better Stabilizer Options in Custom Builds
Custom mechanical keyboards often feature screw-in (PCB-mount) stabilizers, which attach firmly to the PCB using screws. This design reduces housing wobble and eliminates much of the rattle found in standard stabilizers. The secure attachment also allows for better lubrication, resulting in smoother performance.
The materials used in these stabilizers are a step up as well. For instance, the Durock V3 stabilizers ($20–$25) include gold-plated wires and an elastic support base to limit unnecessary movement. Another popular choice, the Swagkeys Knight V2 ($15–$20), features double-shot stems with TPU inserts that replicate the Holee mod straight from the factory. For those seeking top-tier options, the TypePlus x YiKB ($25–$30) uses a patented reduced-contact wire design and POK housing material, requiring minimal tuning to achieve a near-perfect experience.
Why Custom Builds Have Less Rattle
Custom keyboard builders pay close attention to stabilizer tuning. They use a two-step lubrication process: applying thick dielectric grease (e.g., Krytox XHT-BDZ) to contact points and thinner Krytox 205g0 to stem walls. This combination ensures smooth and quiet stabilizer travel. Additionally, builders often check stabilizer wires for flatness before installation, as even minor bends can cause ticking noises. To fix bent wires, many builders test them on a glass surface and carefully straighten them by hand.
"Properly-tuned stabilizers essentially disappear - you don't notice them because they work smoothly and quietly." - MKB Guide
Custom builds also incorporate acoustic dampening layers, such as case foam, PCB foam, or silicone gaskets, to absorb vibrations before they reach the keyboard case. These layers complement the stabilizers, so even if the stabilizers aren’t flawless, the overall sound remains clean and refined. Together, these features create a typing experience free of the distracting rattle common in stock keyboards.
KeebsForAll as a Source for Custom Components
If you're looking to upgrade your keyboard or start a custom build, KeebsForAll is a great place to find quality components. They sell Krytox 205g0 starting at $7.95, along with switches, keycaps, and custom keyboard kits like the Freebird series, which come with hot-swappable PCBs designed for screw-in stabilizers.
Don’t feel like building your own? The KFA Marketplace offers pre-built custom keyboards from third-party sellers. Many of these boards already feature tuned stabilizers, making it an easy way to enjoy the benefits of a custom keyboard without sourcing and assembling everything yourself.
Budget vs. Custom Keyboards: A Direct Comparison
Budget vs. Custom Keyboard Stabilizers: Cost, Performance & Rattle Compared
Comparison Table: Budget vs. Custom Stabilizers
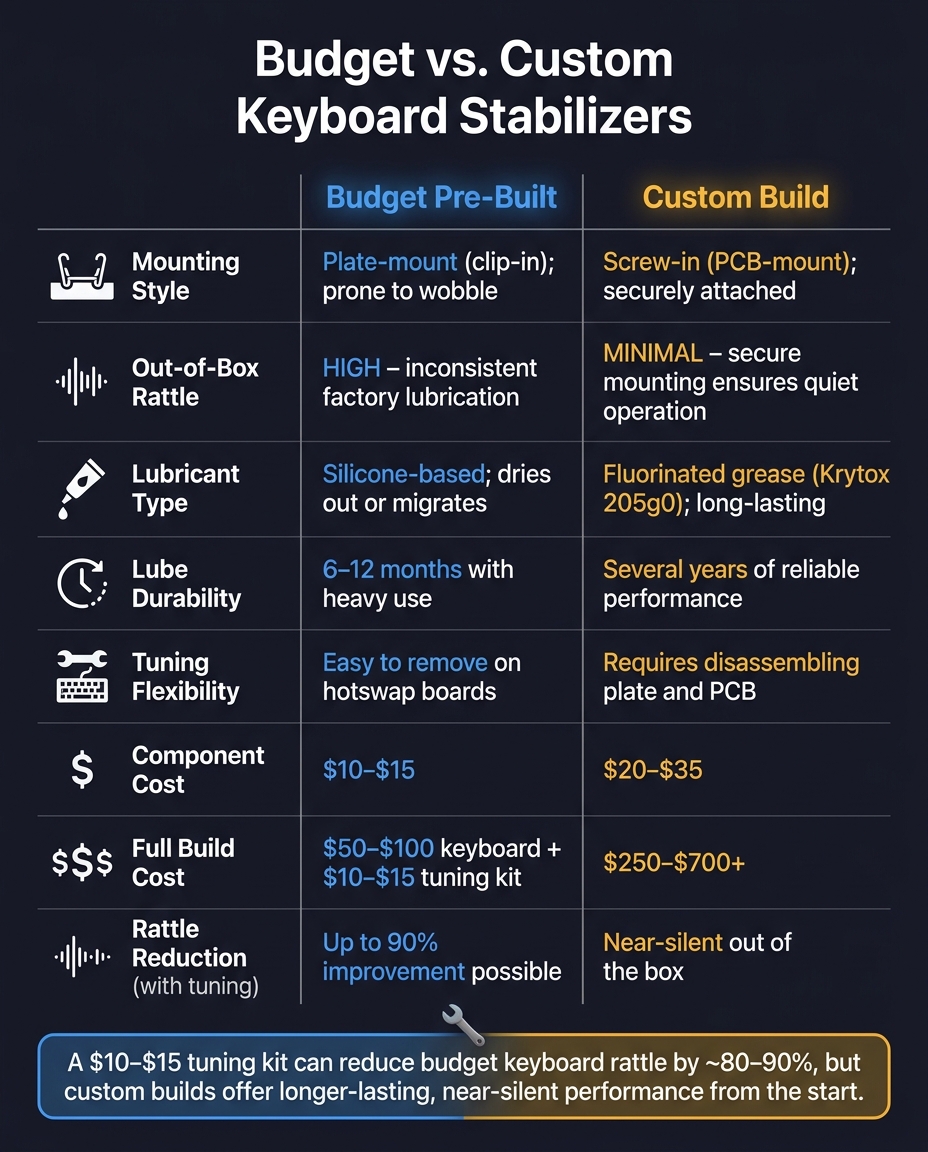
When comparing budget and custom stabilizers, the key differences lie in factors like mounting style, lubrication quality, and ease of tuning.
| Factor | Budget Pre-Built | Custom Build |
|---|---|---|
| Mounting Style | Plate-mount (clip-in); can wobble | Screw-in (PCB-mount); securely attached to the PCB |
| Out-of-Box Rattle | High; factory lubrication often inconsistent | Minimal; secure mounting ensures quieter operation |
| Lubricant Type | Silicone-based; prone to migration or drying out | Fluorinated grease (e.g., Krytox 205g0) for longer-lasting consistency |
| Lube Durability | 6–12 months with heavy use | Several years of reliable performance |
| Tuning Flexibility | Easy to remove on hotswap boards | Requires disassembling the plate and PCB |
| Component Cost (USD) | $10–$15 | $20–$35 |
These differences highlight how budget and custom options affect both cost and performance.
Cost vs. Performance Trade-Offs
Spending a little extra on tuning can make a big difference, even for budget boards. For example, a $10–$20 tuning kit can significantly reduce stabilizer rattle. Adding dielectric grease alone can cut rattle by about 80%, and it's a quicker fix than fully disassembling the board. That said, the effectiveness of these fixes fades over time as lubricants degrade, requiring periodic re-tuning.
On the other hand, custom builds come with much higher upfront costs, typically starting around $250–$300 for a basic setup and climbing to $500–$700 or more for premium builds. These higher costs include screw-in stabilizers, better materials, and lubricants that last longer. Another consideration: inconsistent lubrication on budget boards can cause up to 1ms of travel variance, which can negate the benefits of high-speed polling rates like 8000Hz.
Guidance for Beginners
For beginners, tuning a budget keyboard can be a cost-effective way to improve performance without breaking the bank. If your budget is under $200, pairing a quality pre-built keyboard with a $15–$20 tuning kit - including Krytox 205g0, dielectric grease, and a small brush - can get you close to the performance of a custom build. Simple upgrades like the Holee mod and basic lubrication can make a noticeable difference in reducing rattle.
If you're ready for a more permanent solution, investing in a custom build is worth considering. Screw-in stabilizers, for example, eliminate the need for frequent tuning. As Omnitype aptly says:
"A perfectly tuned stabilizer is truly the difference between a bad keyboard build and a great keyboard build."
Another option is to explore the KFA Marketplace for pre-built custom keyboards. These boards often come with tuned stabilizers, offering many of the advantages of a custom build without the hassle of sourcing individual components.
Conclusion
Stabilizer rattle is one of the clearest differences between budget pre-built keyboards and custom builds. Budget boards often use plate-mount stabilizers with uneven lubrication, while custom keyboards rely on screw-in stabilizers that are precisely lubricated. The result? A quieter, smoother typing experience with less ongoing maintenance.
Dialed-in stabilizers can make a massive difference in both sound and feel, no matter your price range - whether you're working with a $50 pre-built board or a $400 custom masterpiece. As the MKB Guide explains:
"Stabilizers are often the most impactful single mod for keyboard sound quality."
Fortunately, achieving this upgrade is easier than you might think. High-quality stabilizers and tuning supplies are available at KeebsForAll. They carry top-tier options like Durock V2 screw-in stabilizers and TX Stabilizers (Rev. 3), as well as Krytox 205g0 lubricant for precise tuning. If you'd rather skip the DIY process, the KFA Marketplace offers pre-built custom keyboards equipped with premium components.
With the right stabilizers and proper tuning, the performance gap between budget and custom keyboards shrinks dramatically - making it one of the most satisfying upgrades for any keyboard enthusiast.
FAQs
How can I tell if my rattle is from the stabilizer wire or the case?
To figure out what's causing a stabilizer rattle, start by gently tapping the wire. If you hear a ticking or metallic noise, it might mean the wire is bent, out of alignment, or not properly seated. Try reseating and lubricating the wire to see if the noise stops. If it doesn’t, the problem could lie with the case or the mounting structure - check for loose screws or vibrations in the case. Holding the wire steady during testing can help you narrow down the exact issue.
Which stabilizer mods work best if my keyboard can’t use screw-in stabilizers?
For keyboards that are limited to plate-mounted stabilizers, some simple mods can make a big difference. Start by clipping the stabilizer stems - this helps reduce wobble and creates a smoother feel. Next, try the band-aid mod using fabric tape under the stabilizers to dampen noise. Finally, apply dielectric grease to lubricate the stabilizers for better performance. These tweaks are budget-friendly and can significantly improve both the sound and stability, all without the need for screw-in stabilizers.
When is it worth upgrading to a custom keyboard instead of re-tuning a budget board?
Upgrading to a custom keyboard can be a game-changer, especially if issues like stabilizer rattle or an uneven typing feel persist even after tuning. Custom keyboards let you choose high-quality stabilizers and components, which can significantly improve both the sound and overall typing experience. Plus, they offer a more personalized touch.
That said, if you're on a budget, tweaking your current keyboard might be a better option. Simple mods like lubing the switches or adding dampening materials can often deliver noticeable improvements without the higher price tag of a custom build.