
Spring swapping is the process of replacing the springs inside mechanical keyboard switches to change how keys feel and respond. It’s simple, affordable (around $10–$20 for 100 springs), and doesn’t require soldering if you have a hot-swap keyboard. This beginner-friendly mod lets you customize the actuation force (how much pressure is needed to press a key) and bottom-out force (the pressure to fully press a key).
Here’s a quick overview of what you need to know:
- Tools Required: Keycap and switch puller, switch opener, tweezers, and optional lubricant (e.g., Krytox 205 g0).
- Spring Types: Light (35g–55g) for effortless presses, medium (60g–70g) for balance, and heavy (75g–100g+) for accuracy.
-
Steps:
- Remove keycaps and switches.
- Open switches with a switch opener.
- Replace springs and reassemble.
- Test switches before reinstalling.
This guide explains the tools, workspace setup, spring options, and troubleshooting tips to help you get started. Swapping springs can transform your typing experience, whether you prefer light, quick presses or firm, deliberate keypresses.
Tools, Parts, and Workspace Setup
Tools You Need and What They Do
You don’t need a ton of tools to get started, and the ones you do need are pretty affordable. A keycap puller is used to safely remove keycaps, while a switch puller cleanly removes switches from hot-swap sockets. To open up the switches themselves, you’ll need a switch opener - this tool lets you release the housing clips without damaging the plastic. The KFA Switch Opener ($19.00) is a solid aluminum option that works with both MX-style and winglatch switches, making it a great pick for beginners.
Tweezers are handy for placing springs with precision, and a lubricant like Krytox 205 g0 (starting at $7.95) can help eliminate the metallic "ping" sound caused by springs during keypresses. While using lubricant is optional, it’s highly recommended for a smoother typing experience. These tools are essential for a safe and efficient swap, ensuring all components are handled properly.
| Tool | Function |
|---|---|
| Keycap Puller | Safely removes keycaps |
| Switch Puller | Cleanly removes switches |
| Switch Opener | Opens switch housing without damage |
| Tweezers | Precisely handles and places springs |
| Lubricant (Krytox 205 g0) | Reduces spring noise and improves switch feel |
Understanding Spring Options
Springs might seem like a small detail, but they can make a big difference in how your keyboard feels. Light springs (35g–55g) require minimal force to press, making them feel effortless, though they can lead to accidental keypresses. Medium springs (60g–70g) are the most popular choice, striking a balance between comfort and control for typing and gaming. Heavy springs (75g–100g+) offer a firmer press, which helps reduce typos but may tire your fingers during extended use.
Spring styles also play a role. Standard linear springs provide consistent resistance throughout the press. Progressive springs get heavier as you press down, offering a cushioned feel at the bottom. Two-stage springs add a snappier return, while slow (or long) springs - typically measuring 20mm to 23mm - offer extra pre-tension and a softer bottom-out. Most aftermarket spring packs include 100 to 110 pieces and range in price from $5.99 to $20.00, depending on the material and brand.
Setting Up Your Workspace
When working with tiny parts like springs and switch components, a clean and well-lit workspace is a must. Start by unplugging your keyboard. Use small containers - like old jars or pill organizers - to separate top housings, stems, springs, and bottom housings. Keeping everything organized prevents mix-ups and makes reassembly much easier.
A tidy, organized setup saves time and reduces the chance of losing parts or assembling switches incorrectly. With your tools ready and your workspace prepped, you’ll be set for a smooth spring-swapping process.
sbb-itb-3cb9615
How to Swap Springs in your Switches
Choosing the Right Springs
Now that your tools and workspace are ready, it’s time to dive into picking the right springs to fine-tune your typing experience.
How Spring Weight Affects Typing Feel
Spring weight, measured in grams (g), reflects the force needed to fully press a key. Most aftermarket springs are categorized by their bottom-out weight - the force required to press the key all the way down - rather than the actuation weight.
Heavier springs offer more resistance throughout the keypress, which can help avoid accidental presses but may slow you down. Over time, using heavy springs (80g or more) could lead to finger fatigue during long typing sessions.
Spring length also impacts the typing feel. Longer springs (20mm–22mm) provide a firmer, snappier response right from the start of the press. On the other hand, shorter springs (14mm–15mm) reduce initial resistance but may feel slower when the key returns.
Matching Springs to Your Use Case
A 62g spring is a great starting point for most users - it’s widely regarded as the standard for balanced performance.
"62g is by far the most popular and best-selling in the community. Use 62g as the benchmark when deciding if you want to type on something light or heavy." - MechStock
From there, you can adjust based on your specific needs. For competitive gaming, lighter springs in the 35g–45g range are often preferred for their quick responsiveness. If you’re typing or working in an office environment, springs in the 55g–65g range strike a nice balance, offering enough resistance to reduce fatigue while still being comfortable for extended use. For those who spend hours writing or coding, heavier springs in the 65g–80g range can provide the tactile feedback needed to reduce errors.
To make sure you’ve chosen the right spring weight, try installing them on 10–20 keys, like the home row or WASD cluster, and use them for about a week. This partial test run helps ensure you’re happy with the feel before committing to a full keyboard swap.
If you’re looking for high-quality springs and other mechanical keyboard components, check out KeebsForAll. They offer a variety of options to suit your typing style.
Spring Comparison Table
| Type | Feel | Ideal For | Trade-off |
|---|---|---|---|
| Linear (Standard) | Consistent resistance throughout | General typing, competitive gaming | No cushioning for accidental presses |
| Progressive | Starts light, gets heavier toward bottom | Long typing sessions, heavy-handed users | Can feel mushy; may produce spring noise |
| Two-Stage | Snappy and responsive with fast rebound | Typists seeking a tactile-like sensation | May increase top-out noise |
| Slow (Long) | Firm initial resistance, consistent feel | Users wanting a snappy return | Can cause fatigue if weight is too high |
Step-by-Step Spring Swapping Process
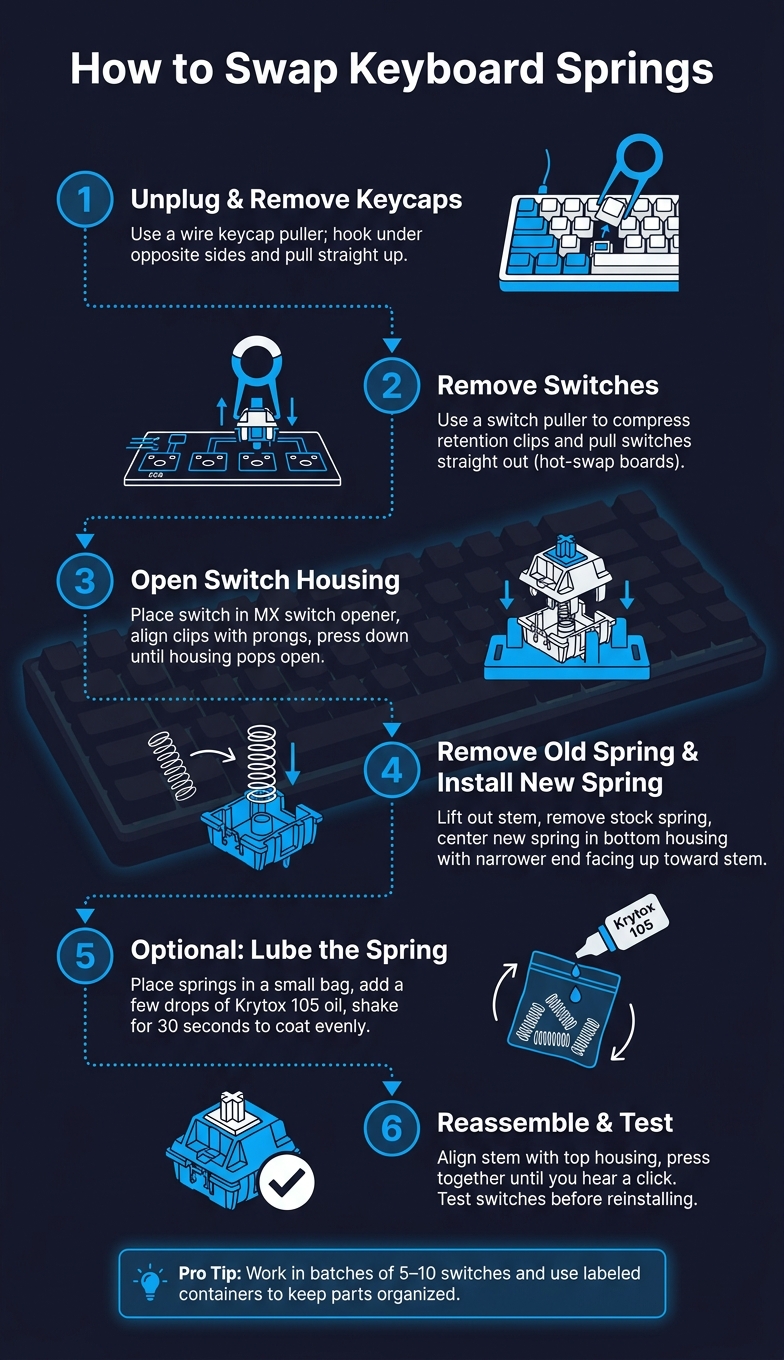
How to Swap Keyboard Springs: Step-by-Step Guide
Getting the Keyboard Ready
Start by unplugging your keyboard. Use a wire keycap puller to remove the keycaps. Hook the loops under opposite sides of the keycap and pull straight up. (Tip: Avoid plastic pullers - they can scratch your keycaps.) If your keyboard is hot-swappable, grab a switch puller to compress the retention clips and pull each switch straight out. For soldered boards, you'll need to desolder the switch pins before removing the switches. Once you've removed the keycaps and switches, you're ready to access the springs inside the switches.
Opening the Switch Housing
Place a switch into an MX-style switch opener, making sure the housing clips align with the prongs on the tool. Press down evenly until the clips release and the housing pops open.
"You set the switch in the opener with the clips aligned with the prongs in the opener tool, and press down, sometimes wobbling the switch around a bit; it should pop open, exposing the spring." - Marcusb.org
If the clips are stubborn, gently wobble the switch while pressing. Avoid using a screwdriver to pry the housing apart - it can crack the plastic. Once the housing is open, lift out the stem and remove the stock spring.
Installing the New Spring and Reassembling
With the switch internals exposed, place the new spring in the bottom housing, centering it carefully. Make sure the narrower end of the spring aligns with the stem. Before reassembling, consider lubing the switches and springs. A quick bag-lube using Krytox 105G0 or dielectric grease can significantly reduce metallic "ping".
Align the stem with the top housing and press everything back together until you hear a click. That click confirms the switch is securely closed, ensuring a smoother typing experience after the spring swap.
If you're working on a full keyboard, it’s efficient to open all switches, swap the springs, and reassemble in batches. Before reinstalling everything, test a handful of switches manually. Press them to confirm smooth movement and ensure there’s no sticking or crunching. Once you're satisfied, proceed with the rest of the board.
Troubleshooting and Tips
Common Mistakes and How to Fix Them
After putting your switches back together, you might run into a few hiccups. Here’s a quick guide to help you troubleshoot the most common problems:
| Problem | Likely Cause | Fix |
|---|---|---|
| Key doesn't register | Bent pins or reversed magnet (Hall Effect) | Use needle-nose tweezers to straighten the pins; flip the magnet to the correct orientation |
| Sluggish/slow return | Too much lube or a spring that's too light | Remove excess lube and try swapping in a heavier spring |
| Scratchy or uneven feel | Misaligned housing | Re-seat the stem and ensure the housing snaps together evenly |
| Metallic "ping" | Dry spring vibrating in the housing | Bag-lube the springs with Krytox 105 |
| Ghost inputs (Hall Effect) | Spring tension variance moving the magnet | Run a software recalibration |
One of the most common issues is bent pins, which can stop a key from working. If this happens, carefully bend the pin back to a 90-degree angle using needle-nose tweezers before reinserting it. Also, avoid forcing a switch into a hot-swap socket. Fun fact: by 2026, over 85% of custom keyboards feature hot-swap PCBs, but these sockets are usually rated for about 100 swaps before they start losing their grip.
Tips for Beginners
If you're new to this, start small. Work on batches of 5–10 switches at a time to stay organized and avoid mixing up parts. Use small, labeled containers for your top housings, stems, and springs to keep everything in order.
Before you go all-in, test one switch to make sure everything feels and works as expected. And don't toss your original springs - you might want to go back to them if the new ones don't feel right. Taking these steps will help prevent issues like unwanted noise or performance problems.
How to Reduce Spring Noise
Let’s talk about spring noise - specifically, that metallic "ping" you sometimes hear when pressing a key. This sound comes from the spring vibrating inside the housing.
"The biggest single noise reduction comes from the spring." - KeebDepot
The quickest way to fix this is bag-lubing. Here’s how: place your springs in a small plastic bag, add a few drops of Krytox 105 oil, and shake the bag for about 30 seconds. This coats the springs evenly, reducing vibration and noise.
"If it feels mushy or sluggish - you used too much lube. Open it back up and remove some." - KeebDepot
If the noise continues after lubing, check the spring’s position. A spring that’s even slightly off-center can vibrate more, so reseating it might help. For an upgrade, consider gold-plated springs. They’re naturally smoother and less likely to produce metallic noise compared to standard steel springs. Keep in mind, though, they’ll cost you about $1–$2 per spring. These adjustments are the final steps to fine-tune your switches after a spring swap.
Conclusion
Key Takeaways
Spring swapping is a fantastic way to dive into keyboard customization. With the right tools and preparation, the process is simple: gather the necessary equipment, choose springs that suit your needs, and swap them with confidence. Selecting the right spring weight to match your typing style can make a noticeable difference in how your keyboard feels and performs.
Spring type also matters. Whether you opt for linear, progressive, or two-stage springs, each provides a unique typing experience. Best of all, for hot-swap keyboards, the process is solder-free and completely reversible.
"Swapping specialty springs lets you tailor feel to your typing style – from featherlight rapid touches to forceful bottoming out." - Natalie Smith, Tech Writer, DowneLink
With these basics covered, you're ready to explore more advanced customizations.
Next Steps for Beginners
Once you've mastered spring swapping, the journey doesn't have to stop there. Many enthusiasts start experimenting with mixed spring weights. For instance, you might use a heavier 70g spring for the spacebar to provide a solid press, while keeping lighter 45g springs on the rest of the keys for a smoother touch. Another exciting avenue is "Frankenswitching", where you combine components from different switch brands to craft a completely personalized typing experience.
Ready to take the next step? Check out KeebsForAll for beginner-friendly tools like an aluminum MX-compatible switch opener ($19.00) and Durock gold-plated spring packs ($9.25 for 100 springs). These tools and supplies make it easy to continue your customization journey.
FAQs
Will spring swapping change the sound of my keyboard?
Swapping out springs can definitely alter your keyboard's sound. Heavier springs typically result in a louder and more solid bottom-out noise, while lighter springs often produce a softer, higher-pitched tone. If you're looking to fine-tune the acoustics even more, try lubricating the springs during the swap. This simple step helps cut down on unwanted noise and friction, giving your keyboard a smoother and cleaner sound overall.
How do I pick the right spring weight for me?
Choosing the right spring weight for your keyboard switches can be a bit of a journey, often involving some trial and error. A good starting point for many enthusiasts is a balanced 62g spring. If you’re unsure, consider trying a medium range, typically between 60g and 70g.
Prefer faster typing? Lighter springs in the 45g to 55g range might be your best bet. On the other hand, if you value more precise tactile feedback, heavier springs - 80g or more - could be the way to go.
Keep in mind that aftermarket springs are generally measured by their bottom-out weight. For a wide variety of options to help you find your perfect match, check out KeebsForAll.
Can spring swapping damage hot-swap sockets or switches?
Spring swapping is typically safe for hot-swap sockets and switches, as long as you handle the process with care. The biggest concern arises during the removal and reinsertion of switches. To minimize risks, start by unplugging your keyboard. Use a proper switch puller and handle the switches delicately. Before reinserting, check that the switch pins are straight to avoid damaging the sockets. If a switch feels stuck, never force it - this could lead to circuit board damage. Patience and precision are key!