
Best Stabilizer Lubing Techniques for Beginners
[ Back to Mechanical Keyboards 101 ]Lubing keyboard stabilizers is one of the easiest ways to improve how your mechanical keyboard feels and sounds. Stabilizers are used for larger keys like the spacebar, shift, and enter, and they often come with rattling or ticking noises due to friction between their metal wires and plastic parts. By applying the right lubricants, you can fix these issues, making your keyboard quieter and smoother to type on.
Quick Summary:
- Why Lube Stabilizers? To reduce noise (rattling) and improve key feel.
- Tools Needed: Lubricants (Krytox 205g0 for plastic, dielectric grease for wires), fine-tip brush, keycap and switch puller, tweezers, and isopropyl alcohol for cleaning.
-
Methods:
- Non-Destructive Lubing: Quick, no desoldering required.
- Full Disassembly: More thorough but takes longer.
- Common Mistakes: Over-lubing (causes sluggish keys), uneven key feel, and persistent rattle (often due to unbalanced wires).
Whether you're a beginner or just looking for a quick upgrade, this guide will walk you through the tools, techniques, and fixes to get your stabilizers working perfectly.
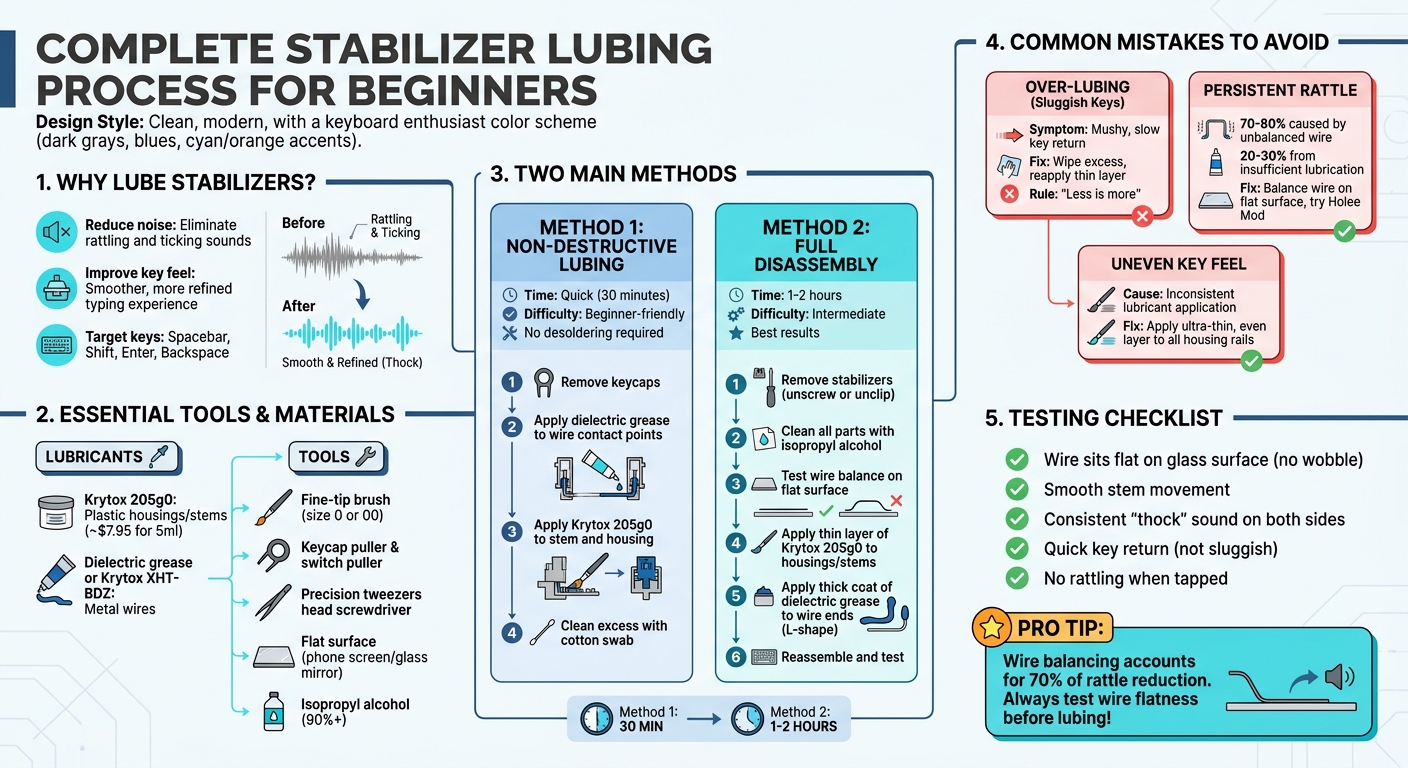
Step-by-Step Guide to Lubing Keyboard Stabilizers for Beginners
How to Lube and Tune Stabilizers
sbb-itb-3cb9615
Tools and Materials You'll Need
Before diving into the lubing process, it’s important to gather everything you’ll need. The right tools not only make the process smoother but also help you achieve the quieter, more refined performance you’re aiming for.
Recommended Lubricants
Two types of lubricants are essential here: one for the plastic stabilizer housings and stems, and another for the metal wire. For the housings and stems, Krytox 205g0 is the go-to option. This medium-thick grease ensures a smooth, quiet feel without being overly heavy. You can grab a 5 ml container for about $7.95, and it’s enough to handle hundreds of switches and stabilizers.
When it comes to the wire, you’ll want something thicker to eliminate any rattling. Dielectric grease (such as Permatex) or Krytox XHT-BDZ works best due to their high viscosity, which fills the gaps where the wire meets the housing. As 404HzLab points out, “Factory lube is usually thin and inconsistent, so a 30-minute session with the right grease can outperform 'premium' switches costing twice as much.” If you’re on a budget, GIN-01 or Super Lube are solid alternatives. However, steer clear of generic lubricants in small syringes - they tend to separate over time and can leak onto your PCB.
Once you’ve selected your lubricants, it’s time to gather the tools to complete the upgrade.
Required Tools
Having the proper tools makes the process more efficient and ensures precise application for the best results.
- Fine-tip brush (size 0 or 00): Perfect for applying lube accurately to the stabilizer housing and stem.
- Keycap puller and switch puller: Essential for removing keycaps and switches to access your stabilizers.
- Precision tweezers: Useful for handling small parts and performing mods like the Holee mod.
- KFA Switch Opener: Speeds up disassembling switch housings (available from KeebsForAll).
- Small Phillips head screwdriver: Necessary for screw-in stabilizers.
- Flat surface: A phone screen or glass mirror works well for checking if stabilizer wires are straight.
- Pliers: Handy for gently bending warped wires back into shape before applying lubricant.
With everything in place, you’re ready to start upgrading your stabilizers for a smoother, quieter typing experience.
Lubing Techniques for Beginners
When it comes to lubing your keyboard switches and stabilizers, you have two main options: non-destructive lubing, which works with stabilizers still installed, or full disassembly, where you take everything apart for complete control. Both methods can improve your keyboard's feel and sound, but they vary in terms of effort and results. Here's a breakdown of each technique to help you decide which suits your needs.
Non-Destructive Lubing (No Desoldering)
If you're looking for a quicker fix or don't have soldering tools, this method is perfect. Start by removing the keycaps from stabilized keys like the Spacebar, Shift, Enter, and Backspace. To reach tight spaces, use tools like a piece of plastic straw, folded tape, or an interdental brush [[5]](https://github.com/EanNewton/Awesome-Keebs/blob/main/tutorials/How to Lube Stabilizers Without Desoldering in 5 Easy Steps.md).
Once ready, dip your applicator in dielectric grease. Use tweezers to gently lift the stabilizer stem and insert grease into the bottom opening where the wire sits. Then, apply synthetic oil - such as Super Lube or Krytox 205g0 - on your tool and work it along the stem and housing walls to reduce friction [[5]](https://github.com/EanNewton/Awesome-Keebs/blob/main/tutorials/How to Lube Stabilizers Without Desoldering in 5 Easy Steps.md). Be sure to clean off any excess with a cotton swab. For quick touch-ups after assembly, you can use a syringe to inject lubricant directly into the gaps between the stem and wire.
This technique is great for cutting down on rattle and scratchiness without the hassle of desoldering. While it might not match the precision of a full teardown, it’s efficient and only requires basic tools you can easily find at most hardware stores.
Full Disassembly Lubing
For those who want the best results, full disassembly is the way to go. This approach gives you complete access to every stabilizer component, allowing for precise adjustments. If you're working with plate-mount stabilizers, you can remove them by pinching the housing clips and pulling upward. For screw-in (PCB-mount) stabilizers, unscrew them from the PCB, push the wire inward to remove it, and separate the stems.
Start by cleaning all parts with 90% or higher isopropyl alcohol to remove any factory-applied lubricant. Next, apply a thin layer of Krytox 205g0 to the stem sides and housing interiors, ensuring even coverage without clumps. For the wire, use a thicker coat of dielectric grease or XHT-BDZ, applying it in an "L" shape at the ends where the wire enters and clips into the stem.
Before lubricating, test the wire's balance by placing it on a flat surface (like a phone screen). If it rocks when tapped, gently bend it until it sits flat - unbalanced wires are a common cause of rattling.
Addressing the two main sources of stabilizer noise - wire-to-housing and stem-to-wire contact - can eliminate most rattling issues. These two areas account for 70% of stabilizer noise. While this process can take 1–2 hours, the payoff is a smoother, quieter typing experience that lasts for years. After reassembling, test your work by installing a single switch and keycap to ensure everything feels and sounds right before completing the entire keyboard.
Common Mistakes and How to Fix Them
Even with the best tools and techniques, mistakes can happen when lubing stabilizers. The good news? Most issues are fixable without having to start over. Common problems usually arise from using too much lubricant, mechanical imbalances, or uneven application. Let’s break down these issues and how to address them.
Over-Lubing and Stiff Keys
One of the most frequent mistakes is applying too much lubricant. If your keys feel mushy, sluggish, or slow to bounce back, over-lubing is likely the culprit. In extreme cases, you may even see grease leaking out of the housing or onto the PCB.
"Over-lubing can make your keys feel sluggish. Less is more."
To fix this, start by wiping off the excess lubricant with a clean brush or a lint-free cloth. If the problem persists, disassemble the stabilizer, clean it thoroughly with isopropyl alcohol, and reapply a thinner layer of lubricant. Avoid adding lubricant with a syringe after assembly - it often leads to over-application, which can only be fixed by taking everything apart again. A careful reapplication should restore your keys' responsiveness.
Persistent Rattle
If your stabilizers still rattle after lubing, the problem is likely mechanical rather than lubrication-related. In fact, wire balancing is responsible for the majority of rattle reduction - about 70–80% - while lubrication covers the remaining 20–30%.
To check the wire, place it on a flat surface like a phone screen and tap the ends. If it rocks or wobbles, gently bend the wire until it lies completely flat. A warped spacebar can also cause rattling. Lay the keycap on a flat surface and tap it; if it rocks, the keycap (not the stabilizer) may be the culprit.
For stubborn rattles, consider trying the Holee Mod. Place a small piece of fabric Band-Aid or UHMW tape inside the stabilizer stem where the wire contacts the plastic. This cushions the metal-on-plastic interaction and reduces noise. Additionally, uneven lubricant application can sometimes cause inconsistency, so double-check your work if rattling persists.
Uneven Key Feel
If one side of a stabilized key feels different from the other, inconsistent lubricant application is usually to blame. Use a fine-tip brush (size 0 or 00) to apply an ultra-thin, even layer of lubricant to the housing rails. Aim for a smooth, uniform film - clumps or drips are signs of over-lubing.
Once installed, press the key on both the far left and far right sides. Both sides should feel and sound the same. If they don’t, disassemble the stabilizer and ensure the lubricant is evenly distributed across all four sides of the stem and the interior housing walls. Using the same lubricant type for all stabilizers, such as Krytox 205g0 for housings and dielectric grease for wires, can help maintain a consistent typing experience.
Testing and Installation
Testing Stabilizer Performance
Before putting your entire keyboard back together, it's a good idea to test each stabilizer individually. This lets you catch any problems early. Start by placing the stabilizer wire on a flat surface like a phone screen or a glass mirror. Tap both ends - if it wobbles or makes a clicking sound, the wire is bent and needs to be straightened.
Once assembled, manually move each stabilizer stem to check for smooth motion. Then, test each stabilizer with one switch and keycap. If the key feels sluggish or slow to spring back, it might mean you've applied too much lubricant.
"A well-tuned spacebar is often described as a 'thock' - a clean, heavy sound without any high-pitched rattling."
- KeebArchive Editorial
Pay close attention to the sound and feel of stabilized keys, especially the spacebar. Tap both the far left and far right sides. The sound should be consistent - a deep "thock" on both ends. If you hear odd noises, try swapping out the switch beneath the key with a well-lubed, known-good switch. This can help rule out issues like scratchy switch leaves or spring ping.
Once you're confident each stabilizer is working smoothly, you can move on to reinstalling and fine-tuning their placement.
Reinstallation and Final Adjustments
Careful testing ensures that your keyboard will operate quietly and smoothly after reassembly.
When reinstalling stabilizers, ensure the housings are aligned and sit flush against the PCB or plate. If you're using PCB-mount stabilizers, tighten the screws firmly to keep them secure. For plate-mount stabilizers, make sure they clip into the plate snugly. Loose stabilizers can cause internal parts to collide, leading to inconsistent key presses.
If there's excess lubricant on the tops of stabilizer stems or the keyboard plate, clean it off with a cotton swab. Too much lube can cause keycaps to slip off during use [[5]](https://github.com/EanNewton/Awesome-Keebs/blob/main/tutorials/How to Lube Stabilizers Without Desoldering in 5 Easy Steps.md). If rattling persists, lift the stabilizer stem and apply a small amount of grease where the wire sits. Be cautious not to overdo it.
For the spacebar, tap along its entire length to ensure the sound is consistent. If the keycap rocks when tested on a flat surface, it may be warped and require replacement. Finally, press each stabilized key repeatedly from side to side to confirm smooth operation before moving on to fully assembling your keyboard.
Conclusion
Key Takeaways
Tuning your stabilizers can completely transform a noisy, rattling keyboard into one with a smooth and satisfying "thock." The process is simple at its core: apply Krytox 205g0 to housings and stems, use thicker lubricants like XHT-BDZ or dielectric grease for wires, and always stick to the "less is more" rule to ensure your keys return quickly and smoothly. These steps, when paired with the methods outlined earlier, will not only improve your keyboard's sound but also its overall reliability.
Before you dive into assembly, test your stabilizer wires on a glass surface to confirm they're perfectly straight. Clean off any factory grease with isopropyl alcohol, and use a fine-tip brush for precise lubricant application. Testing each stabilizer with a single switch and keycap before assembling the entire board can save you a lot of hassle later.
Perfecting this process takes some practice, but the results are worth it. As techmakes aptly states:
Modding stabilizers is the simplest and most effective means of making a night-and-day difference to your keyboard.
Even a quick 30-minute lubing session can elevate budget components to perform like premium ones. With these tips in hand, you're ready to explore products that will help you get started.
Resources for Beginners
Getting started with stabilizer lubing doesn’t require a big budget. For under $100, you can gather everything you need: switches, quality lubricants, tools, and even a gasket keyboard kit. KeebsForAll is a great place to start - they offer the Krytox 205g0 lubricant (starting at $7.95), the KFA Switch Opener ($19.00), and other essential tools. Their beginner-friendly keyboard kits, priced at $160, $199, and $249, include hot-swappable PCBs, so you can practice without needing to desolder.
Having the right tools and materials is crucial for achieving professional results. Check out KeebsForAll for high-quality components that can help you create a polished build right from the start.
FAQs
How do I know if my stabilizer wire is unbalanced?
You might notice an unbalanced stabilizer wire if there’s rattling, wobbling, or an uneven typing feel, particularly on larger keys like the spacebar or Enter. Signs like inconsistent sound or uneven key presses often point to a misaligned or off-center wire in the stabilizer housing. Fixing this usually involves proper tuning, alignment, and applying lubrication to enhance performance.
What’s the fastest way to fix stabilizer rattle without taking the board apart?
The fastest way to deal with stabilizer rattle - without taking your keyboard apart - is by tweaking the stabilizer wire. Lay the wire on a flat surface, such as a mirror or the screen of your phone, and carefully straighten it if you notice any bends. A perfectly flat wire helps minimize rattling or ticking noises caused by uneven contact, saving you the hassle of disassembling your keyboard.
How can I tell if I overlubed my stabilizers?
Signs that your stabilizers might be overlubed include keys that feel mushy, sluggish, or less responsive. You might also hear a dull, overly muted sound and experience a noticeable drop in tactile feedback. Overlubing can actually make the stabilizers feel less smooth, impacting the clarity of your keystrokes. If the stabilizers feel unusually loose or the sound is excessively muffled, it's a good indication that too much lube has been applied.