
How to Design an Ergonomic Keyboard Layout
[ Back to Mechanical Keyboards 101 ]Want a healthier, more comfortable typing experience? Designing an ergonomic keyboard layout can reduce strain, prevent injuries, and improve efficiency. Here's what you need to know:
- Ergonomic layouts minimize finger movement and promote natural hand alignment.
- Compared to QWERTY, layouts like Colemak reduce finger travel by 2.2x and increase home row usage by 35x.
- Key principles include focusing on the home row, reducing strain with columnar layouts, and balancing hand workload.
- Tools like typing heatmaps and layout analyzers help customize layouts to your needs.
- Popular layouts include Colemak (familiar yet efficient) and Gallium (highly optimized for ergonomics).
- Customization involves tweaking key positions, using thumb clusters, and optimizing split keyboards for comfort.
The result? A setup tailored to your typing style that reduces fatigue and increases productivity. Whether you're coding, writing, or just typing for hours, this guide walks you through each step - from analyzing habits to testing your custom layout.
“The REAL Ergonomic Keyboard Endgame!” - How To Design & Make A Totally Custom Keyboard
Basic Principles of Ergonomic Keyboard Design
Ergonomic keyboard layouts are built around three main ideas: cutting down on finger travel, limiting unnecessary movements, and balancing the workload between your hands. These principles play a huge role in reducing the strain your hands endure - especially for someone like a data-entry clerk, who may type around 70,000 keystrokes every day. Let’s dive into how these concepts translate into practical design choices.
Using the Home Row and Thumbs Effectively
The home row (A-S-D-F and J-K-L-;) is where most of the action should happen. Placing frequently used letters here helps keep your hands in a neutral position and reduces finger movement. However, traditional keyboards often neglect the thumbs, leaving them stuck with one job: pressing the spacebar. Meanwhile, weaker fingers like the pinkies are tasked with reaching for keys like Enter, Backspace, and Shift.
"The secret to type faster with a programmable keyboard is to keep your fingers as close to the home row as possible." - Dygma
A smarter solution? Use thumb clusters - groups of keys positioned where your thumbs naturally rest. By assigning high-frequency functions to these clusters, you can ease the workload on your pinkies and improve overall efficiency.
Reducing Finger Movement and Strain
Every keystroke that strays from the home row adds strain. That’s where columnar layouts come in. Unlike the staggered rows of standard keyboards, columnar designs align keys vertically to match the natural curling motion of your fingers. This reduces sideways strain and feels more intuitive. Ergonomic keyboards also follow specific spacing guidelines: keys are typically spaced 18–19 mm apart horizontally and 18–21 mm vertically.
Another key factor is avoiding same-finger bigrams (SFB) - instances where one finger has to press two consecutive keys. These repetitive motions are a common source of strain. Modern ergonomic layouts aim for SFB rates below 1%. Features like layered key mapping, which let you access numbers, symbols, and navigation keys without leaving the home row, further reduce finger stretch and improve comfort.
Balanced hand usage is just as important. Overworking one hand can lead to fatigue and even injury over time.
Distributing Work Between Both Hands
When one hand does more work than the other, it increases the risk of discomfort and strain. Standard keyboards often create this imbalance. For example, a centered keyboard layout can force your right hand into awkward positions to accommodate the numeric keypad. Modern ergonomic layouts, like Gallium, address this issue with a hand alternation rate of about 32.63%, compared to the 19–20% rate of traditional QWERTY. This ensures tasks are more evenly divided between both hands.
| Metric | Goal | Benefit |
|---|---|---|
| Home Row Usage | 70%+ | Reduces finger travel |
| Same-Finger Bigrams | Under 1% | Lowers repetitive strain |
| Hand Balance | 40/60 to 50/50 split | Prevents overloading one hand |
| Lateral Stretches | Minimal | Avoids sideways strain on fingers |
Split keyboard designs take this a step further by letting each hand stay in a straight, neutral position without crossing over to the other side. When paired with thumb clusters that handle heavy-use functions, this design ensures no single finger or hand is overworked.
Grasping these principles is the first step toward optimizing your keyboard layout for comfort and efficiency.
Step 1: Analyze Your Typing Patterns
Before rearranging your keyboard layout, take a moment to understand how you type. Everyone's typing habits are shaped by factors like hand size, finger strength, and the type of work they do. For instance, a programmer who spends hours coding will have different needs compared to someone whose day revolves around writing emails.
Using Typing Heatmaps and Analysis Tools
Typing heatmaps can show you which keys you use most and which ones barely get touched. Tools like QMK Heatmap Generator (for CSV keylog data) or Oryx's "Live Training" can create real-time heatmaps, even capturing layers and modifier keys.
For a deeper look at how effective your layout is, tools like Genkey and a200 analyze patterns like Same Finger Bigrams (SFB) - when one finger has to hit two keys in quick succession - and other movements that might cause unnecessary strain.
"Your fingers on QWERTY move 2.2x more than on Colemak. QWERTY has 16x more same hand row jumping than Colemak."
– colemak.com
Skip typing games like MonkeyType, as the random strings they generate don't reflect your actual typing habits. Instead, log your real work - whether you're coding, writing, or entering data - to get an accurate picture of your typing patterns.
These insights will help you identify which keys deserve more accessible positions based on your unique typing habits.
Identifying Your Specific Needs
Once you've gathered heatmap data, use it to customize your layout for your specific activities. Your primary tasks play a big role in shaping your ideal keyboard setup. For example, programmers often need quick access to brackets, semicolons, and numbers, while writers benefit from layouts that prioritize punctuation and frequently used letter combinations. The "corpus" of text you type most often will guide which keys should take priority.
Pay attention to overused fingers. Ergonomic studies show that the pinky requires about 1.6 times more effort than the index finger for the same movement. If your heatmap highlights frequently used keys in awkward positions or underused keys on the home row, those are clear candidates for remapping.
Erez Zukerman, CEO and Co-Founder of ZSA Technology Labs, captures it perfectly:
"My typing pattern tends to change according to whatever I'm currently doing: Editing images isn't like replying to email, and my keyboard usage patterns reflect this."
And as a 200 wpm typist known as "semi" puts it:
"What matters is not how well the layout fits the metrics, it's how well the metrics fit you."
Step 2: Choose a Starting Layout
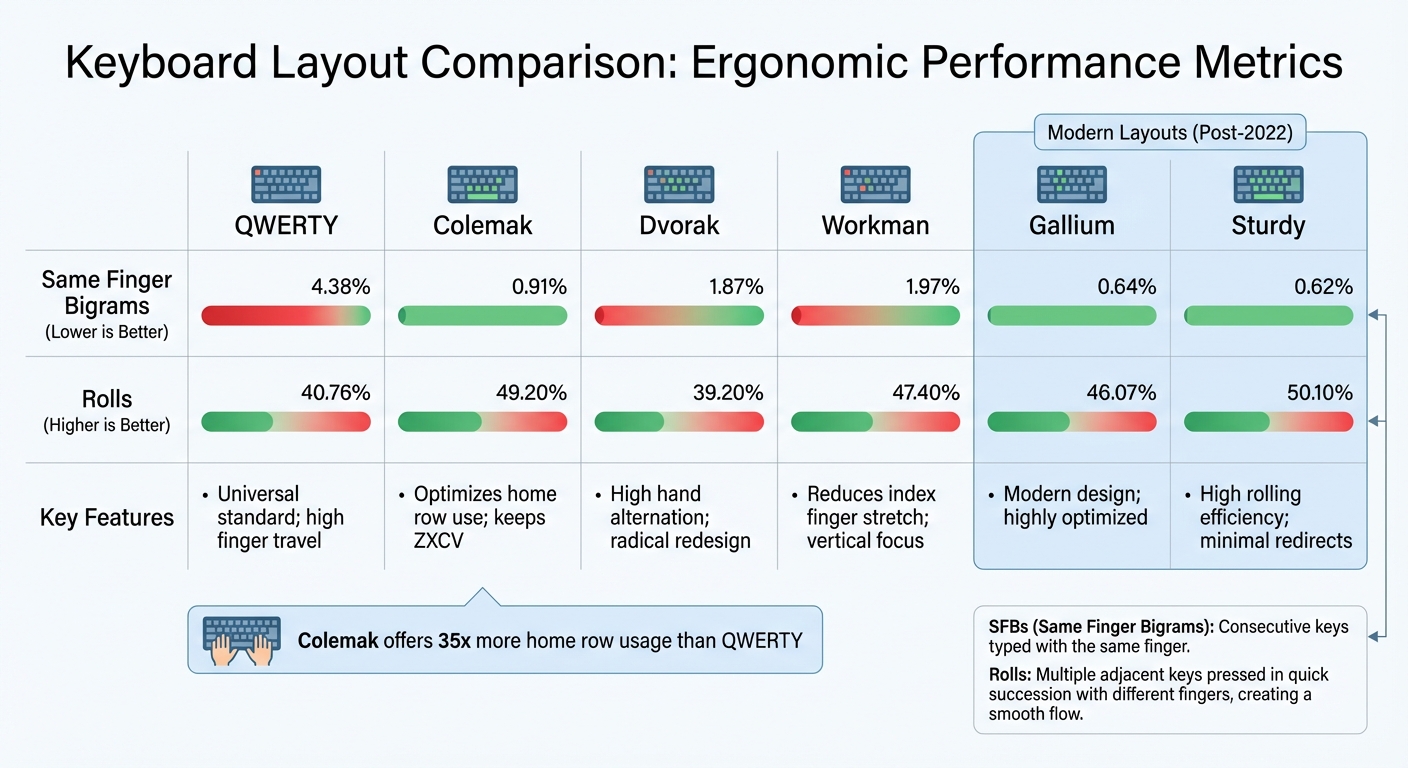
Ergonomic Keyboard Layout Comparison: QWERTY vs Colemak vs Gallium vs Sturdy
Once you've analyzed your needs, the next step is selecting an ergonomic keyboard layout. While designing a layout from scratch is possible, starting with a well-established ergonomic layout can save you time and give you the advantage of years of community testing and refinement.
Comparing Common Layouts
The keyboard layout landscape has come a long way since the dominance of QWERTY. While QWERTY remains the universal standard, its ergonomic performance leaves much to be desired. Its main benefit? It's everywhere, making it convenient for switching between devices.
Colemak strikes a balance between familiarity and efficiency. It retains 17 QWERTY keys, including the important ZXCV shortcuts, while repositioning frequently used letters to the home row. This results in a layout where you can type 35 times more words using just the home row compared to QWERTY. As Keeb Supply explains:
"The benefit of further optimization is sometimes said to be negligible compared to what Colemak offers over Qwerty".
For those aiming for peak efficiency, Gallium and Graphite represent cutting-edge layouts. Developed after 2022 using advanced computer analysis, these layouts deliver much better ergonomic statistics than older alternatives. For instance, Gallium boasts a Same Finger Bigram (SFB) rate of just 0.64%, a significant improvement over QWERTY's 4.38%.
| Layout | SFBs (Lower is better) | Rolls (Higher is better) | Key Features |
|---|---|---|---|
| QWERTY | 4.38% | 40.76% | Universal standard; high finger travel |
| Colemak | 0.91% | 49.20% | Optimizes home row use; keeps ZXCV |
| Dvorak | 1.87% | 39.20% | High hand alternation; radical redesign |
| Workman | 1.97% | 47.40% | Reduces index finger stretch; vertical focus |
| Gallium | 0.64% | 46.07% | Modern design; highly optimized |
| Sturdy | 0.62% | 50.10% | High rolling efficiency; minimal redirects |
Selecting the Best Layout for You
Choosing the right layout depends on your priorities and how much effort you're willing to invest in relearning typing habits. Comfort should take precedence over speed. The main reason to switch layouts is to reduce strain and finger movement, not to type faster.
If you're looking for a straightforward upgrade without a steep learning curve, Colemak is a great option. Many keys remain in familiar positions, and it's easier to find compatible keycap sets. For programmers, consider how the layout handles symbols and whether a dedicated symbol layer is needed. For coding, the placement of brackets and operators can be more critical than the arrangement of alphabetic keys.
For those ready to dive into a completely new system, Gallium is currently the top pick for its excellent ergonomic balance.
Keep in mind that adapting to a new layout takes time and practice. On average, you can expect to reach 40 words per minute after a month, 50 wpm after two months, and 80 wpm after a year of daily practice. Before committing, try out different layouts using tools like Cyanophage's layout playground or Oxeylyzer, which let you test layouts with your actual typing data.
Once you've selected a layout, the next step is customizing it to suit your specific typing needs.
sbb-itb-3cb9615
Step 3: Customize Key Placement for Your Keyboard
Once you've settled on your base layout, it's time to tweak the key positions to fit your hardware and align with how your fingers naturally move. These adjustments are where theory meets practice, helping you create a layout that feels intuitive and reduces strain over time.
Fine-Tuning Column Staggering and Splaying
One of the key adjustments is column staggering. Since your fingers vary in length, you'll want to shift the ring finger column up by about 0.2 inches (5 mm) and the middle finger column an additional 0.1 inches (2.5 mm). This slight adjustment ensures the keys align with your natural finger lengths.
Another important technique is splaying, which angles the key columns outward to match the natural spread of your fingers. For example, the pinky column is often angled outward by around 4°. This reduces lateral stretching, which is much harder on your fingers compared to curling motions - studies suggest lateral stretching requires twice the effort.
Optimizing Thumb Clusters and Modifier Keys
Your thumbs are the strongest digits on your hands, yet most traditional keyboards don’t make full use of them. By assigning high-frequency keys like Space, Enter, Backspace, and layer modifiers to thumb clusters, you can take some of the workload off your pinky fingers.
To make thumb clusters comfortable, arrange them in a natural arc. A slight -15° fan-like angle works well for matching the thumb's natural movement. Using larger keycaps (like 1.5u keys) for primary thumb functions can improve accuracy. These keys are often rotated between 75° and 90° to match the vertical arc of your thumb. Position the thumb cluster relative to a fixed point on the main key matrix - usually the inner-bottom modifier key - so everything stays within easy reach.
If you're designing your layout using tools like Ergogen, you can define variables like kx (key width) and ky (key height) to switch between MX spacing (0.75 inches or 19 mm) and Choc spacing (about 0.71 inches × 0.67 inches, or 18 mm × 17 mm).
Adjustments for Split and Columnar Keyboards
Split and columnar keyboards open up even more possibilities for ergonomic customization. Columnar layouts, for instance, forgo the traditional row stagger and instead align keys in straight vertical columns that follow the natural motion of your fingers.
Split keyboards, like the Freebird60 (starting at $160.00) or Freebird75 (starting at $199.00) from KeebsForAll, allow you to rotate each half by about 15°. This rotation helps maintain a neutral wrist angle and minimizes ulnar deviation. When designing for a split keyboard, create one half of the layout and mirror it for symmetry. A good rule of thumb is to ensure each finger stays within one key's distance from its home position. This approach often results in layouts with 36 to 42 keys.
With your layout customized, the next step is to test and refine it using design tools to ensure it performs as expected.
Step 4: Use Design and Testing Tools
Once you've adjusted your custom layout, the next step is to use specialized tools to design and test your configuration. These tools let you fine-tune key positions, create manufacturing files, and flash your custom layout directly onto your keyboard hardware.
Designing with Ergogen and Configurators
Ergogen is a powerful tool for crafting ergonomic keyboard layouts, particularly for split and columnar designs. It uses a text-based YAML configuration file, allowing you to define every element with precision. As FlatFootFox puts it:
"Ergogen is designed to get you out of graphical CAD tools and fiddly alignment controls, letting you focus on parametrically defining a keyboard layout down to the last millimeter."
An Ergogen configuration typically includes several sections:
- Units: Set variables like key spacing.
- Points: Define the coordinates ([x, y]) and rotations for keys.
- Outlines: Shape the physical structure of the board.
- PCBs: Specify component footprints and electrical connections.
- Cases: Create 3D housing models.
Keys can also be grouped into zones, such as a "matrix" for main keys and "thumbs" for thumb clusters. For split keyboards, the mirror property automatically generates a symmetrical half. Beginners can use the web-based version at ergogen.xyz, which provides real-time previews without requiring any software installation.
After Ergogen generates the PCB design files, you can use KiCAD to trace the electrical connections. FlatFootFox describes this process as solving a "complex routing puzzle". On the firmware side, the QMK Configurator offers a user-friendly drag-and-drop interface to customize your keymap. Once finished, you can download the firmware file and save the "QMK Keymap JSON File" for future adjustments.
With your design complete, the next step is to flash the firmware and test it on your hardware.
Flashing Firmware and Testing on Hardware
Once your design is ready, it's time to flash the firmware onto your keyboard and test its functionality. Use your compiled firmware file (.hex, .bin, or .uf2) and upload it to the keyboard's microcontroller. To start, enter bootloader mode by pressing your board's reset button or using a designated keycode, then flash the firmware using QMK Toolbox.
QMK Toolbox is a reliable flashing tool compatible with both Windows and macOS. It supports various bootloader types. For example, keyboards like the Freebird60 or Freebird75 from KeebsForAll, which use STM32 microcontrollers, require QMK Toolbox alongside dfu-util. Once your device is detected, simply select the firmware file and execute the flash command. For newer RP2040-based boards, the process is even easier - these boards show up as USB drives, allowing you to drag and drop the .uf2 file.
After flashing, test your layout immediately. If certain keys or layers aren't functioning as expected, make small incremental changes to simplify troubleshooting. Always double-check that you've selected the correct hardware version in your configurator, as flashing the wrong firmware can lead to unresponsive keys.
Step 5: Test and Refine Your Layout
Start testing your layout right away. A tool like keyboardtester.com can help you confirm that every key and layer is functioning as expected. This initial testing ensures your layout is operational and sets the stage for making ergonomic improvements. Spend about 15 minutes a day practicing to allow your muscle memory to adapt and to uncover any issues with the layout.
Monitoring Comfort and Performance
Once you’ve confirmed everything works, shift your attention to how the layout feels during use. Pay close attention to any physical discomfort, such as overextending your pinky, awkward thumb positions, or unnatural lateral finger movements. As keyboard layout researcher semi puts it:
"If there is anything we should be able to agree on in keyboard layouts, it's that what is 'good' is entirely subjective. People have different hands. They have different ideas of what is comfortable, and different physical limits".
To dig deeper into potential problem areas, try using layout analyzers like the Cyanophage playground or Monkeyracer. These tools can measure metrics like Same Finger Bigrams (SFBs), Lateral-Stretch Bigrams (LSBs), and Redirects to identify patterns that might cause discomfort. For testing typing speed, use larger word sets like "English 5k" on Monkeytype. This helps ensure that punctuation and less frequently used keys are positioned effectively for your needs. Focus on accuracy first; speed will naturally improve as the layout becomes second nature.
Adjusting Layers and Punctuation Keys
Using performance data as a guide, refine your symbol and number layers. If you’re coding, make brackets and semicolons easier to reach. For writing, prioritize commonly used punctuation marks like quotation marks. Analyze usage patterns to spot keys that are causing strain and move them to more comfortable positions. If certain key combinations feel awkward or slow you down, make small, incremental changes to find what works best for you.
Conclusion
Creating an ergonomic keyboard layout takes some effort, but the payoff can be well worth it. Start by analyzing your typing habits, choose a layout that aligns with your needs, and tweak the key placements to minimize finger movement. Testing and refining are crucial steps in this process. As keyboard layout researcher semi puts it:
"What matters is not how well the layout fits the metrics, it's how well the metrics fit you."
Be prepared for a 2–3 week adjustment period before you can truly assess how effective the new layout is. During this time, focus on comfort rather than speed. Pay attention to any signs of physical strain, awkward finger positioning, or discomfort, and make gradual changes based on how the layout feels in daily use, rather than relying solely on performance metrics from analyzers.
To complement your layout, investing in the right hardware can make a big difference. The right keyboard setup makes customization easier and enhances the overall ergonomic experience. For example, KeebsForAll's Freebird series offers hot-swappable PCBs and support for multiple layouts, so you can experiment with different switches without needing to solder. Pricing starts at $160.00 for the Freebird60 Full Kit, while the Freebird75 Full Kit and the Freebird TKL Full Kit are available for $199.00 and $249.99, respectively. These kits also come with CNC-machined aluminum cases, providing a sturdy and stable base to support good typing posture during long sessions.
FAQs
How can I create an ergonomic keyboard layout that suits me?
To create a keyboard layout that suits your ergonomic needs, start by defining your primary goals. Are you looking to minimize strain, boost typing speed, or address discomfort? Pinpointing these objectives will help shape your design. Don’t forget to factor in your hand size and typing habits, as these can significantly influence your choices.
Next, select a base layout that complements your typing style. For instance, Colemak is a popular choice for those seeking a mix of comfort and efficiency. If you want to take it a step further, explore split-hand designs, which can offer even greater ergonomic advantages. Tools like Ergogen are great for tweaking key spacing, column angles, and thumb cluster placement to align with your natural hand positioning. To ensure everything works as planned, test your design with software like QMK Configurator, making adjustments to enhance comfort and reduce strain.
When you're ready to bring your layout to life, invest in quality components. Stores like KeebsForAll carry a wide selection of ergonomic-friendly parts, including switches, keycaps, and PCBs. Assemble your keyboard, flash the firmware, and fine-tune the setup until it feels just right. The result? A custom keyboard that not only feels natural but also supports your typing needs seamlessly.
What tools can I use to analyze my typing habits and create a custom ergonomic keyboard layout?
To craft an ergonomic keyboard layout that suits your unique typing style, a range of tools can help you analyze and refine your design. Ergogen is a great starting point, offering features to map key positions, optimize hand placement, and visualize finger movement. This makes it easier to build a layout that feels natural and reduces strain. Then there's Genkey, which dives into your typing data, providing insights like key usage patterns and heatmaps. With this information, you can pinpoint overused keys and make adjustments to improve balance.
If you're focused on fine-tuning hand balance and reducing typing effort, the Colemak Mod-DH Layout Analysis Tool can evaluate layouts and offer actionable feedback. And for those who prefer a hands-on approach to planning, the Keyboard Layout Editor (KLE) lets you design and test virtual layouts before committing to a physical build. By combining these tools, you can experiment with ergonomic designs and create a keyboard layout tailored for comfort and efficiency.
How long does it take to get used to an ergonomic keyboard layout?
The time it takes to get used to a new ergonomic keyboard layout varies based on your typing habits and how much the new layout differs from the one you're accustomed to. For some, it might only take a few hours or days to feel comfortable. Others might need a week or two of regular use to fully adjust.
If you want to speed things up, focus on keeping your hands in the correct position and practice consistently. Over time, your muscle memory will kick in, and typing on the new layout will start to feel second nature.