
How to Test Keyboard Stabilizers After Installation
[ Back to Mechanical Keyboards 101 ]Testing your keyboard stabilizers ensures smooth typing and avoids issues like rattling, sticking, or wobbly keys. Stabilizers keep larger keys steady, but even small misalignments or improper lubrication can cause problems. Here's a quick summary of the process:
- Inspect visually: Check housing alignment, wires, and for debris or defects.
- Test functionality: Press stems for smooth movement and listen for noise.
- Troubleshoot issues: Adjust bent wires, fix rattling, or clean excess lubricant.
- Final check: Test all keys for uniform sound, feel, and responsiveness.
Proper testing can save time and effort later by catching issues early. Keep your stabilizers clean, aligned, and lightly lubricated for optimal performance.
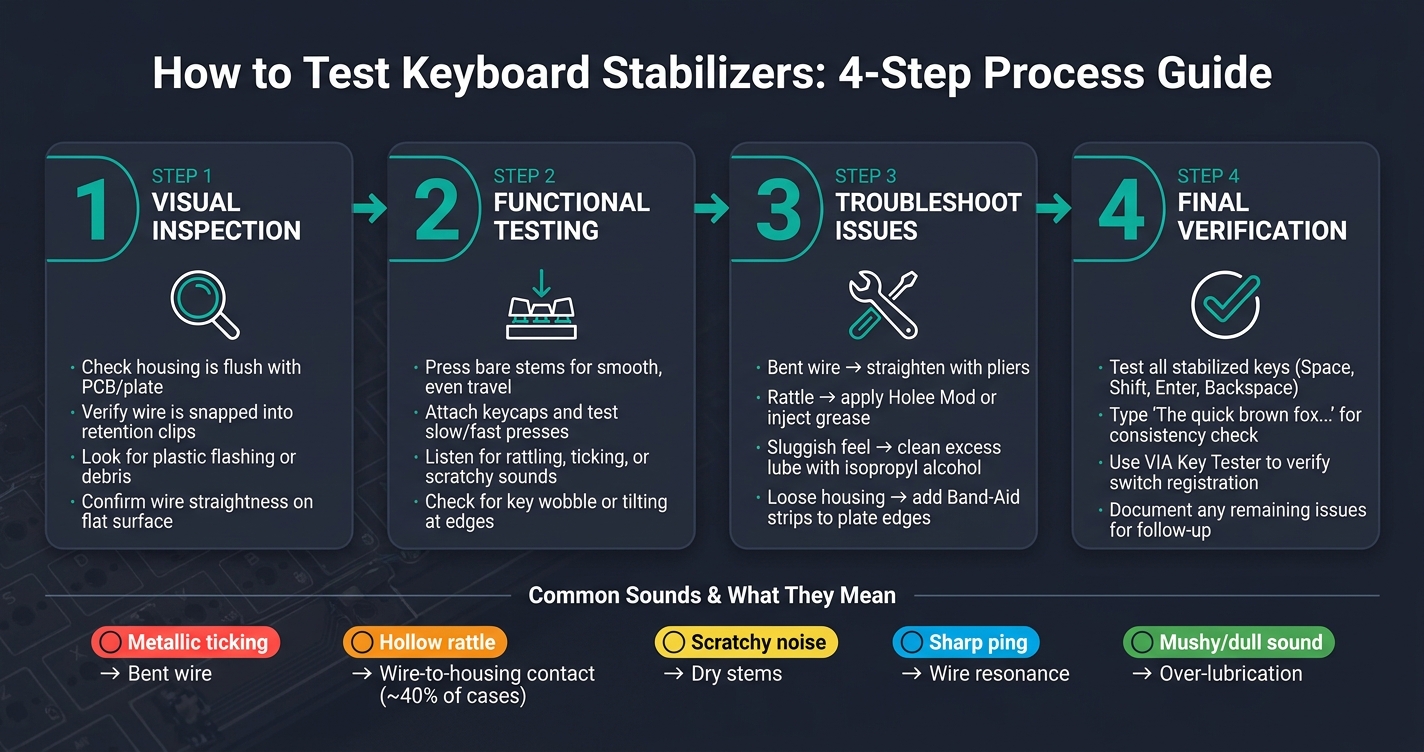
How to Test Keyboard Stabilizers: 4-Step Process Guide
How to Tune Your Keyboard Stabilizers
sbb-itb-3cb9615
Step 1: Visual Inspection
Before testing any key, take a moment to inspect your stabilizers. A careful visual check can help you catch potential problems early.
Check Housing and Wire Alignment
Start by ensuring each stabilizer housing is completely flush with the PCB or plate - there should be no gaps or tilting. Even a slight gap can lead to internal parts colliding during use.
For plate-mounted stabilizers, examine the plastic clips on both sides of the housing. They should be securely snapped in place and remain stable when lightly tapped. For screw-in stabilizers, confirm that the housing hasn’t twisted during installation - it should sit squarely and flat against the PCB.
Next, inspect the wire. It should be firmly snapped into the retention clips on both sides of the housing and evenly aligned. If one side appears lower or the wire sags, it’s not properly secured. Compare both stems to ensure symmetry.
"If you didn't seat the stabilizer properly it can cause parts to collide in ways they weren't intended to." - Omnitype
Look for Debris or Defects
Once alignment is verified, check each stabilizer for unwanted debris. One common issue is plastic flashing, a thin layer of leftover material from manufacturing, often found along the bottom edges of the housing. If you’ve done a clipping mod, confirm the cut edges are smooth - rough spots can disrupt the stem’s movement.
Also, inspect for dust, lint, or hair in the lubricant. These contaminants can cause scratchy movement and are easy to overlook. If you notice any, clean the area with isopropyl alcohol and reapply a thin, even layer of lubricant before continuing. Finally, check the wire for straightness by placing it on a flat surface. If it rocks or makes noise when tapped, it’s warped and may produce a ticking sound during typing.
| Component | What to Check | Why It Matters |
|---|---|---|
| Housing | Flush with PCB/plate | Loose fit causes chatter and rattle |
| Wire | Fully snapped into housing clips | A loose wire can pop out, causing key failure |
| Wire ends | Fully inserted into stem channels | Partial insertion leads to grinding or binding |
| Stems | Move together at the same height | Misalignment causes one-sided rattle or tilting |
| Housing bottom | Free of plastic flashing or rough edges | Rough surfaces disrupt smooth key travel |
Once you’ve confirmed everything is aligned and free of debris, you’re ready to move on to functional testing in the next step.
Step 2: Functional Testing
Now that you've completed the visual inspection, it's time to put the stabilizers to the test. Functional testing reveals what your eyes can't - how the stabilizers actually perform when used.
Test Key Travel and Smoothness
Start by pressing the stabilizer stems without the keycaps. This helps you feel the movement directly and detect any binding or resistance before adding the keycap's weight. Both stems should move evenly and return to their original position without hesitation.
Once you're satisfied with the bare stems, attach the keycaps and press each stabilized key slowly from top to bottom. The movement should feel smooth and consistent. If a key feels "mushy" or doesn't spring back quickly, it's often due to over-lubrication.
"Over-lubing will make your keys feel 'mushy' and slow." - KeebArchive Editorial
If you notice this issue, remove the keycap, clean the stabilizer, and reapply the lubricant sparingly. After confirming the feel, focus on the sound to identify any potential noise issues.
Listen for Rattling or Noise
Press each stabilized key five times slowly, then five times quickly. This will help you detect any noise variations caused by the stabilizers. Here’s a quick guide to common sounds and their likely causes:
| Sound | Likely Cause |
|---|---|
| Metallic ticking | Bent or unbalanced wire |
| Hollow rattle | Wire-to-housing contact (most common, ~40% of cases) |
| Scratchy noise | Dry stems or housing walls |
| Sharp ping | Wire resonance |
| Mushy/dull sound | Over-lubrication or debris |
To pinpoint the source, tap different areas of the keycap. If the ticking noise happens only on the upstroke (when the key is released), it’s almost always due to the stem hitting the wire.
Check for Key Wobble or Tilting
After ensuring smooth travel and proper sound, assess the stability of each key. Gently press on both edges of each stabilized key. If the key rocks or tilts unevenly, the wire may be unbalanced, or the housing might not be properly seated.
You can also lightly rock the Gateron V2 screw-in stabilizer housings. If they shift noticeably, it indicates misalignment. For persistent tilting issues, inspect the keycap itself - especially the spacebar. A warped keycap can throw the stems out of alignment regardless of how well the stabilizer is installed.
Step 3: Troubleshooting Common Stabilizer Issues
After completing functional tests, it’s time to tackle some of the most common stabilizer problems: rattling, sluggish movement, and uneven key feel.
Fix Rattling or Loose Stabilizers
Rattling often happens because the stabilizer wire either hits the housing or is slightly bent, causing uneven contact. To check for a bent wire, place it on a flat surface - if it rocks, gently straighten it using pliers.
If the noise comes from the wire hitting the stem, the Holee Mod can help. Place a small piece of fabric Band-Aid or UHMW tape inside the stabilizer stem where the wire rests. This softens the metal-on-plastic contact, reducing noise. For pre-assembled stabilizers, you can inject a thick grease (like dielectric grease or Krytox XHT-BDZ) into the back of the housing where the wire sits, using a syringe.
For plate-mounted stabilizers that feel loose, try adding small strips of Band-Aid to the plate edges where the stabilizer clips in. This creates a tighter fit and reduces housing movement.
Next, let’s look at sluggish movement.
Fix Sticky or Slow Movement
Over-lubrication is a common culprit behind sluggish or sticky keys. Use only a minimal amount of lubricant. If you notice white clumps of grease inside the housing, carefully remove the excess with a small brush or cloth. In extreme cases, you may need to disassemble the stabilizer and clean the components with 90%+ isopropyl alcohol before applying a thinner layer of lubricant.
If you’re using the Holee Mod, make sure the fabric shim isn’t too thick. If it seems to be causing resistance, replace it with a thinner material like medical tape.
Finally, let’s address any uneven key feel or tilting.
Fix Uneven Key Feel or Tilting
Uneven key feel is usually caused by a warped wire or a poorly seated keycap. If a key tilts despite the wire being balanced, test the keycap on a flat surface - if it wobbles, the keycap might be warped. For loose stabilizer stems, try adding a thin shim made from cling wrap to improve the fit.
For PCB-mounted stabilizers, ensure the screws are fully tightened and that the housings sit flush against the PCB. Any misalignment in the housing can transfer directly to the keycap, causing uneven presses.
| Issue | Likely Cause | Fix |
|---|---|---|
| High-pitched ticking | Bent or warped wire | Balance the wire on a flat surface and adjust with pliers |
| Loose clacking | Gap between wire/stem | Apply the Holee Mod or inject extra grease |
| Housing wobble | Loose plate fit | Use Band-Aid strips on the plate edges |
| Sluggish/mushy feel | Over-lubrication | Clean with isopropyl alcohol and reapply lubricant sparingly |
| Keycap wobble | Loose stem-to-cap fit | Use a cling wrap shim on the stabilizer stem |
Step 4: Final Testing and Verification
Once troubleshooting is complete, it's time to ensure everything functions perfectly before wrapping up the build. This involves running a series of tests to confirm proper alignment, consistent sound, and smooth key operation.
Run a Full Keyboard Test
Start by testing all stabilized keys, like Space, Shift, Enter, and Backspace. Press each one at both edges to check for uniform sound and feel. This step ensures the alignment and balance you've worked on earlier is spot on.
Next, type the phrase "The quick brown fox jumps over the lazy dog" repeatedly. This will help you confirm that every key feels consistent. Additionally, lightly tap each keycap to detect any irregularities. If something feels or sounds off, it might require minor adjustments.
"A well-tuned spacebar is often described as a 'thock' - a clean, heavy sound without any high-pitched rattling." - KeebArchive Editorial
If you notice a key returning slowly, it could indicate excess lubricant. In such cases, carefully remove the extra lubricant and retest the key.
For software-based verification, tools like VIA can be incredibly useful. Use the KEY TESTER tab in VIA's Test Matrix mode to ensure all switches, including those under stabilized keys, register correctly. This is particularly helpful for custom layers or configurations.
Note Any Remaining Issues
If you still notice minor inconsistencies after testing, revisit Step 3 for targeted tweaks. Keep in mind that not all imperfections need immediate fixing. Slight sound differences, for instance, often resolve themselves after a break-in period, as the lubricant spreads evenly and components settle with use.
Document any persistent issues by noting the affected key, the type of problem (e.g., sound or feel), and the conditions under which it occurs. For keyboards used heavily, plan a quick re-inspection every 6–12 months, as lubricants can dry out or shift over time.
Here’s a quick reference table for common issues and solutions:
| Sign During Final Test | What It Means | Next Step |
|---|---|---|
| Sharp "tick" on light tap | Stabilizer wire may need lubrication/balancing | Add lubricant or re-balance the wire |
| Slow/sluggish return | Possible over-lubrication | Wipe away excess grease from housing/stem |
| Uneven sound left vs. right | Stabilizer may be misaligned | Re-check wire seating and stem alignment |
| Hollow rattle on full press | Potential loose housing or vibration | Re-seat the stabilizer or apply the Holee Mod |
Conclusion
Getting stabilizers right can turn a frustrating keyboard build into a satisfying one. As Omnitype aptly says:
"A perfectly tuned stabilizer is truly the difference between a bad keyboard build and a great keyboard build."
The key steps? Inspect, test, troubleshoot, and verify your stabilizers. Testing before full assembly saves time and ensures everything works as it should. These steps are crucial for achieving smooth performance and a seamless build.
For those striving for perfection, KeebsForAll offers high-quality components designed to enhance stabilizer performance. Options like the TX AP Clip-In Stabilizers (Rev. 4) starting at $8.99 and the TX Stabilizer Tester at $6.00 provide reliable solutions without breaking the bank. You can explore their full range at keebsforall.com.
Well-tuned stabilizers make every keystroke count.
FAQs
Do I need to remove keycaps to test stabilizers?
No, you don’t need to remove keycaps to test stabilizers. You can simply press down gently on the keys to check for any unwanted wobble or movement. This allows you to assess their alignment and functionality without taking anything apart. Removing keycaps is only necessary if you’re planning to fine-tune, lubricate, or make adjustments during installation. For basic testing, leaving the keycaps on works just fine.
How can I tell if a stabilizer wire is bent?
To determine if a stabilizer wire is bent, lay it on a flat surface, such as a mirror or the screen of a phone. Gently tap the ends. If you hear a distinct clack sound or notice the wire rocking, it’s probably bent. To fix it, use your hands or a pair of small pliers to carefully straighten the wire until it sits perfectly flat. This adjustment helps maintain proper alignment and ensures smooth key functionality.
What’s the quickest way to fix stabilizer ticking?
To address stabilizer ticking efficiently, start by ensuring the stabilizer wire is completely flat and well-lubricated. Test for any bending by laying the wire on a flat surface; if it's uneven, gently straighten it using pliers. Apply a light coat of Krytox 205g0 or dielectric grease to the wire and contact points to minimize noise. For added support, consider using the Holee mod. This involves placing a small piece of fabric tape or a Band-Aid inside the stabilizer stem to improve stability and reduce unwanted sounds.