
If your keyboard supports PCB screw-ins, I’d pick those first. They usually sit tighter, move less, and are less likely to rattle than plate-mount stabilizers.
Here’s the whole article in plain English:
- Plate-mount stabilizers clip into the plate
- PCB-mount stabilizers attach to the PCB with clips or screws
- Screw-in PCB stabilizers usually give the firmest fit
- Plate-mount stabilizers are often easier to put in, but they can come loose more often
- PCB thickness matters: most boards use 1.2 mm or 1.6 mm
-
Layout matters too:
- 60% boards usually need 4 stabilizers
- 65% / 75% / TKL boards usually need 5
- Full-size boards usually need 7
- Most standard builds use a 6.25u spacebar, while some custom layouts use 7u
If I were choosing, I’d keep it simple:
- Use plate-mount only if the board requires it
- Use PCB clip-in if I want a middle ground
- Use PCB screw-in if my PCB supports it and I want the tightest hold
One thing matters just as much as the type: lubing and installing them well. Even a good stabilizer can sound bad if the wire is bent, the housing is loose, or the lube job is messy.
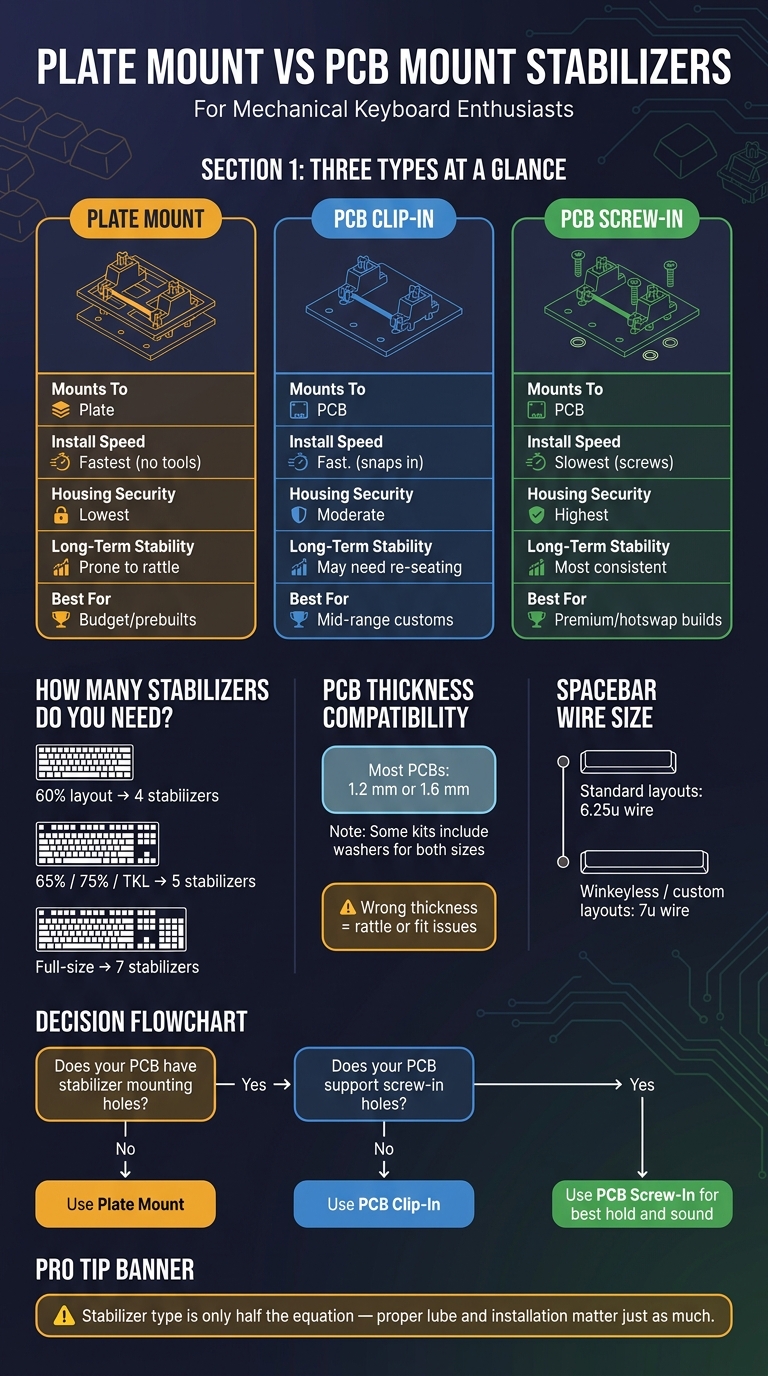
Plate Mount vs PCB Mount Stabilizers: Full Comparison Guide
Plate Mount Stabilizers: Not as Bad as You Think
sbb-itb-3cb9615
Quick Comparison
| Type | Mounts To | Install | Hold | Common Use |
|---|---|---|---|---|
| Plate Mount | Plate | Easy | Lower | Budget boards, some prebuilts |
| PCB Clip-In | PCB | Moderate | Medium | Mid-range customs |
| PCB Screw-In | PCB | Slower | Highest | Custom and hot-swap builds |
So if you want the short answer: buy the stabilizer type your board supports, then spend the extra time on fit, wire check, and lube. That’s what makes long keys feel even instead of loose, noisy, or soft.
Plate Mount Stabilizers: How They Work and How to Install Them
How Plate Mount Stabilizers Attach to the Plate
Plate-mount stabilizers are fast to install, but they depend a lot on how well the plate cutouts fit.
Each housing has small plastic tabs that snap into the plate and stay there through friction. There are no screws or bolts holding them down.
That speed comes with a tradeoff. If the cutout is a little loose, the stabilizer can wobble and make a metallic rattle. That’s one reason many entry-level boards, like the MonsGeek ICE75, ship with plate-mount stabilizers.
Plate material also changes the fit. Metal plates usually give the tabs a firmer snap, so the housings stay put more securely. Plastic plates can flex more, and over time that can make the fit feel looser.
Step-by-Step: Installing Plate Mount Stabilizers
Start by checking fit before you clip anything into place.
- Check fit and wire condition: Confirm that the stabilizer matches the plate cutouts. Then place the wire on a piece of glass to see if it has any bends.
- Lube and assemble: Apply dielectric grease to the wire ends. Add a thin film of Krytox 205g0 to the stem sliders and housing pivots. Insert the stem with the side that has two holes facing the wire, thread the wire through the stem, and snap it into the housing clips. It should move freely.
- Clip into the plate: Press the housing into the cutout until both tabs click into place. If the fit feels loose, use a thin strip of tape to shim the cutout edge.
- Test before installing switches: Press each stabilizer stem straight down, then press off-center. It should feel smooth and stay quiet, with no rattle. Once the plate-mount set is secure, the next step is the PCB-mount install.
PCB Mount Stabilizers: How They Work and How to Install Them
How PCB Mount Stabilizers Attach to the PCB
PCB-mount stabilizers attach right to the board, which means fit comes down to the PCB holes and the board thickness. Each housing connects to the printed circuit board with either clips or screws. Because the stabilizer mounts straight to the PCB, it usually feels more solid and has less housing movement.
There are two main types of PCB-mount stabilizers: screw-in and clip-in (snap-in). Before you buy, check your PCB thickness. Most PCBs are either 1.2 mm or 1.6 mm thick, and stabilizers are usually made for one of those sizes. If you use the wrong one, you can end up with fit problems or rattle. Screw-in stabilizers use two small screws per housing to hold the stabilizer flush against the PCB for the firmest fit. Clip-in stabilizers use plastic clips that press into PCB cutouts and snap into place. They're faster to install, but they don't hold as tightly.
It's also smart to check whether your PCB has threaded holes for screw-in stabilizers or only the cutouts needed for clip-in models. Once the mount type and PCB thickness line up, the install is pretty simple.
Step-by-Step: Installing PCB Mount Stabilizers
Start with the bare PCB before you install the plate and switches. That gives you a chance to spot problems early instead of tearing things back apart later. Also make sure the stabilizers match both the mount style and the PCB thickness.
1. Lube and assemble
Add dielectric grease to the wire ends, then put a thin layer of Krytox 205g0 on the stem walls and housing. Insert the stem into the housing. After that, press the wire firmly into the housing slots until it clicks into place.
2. Place and secure the housing
Line up each stabilizer housing with the correct PCB holes. For screw-in stabilizers, thread the screws through the housing and tighten them until secure, but don't overtighten. For clip-in stabilizers, press both legs down evenly until they click into place.
3. Test before moving on
Press each stabilizer stem straight down, then press it off-center. It should move smoothly without rattle or binding. If you hear a tick or feel it catch, remove the wire and reseat it fully before you keep going.
Plate Mount vs PCB Mount Stabilizers: Direct Comparison
Now that both install methods are clear, the choice comes down to three things: speed, hold, and PCB support.
Which Type Is Easier to Install and Tune
Plate mount stabilizers are the fastest to install. You don't need tools or screws. You just clip them into the plate. The downside is the weaker hold. The housings can pop out during keycap swaps, and rattle can show up if the plate cutouts are loose.
Screw-in PCB stabilizers take the most time to install, but they give you the most secure fit and the steadiest long-term performance. Clip-in stabilizers sit in the middle. They're faster than screw-ins and more secure than plate mounts, but they can loosen over time if the fit isn't snug.
If your PCB supports screw-ins, that's usually the default pick.
| Modding & Maintenance | Plate Mount | PCB Mount (Screw-In) | PCB Mount (Clip-In) |
|---|---|---|---|
| Install Speed | Fastest; no tools needed | Slowest; requires screws | Fast; snaps into the PCB |
| Housing Security | Lowest; can pop out | Highest; bolts to the PCB | Moderate; can loosen over time |
| Long-Term Stability | More prone to rattle; harder to lube cleanly | Most consistent; set-and-forget | May need re-seating over time |
| Best For | Budget builds and older prebuilts | Premium customs and hotswap builds | Mid-range builds where speed matters |
Which Type Fits Different Build Goals
Once install quality is out of the way, compatibility decides the rest. Your plate and PCB both need to support the stabilizer type. Some keyboards with plates that only take plate-mount stabilizers don't have enough clearance for the larger housing of a PCB-mount unit. So if you're upgrading a budget board, plate mount may be the only route.
For custom builds with screw-in support, PCB screw-in stabilizers are usually the better choice. They give you cleaner sound, a steadier base for mods like the Band-Aid mod, and better long-term consistency. That matters even more on hot-swap builds, where switches go in and out often.
| Build Goal | Recommended Type | Why |
|---|---|---|
| Entry-level / Budget Pre-built | Plate Mount | Often the only compatible option |
| Mid-range Custom | PCB Clip-In | Good balance of speed and security |
| Premium / Enthusiast Custom | PCB Screw-In | Best sound and long-term stability |
| Hot-swap Custom | PCB Screw-In | Secure stabilizers matter more with frequent switch swaps |
Before you buy, check the mount type and PCB thickness your kit supports. That last compatibility check can save you a lot of hassle later.
How to Choose the Right Stabilizer and Final Takeaways
What to Check Before You Buy or Install
After you compare hold, speed, and fit, pause and check compatibility before you buy anything. This step saves a lot of hassle.
If your PCB has stabilizer mounting holes next to the switch footprint, it supports PCB-mount stabilizers. If those holes aren't there, you're limited to plate mount.
Then check PCB thickness. Most modern PCBs are 1.2 mm or 1.6 mm, and some stabilizer kits come with washers that work with both common sizes.
You should also count how many stabilizers your layout needs:
- A 60% board needs four
- A 65%, 75%, or TKL needs five
- A full-size board needs seven
One more thing: check your spacebar wire size. Most standard layouts use a 6.25u wire. Winkeyless and other custom layouts often need a 7u wire.
Once you know the mount type, buy a kit that matches it. It's smart to skip unlabeled budget stabilizer sets. Go with a known kit that fits your board, like Durock V3, Swagkeys Knight V2, or TX AP, and buy from KeebsForAll for board-matched parts.
Summary: Plate Mount vs PCB Mount
Once you've handled the compatibility checks, the choice is pretty simple: use the easiest setup your board supports.
Plate-mount stabilizers make sense when your board doesn't support PCB-mount hardware. The tradeoff is that they're harder to tune and more likely to rattle over time. Screw-in stabilizers are the default pick for supported PCBs, while clip-in and plate-mount options are more of a compromise for certain layouts.
And here's the part people sometimes miss: installation and lube matter just as much as stabilizer type.
FAQs
How do I know which stabilizer type my keyboard supports?
Check your keyboard kit’s product page or documentation first. Then look at the plate and PCB to make sure they match.
Plate-mount stabilizers attach to the plate itself. PCB-mount stabilizers need the right cutouts and mounting points on the PCB.
Here’s the simple way to check:
- If the PCB has threaded holes, it supports screw-in stabilizers
- If the PCB has rectangular cutouts but no screw points, it supports clip-in or snap-in styles
It’s a small detail, but it matters. A stabilizer can look right at a glance and still not fit your build.
Are screw-in stabilizers always better than clip-in ones?
Not always. It comes down to what matters most to you: sound, stability, or ease of installation.
Screw-in stabilizers are often the go-to choice for sound and long-term reliability because they fasten tightly to the PCB, which helps cut down on wobble. Clip-in stabilizers are easier to install, more convenient, and often cost less.
What causes stabilizer rattle after installation?
Stabilizer rattle after installation usually points to loose parts or alignment issues.
The usual culprits are:
- Dry contact points that need lube
- Warped or bent wires
- Wires that aren’t fully seated in the housing
- Housings that shift inside the plate cutouts
You can also get rattle if the spacebar keycap is warped, the stabilizer screws are too tight, or the stem is hitting the PCB.
The fix is pretty straightforward: check that the wires are straight, lubricate the wire contact points, and, if the fit still feels loose, try plate tape or Band-Aid mods to snug things up.