Setting up a workspace for assembling a mechanical keyboard is all about precision, organization, and safety. A poorly prepared area can lead to misaligned switches, lost components, or even damaged parts. This guide highlights key steps to get your workspace ready for a smooth and enjoyable build:
- Work Surface: Use a flat, stable, and hard surface like a table or workbench. Avoid static-prone or soft areas like carpets or beds. Keep the area clutter-free.
- Lighting: Combine natural light with an adjustable desk lamp to reduce shadows and improve visibility for detailed tasks.
- Seating: Use a comfortable chair that supports good posture. Ensure your work surface is at elbow height.
- Static Protection: Use an anti-static wrist strap and mat, and ground yourself before handling components. Store parts in anti-static bags until needed.
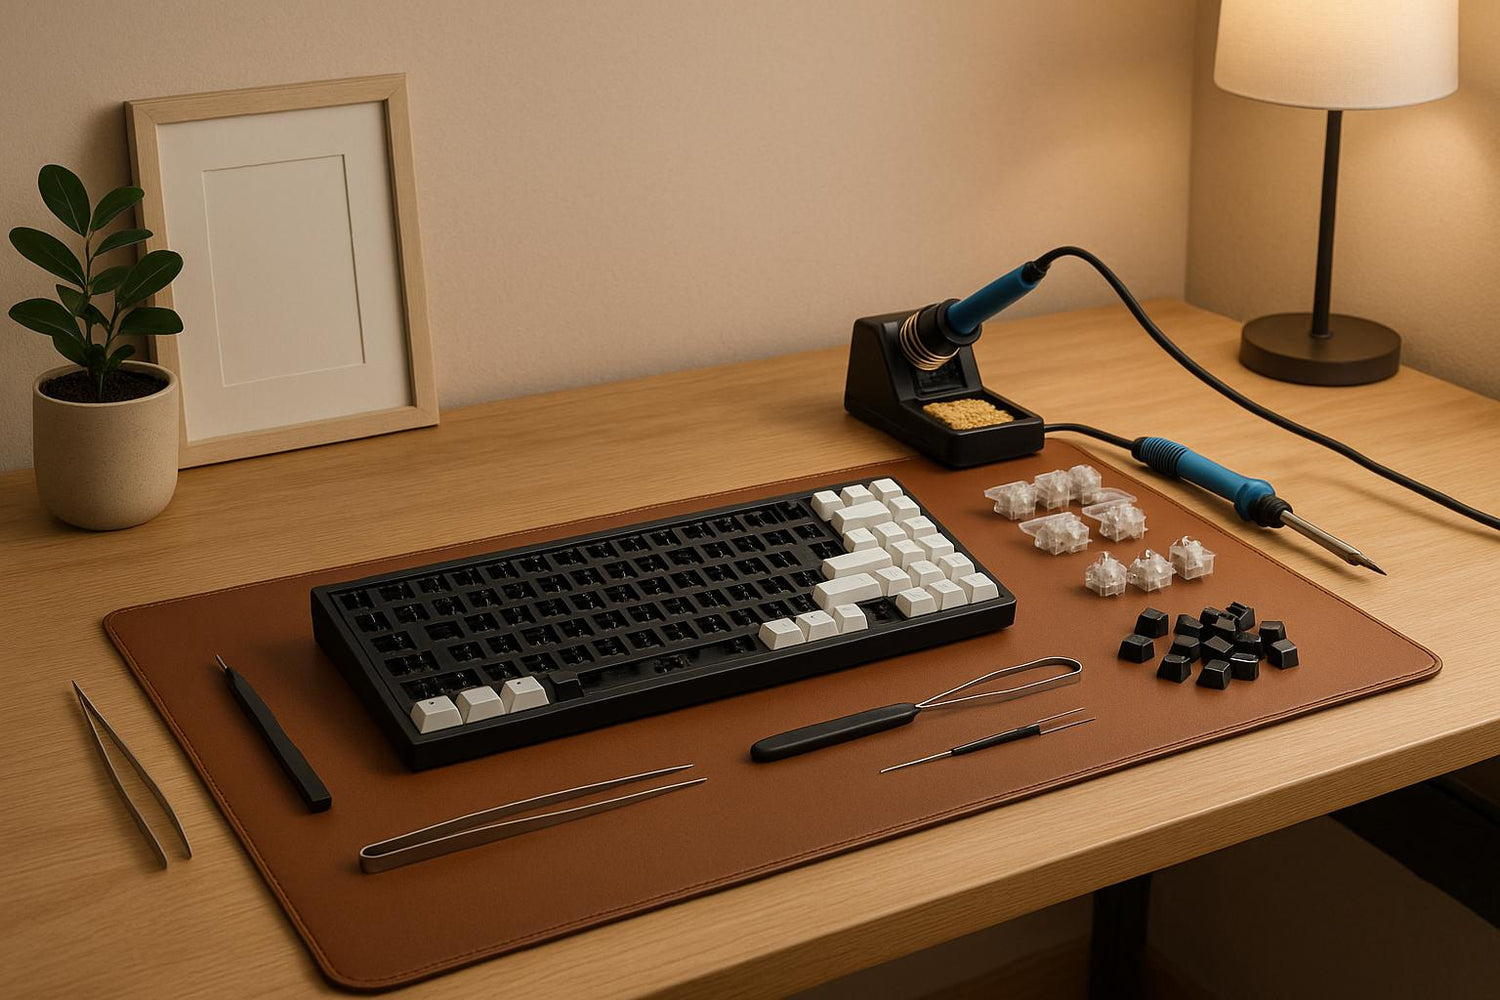
- Tools and Supplies: Gather essentials like precision screwdrivers, keycap pullers, tweezers, and soldering tools (if required). Use high-quality lubricants and cleaning materials for optimal performance.
- Component Organization: Arrange parts in the order of use. Use trays or magnetic dishes to keep small items secure and accessible.
- Safety and Comfort: Focus on ergonomics to prevent strain during long sessions. Take regular breaks and follow the 20-20-20 rule to reduce eye strain.
A well-prepared workspace ensures a smoother build process, better results, and a more enjoyable experience overall. Follow these steps to avoid common pitfalls and get the most out of your keyboard assembly project.
How to Build a Mechanical Keyboard | Simple Step-by-Step Guide | MODE Sonnet

Setting Up Your Workspace
Creating the right workspace is key to ensuring both precision and safety during your keyboard assembly. A well-organized setup can make the process smoother and help you avoid mistakes.
Selecting Your Work Surface
Start with a flat, stable surface - something like a dining table or workbench that's at least 3′ × 2′ in size. The surface should be sturdy enough to handle the pressure you'll apply when pressing switches or assembling components without wobbling.
Avoid soft or static-prone surfaces like beds, couches, or carpeted floors. These not only risk generating static electricity (which can damage sensitive components) but also make it easy to lose small parts like washers or screws. A hard, even surface ensures proper pressure distribution during assembly.
Keep your workspace clutter-free. Remove unrelated items to prevent spills or mixing up components. Only have your keyboard parts and tools within arm's reach.
Think about the surface material. Glass, metal, or laminated wood are ideal since they're easy to clean and don't generate static. If you're working on a scratch-prone surface, place a clean towel or cloth underneath to protect both the surface and your components.
Once you've secured a solid, clutter-free work area, focus on optimizing your lighting and seating for detailed tasks.
Lighting and Seating Setup
Good lighting is critical. Natural light is ideal, so try to work near a window. Supplement this with an adjustable LED desk lamp to ensure your workspace is evenly lit. Position the lamp to minimize shadows while you're working on small, detailed components.
Avoid relying solely on overhead lighting. Ceiling lights often cast shadows, making it harder to see into switch sockets or align stabilizers. A desk lamp positioned at an angle is much more effective for eliminating these issues.
Choose a comfortable chair that supports good posture. Since keyboard assembly can take 2-4 hours, it's important to avoid strain. Adjust your chair so your elbows are at about a 90-degree angle when working.
Set your work surface at elbow height or slightly below. This reduces strain on your shoulders and wrists during tasks like switch installation or soldering. If the surface is too high, consider lowering your chair or standing while you work.
With your surface, lighting, and seating ready, the next step is protecting your components from static electricity.
Static Protection Setup
Static electricity can silently damage your components, so take precautions. Invest in an anti-static wrist strap and work mat to create a static-safe environment.
Proper grounding is essential. Attach your anti-static wrist strap to a grounded metal object, like the chassis of a powered-off computer. Avoid painted or plastic surfaces, as these won't provide effective grounding.
Use an anti-static mat on your work surface. Connect it to the same ground as your wrist strap. This mat not only protects against static but also prevents components from sliding around during assembly.
Discharge static from yourself before handling components. A quick touch to a grounded metal object can save your PCB or switches from accidental damage.
Wear natural fiber clothing during assembly. Synthetic materials like polyester or fleece generate static electricity, while cotton or other natural fibers help minimize static buildup.
Keep components in their anti-static bags until needed. Many items, like PCBs and premium switches, come in protective packaging. Leave them in these bags until you're ready to install them in your keyboard.
Required Tools and Supplies
Having the right tools at your disposal can make assembling a keyboard much easier and help protect your components from accidental damage. The tools you’ll need will vary depending on whether you’re working with a hot-swappable keyboard or one that requires soldering.
Basic Assembly Tools
- Precision Screwdriver Set: You’ll need Phillips and flathead screwdrivers in sizes #0, #1, and #2 to assemble the case and mount the PCB.
- Keycap and Switch Pullers: A wire keycap puller is ideal for safely removing keycaps without scratches, while a switch puller is essential for removing switches from hot-swappable PCBs. While basic kits often include plastic pullers, investing in a sturdy metal puller, like the KFA Switch Opener from KeebsForAll ($19.00), ensures better durability, especially when modifying or lubricating switches.
- Non-Conductive Fine-Tip Tweezers: These are great for handling small components such as stabilizer washers, screws, or foam without risking electrical damage.
- Flush Cutters or Wire Snips: Use these to trim switch legs or cut foam cleanly and efficiently.
Soldering Equipment
If you’re building a keyboard that requires soldering, you’ll need some additional tools to ensure strong and reliable connections.
- Temperature-Controlled Soldering Iron: Opt for an adjustable soldering iron that operates between 650°F and 700°F, with a 40-watt output and interchangeable tips. Non-adjustable irons can overheat, risking damage to your PCB or switches.
- Rosin-Core Solder: Use 0.6–0.8mm rosin-core solder with a 60/40 or 63/37 tin-to-lead ratio for precise work. If you prefer lead-free solder, be prepared for higher working temperatures, which might be a bit challenging for beginners.
- Desoldering Tools: To fix soldering mistakes, keep a desoldering pump (solder sucker) or desoldering braid handy. Pumps are beginner-friendly, while braids offer greater precision.
- Soldering Tip Cleaner: Use a damp sponge or brass cleaner to keep your soldering iron tip clean during use.
Cleaning and Lubrication Materials
Once your keyboard is assembled, proper cleaning and lubrication can optimize its performance and extend its lifespan.
- Lubricant: Krytox 205g0 is a popular choice for smooth, quiet switches. Around 3–5 grams should be enough for a full-size keyboard. KeebsForAll sells it starting at $7.95.
- Artist Brushes: Use size 00 or 000 brushes with non-metal ferrules for precise application of lubricant.
- Dielectric Grease: Apply a small amount to stabilizer contact points to minimize rattle. Be careful not to overdo it.
- Microfiber Cloths and Compressed Air: These are essential for cleaning dust and fingerprints off your components.
- Isopropyl Alcohol: Use 90% or higher isopropyl alcohol to clean flux residue and other contaminants from your components.
Component Organization
Setting up your keyboard components in an organized manner is key to a smooth and hassle-free assembly process. A well-thought-out layout not only saves time but also helps prevent losing or damaging any parts along the way.
Main Component Layout
Start by arranging the larger components in the order you'll need them during assembly. Place the PCB at the center of your workspace, with the case and mounting plate positioned nearby. This arrangement allows you to follow the assembly steps in sequence: preparing the PCB, installing stabilizers, placing switches, assembling the case, and finally attaching the keycaps.
To keep things tidy and efficient:
- Store your switches in a shallow tray or container within easy reach.
- Keep your stabilizers separate, as you'll need them early in the process.
- Leave your keycaps in their original box or a protective container somewhere safe but out of the way - these come into play only at the final stage.
Small Parts Storage
Tiny components like screws, washers, and springs are easy to misplace, so having a designated storage solution is crucial. Use magnetic dishes for metal parts like screws and washers to keep them secure. For non-magnetic items - such as plastic washers, gaskets, or foam pieces - opt for compartmentalized trays and label each section for quick identification.
A small flashlight or your phone's light can also come in handy for inspecting these smaller parts, ensuring you don’t overlook anything during assembly.
Work Surface Protection
Protect your workspace with a sturdy deskmat that prevents scratches, reduces static, and provides a stable, non-slip surface. Brands like KeebsForAll offer deskmats specifically designed for keyboard assembly. For tasks requiring extra care, consider adding a microfiber cloth or a secondary mat to cushion delicate components and protect them from damage.
sbb-itb-3cb9615
Pre-Assembly Checks
Before diving into assembly, take a moment to inspect and test your components. This step can save you from frustrating delays by catching potential issues early on.
Checking for Component Damage
Start with a close look at your keyboard case. Examine it for cracks, breaks, or stress marks - especially around mounting points and corners, as these areas are more likely to suffer damage during shipping. Also, check for any discoloration or cosmetic imperfections that could impact the overall look of your keyboard.
Next, inspect your PCB and plate. Look over the PCB for bent components, broken traces, or signs of discoloration. For the plate, check for warping, stress marks, or any visible deformities. If your PCB and plate came pre-assembled or integrated, make sure they’re properly aligned and nothing appears out of place. Once you’ve confirmed the physical condition of these parts, it’s time to test the PCB.
Testing the PCB
Testing the PCB before assembly is crucial for identifying any problems early and arranging replacements if needed. This step applies whether you’re working with a fully assembled PCB or a bare one after soldering. Even if you’re using a hotswap PCB, it’s a good idea to run a quick test using tweezers to ensure everything is functioning as expected.
Safety and Comfort Guidelines
Creating a workspace that prioritizes safety and comfort goes beyond just organizing tools. An ergonomically friendly setup is essential for maintaining your physical well-being during long assembly sessions, complementing the organized environment discussed earlier.
Hazard Prevention
Ergonomics matter when it comes to preventing strain and injury during extended work periods. Did you know that standard desk heights of 29.5 inches are actually designed for someone who is 6'4"? That’s not ideal for most people. Instead, adjust your work surface to align with your resting elbow height. This simple change can help reduce shoulder tension and improve your posture.
Your chair setup is just as important. Make sure your feet are flat on the floor, with your thighs parallel to the ground. Leave a small gap - about 2–3 fingers wide - between the edge of your chair and the back of your knees to avoid unnecessary pressure. For added comfort, support the natural curve of your lower back with proper lumbar cushioning.
Breaks are key. Follow a cycle of sitting for 16 minutes, standing for 8 minutes, and stretching for 2 minutes within every 30-minute period. Humanscale emphasizes the importance of movement, stating, "The best posture is the next posture, and this implies that movement is critical for maintaining long term comfort and health". Additionally, take quick microbreaks every 20–30 minutes to stretch, walk around, or grab a drink.
For eye health, try the 20-20-20 rule: every 20 minutes, look at something 20 feet away for at least 20 seconds. This is especially important as aging eyes require more contrast - people in their 60s need 250% more contrast than those in their 20s to see clearly.
Once you’ve addressed ergonomics, focus on creating an environment that supports overall comfort.
Air Quality and Cleanup
If you rely on wrist support during long sessions, use palm supports instead of traditional wrist rests. Research shows that "Wrist rests have been shown to double pressure in the carpal tunnel and are not recommended". Palm supports, on the other hand, provide cushioning for your palms without putting strain on sensitive nerves.
Lighting plays a big role in reducing eye strain. Position your task light opposite your dominant hand and angle it across your workspace, rather than shining it directly downward. This setup minimizes shadows and glare, making it easier to see small components and solder joints clearly.
Final Thoughts
A well-prepared workspace is the cornerstone of a successful keyboard assembly. Taking the time to set up your area - from choosing a sturdy work surface and good lighting to neatly organizing your tools and components - can make all the difference. This level of preparation not only ensures better build quality but also helps you avoid common issues like misplaced screws, damaged parts, or assembly mistakes.
Comfort and safety should always be top priorities. Long builds can take a toll, so make sure your workspace is ergonomic to keep yourself productive and pain-free.
Using high-quality tools and components can greatly improve the efficiency of your assembly process. KeebsForAll offers an impressive range of products to help you create a professional workspace. From their Freebird keyboard kits (starting at $160.00) to essential tools like the KFA Switch Opener ($19.00) and Krytox 205 g0 lubricant ($7.95), they’ve got you covered. Their kits include premium features like aluminum cases, hot-swappable PCBs, and Durock V2 screw-in stabilizers, giving you a solid starting point for your build.
"Rest assured, all our KFA products adhere to our stringent quality standards, using premium materials that guarantee unmatched durability." - KeebsForAll
Whether you're assembling your first keyboard or you're a seasoned pro, having the right setup and reliable components - like those from KeebsForAll - sets you up for success. A carefully planned workspace paired with top-tier tools ensures your build process is smooth and efficient from start to finish.
FAQs
Why is static protection important when assembling a keyboard, and how can I make my workspace static-safe?
When assembling a keyboard, protecting against static electricity is a must. Electrostatic discharge (ESD) can harm fragile electronic components, leading to failures or shortening their lifespan. Even tiny, often unnoticed static shocks can cause damage to these sensitive parts.
To maintain a static-safe work environment, make use of tools like anti-static mats, wrist straps, and proper grounding techniques to prevent static buildup. Steer clear of assembling keyboards on carpets or wearing clothes prone to generating static electricity. Always handle components by their edges to reduce the chance of transferring static. These simple steps can make all the difference in keeping your keyboard assembly secure and effective.
What tools and supplies do I need to assemble a mechanical keyboard, and where can I find quality options?
To build your own mechanical keyboard, you'll need a handful of tools and supplies to make the process as smooth as possible. Here's what you'll want to have on hand:
- A precision screwdriver set (magnetic tips can be a lifesaver).
- A keycap puller for safely removing keycaps.
- A switch puller to handle switches with ease.
- Lubrication brushes for applying lube to switches and stabilizers.
- Tweezers for managing those tiny parts.
- A desk mat to protect your workspace and components from scratches or damage.
If you're looking for reliable, high-quality tools and accessories, check out stores like KeebsForAll. They offer a great selection of mechanical keyboard parts and tools, catering to both beginners and seasoned builders at affordable prices.
How do I set up a comfortable and ergonomic workspace for assembling keyboards?
Creating a workspace that's both comfortable and ergonomic is key when assembling keyboards. Start by adjusting your work surface so it's at or just below elbow height - this helps keep your wrists straight and relaxed. Pair this with an adjustable chair that offers solid lumbar support, and, if needed, use a footrest to ensure your legs are positioned properly. To avoid unnecessary strain, keep your most-used tools and components close at hand.
Don't forget to take short breaks to stretch and move around. These small pauses can go a long way in reducing fatigue during extended sessions. Focusing on ergonomics not only boosts comfort but also helps prevent strain in the long run.


![[Pre-Order] Autumn Leaves PBT Keycaps - KeebsForAll](http://keebsforall.com/cdn/shop/products/DSC09732.jpg?v=1676148273)



Leave a comment
This site is protected by hCaptcha and the hCaptcha Privacy Policy and Terms of Service apply.