
Cold solder joints cause issues like unresponsive keys and erratic behavior in mechanical keyboards. They occur when solder doesn’t properly bond between components and the PCB, often due to insufficient heat, contamination, or movement during cooling. These joints appear dull, rough, or uneven and can lead to weak electrical connections that degrade over time.
Key Takeaways:
- What to Look For: Dull, cracked, or uneven solder joints.
- Why Fix It: Prevents key failures, high resistance, and PCB damage.
- Tools Needed: Temperature-controlled soldering iron, solder wick, isopropyl alcohol, flux, and 60/40 rosin-core solder.
- How to Fix: Remove old solder, clean the joint, apply flux, re-solder with proper technique, and test with a multimeter.
Cold solder joints are avoidable with proper soldering techniques, clean surfaces, and maintaining the right temperature. Regular inspection and testing ensure reliable connections and long-lasting performance.
How to Identify Cold Solder Joints on Mechanical Keyboards
Visual Signs of Cold Solder Joints
A well-soldered joint should have a smooth, shiny appearance with a neat, concave shape. On the other hand, cold solder joints often look dull, grainy, or uneven. You might spot cracks, rings around the pin, or incomplete wetting, where the solder clings to the pin but doesn’t flow smoothly onto the pad. To avoid mistaking flux residue for cracks, clean the area with isopropyl alcohol before inspecting. For a closer view, use a magnifying glass or microscope. Once you've visually identified potential issues, confirm your findings with a multimeter.
Pay special attention to areas that endure stress, such as switch pin pads, through-hole stabilizer pads, and SMD diode pads. Examine the PCB row by row, checking each switch pin and related diodes. Don’t forget to inspect USB connector pins and microcontroller pins, as faults in these areas can also lead to key failures.
Testing Connections with a Multimeter
If you suspect a cold solder joint or notice keys failing intermittently, a digital multimeter can help. Set it to continuity mode - if the connection is intact, you’ll hear a beep; if not, silence may indicate an issue. For a more precise check, switch to resistance mode. A properly soldered joint should show a reading close to 0 ohms, while higher readings suggest a problem.
Pay close attention to switches that register inconsistently, work sporadically, or only respond when the PCB is flexed. Flexing or lightly tapping the PCB while testing can expose intermittent faults caused by mechanical stress. This method is particularly handy for those assembling custom keyboards for resale, such as on platforms like KeebsForAll's KFA Marketplace. Cold joints from rushed soldering might not become obvious until weeks of use, making thorough testing essential.
Cold, Fractured, Broken Solder Joints - Spotting and Fixing Them
Tools and Materials You'll Need
Having the right tools can make all the difference when it comes to fixing cold solder joints. The right equipment not only saves time but also helps you avoid unnecessary mistakes. Here's a breakdown of the essential tools and materials you'll need for effective repairs.
Soldering and Desoldering Tools
A temperature-controlled soldering iron is a must-have. Choose one with a power range of 25–40W and adjustable temperature settings between 650–700°F (343–371°C). This range is ideal for keyboard PCBs, as temperatures above 750°F (400°C) can damage the pads by causing delamination. Avoid soldering irons without temperature control. You can find entry-level temperature-controlled stations for $30–$100 in the U.S.
To remove old solder, you'll need a few additional tools. Solder wick (also called desoldering braid) is great for precise removal, especially on through-hole switch pins. A roll typically costs $5–$10. For larger amounts of solder, a desoldering pump ($5–$20) is faster, though it might feel awkward in tight spaces. Precision tweezers are also essential to steady components during repairs since even slight movements can cause new cold joints. If you frequently work on custom keyboards, consider the KeebsForAll KFA Switch Opener ($19.00) for safely removing switches without damaging PCB pins.
Cleaning Supplies and Flux
Clean surfaces ensure proper solder flow, so having the right cleaning supplies is crucial. Isopropyl alcohol with a concentration of 90–99% ($5–$15 per bottle) is perfect for cleaning pads before and after soldering. It evaporates quickly without leaving residue, unlike lower concentrations, which can leave moisture or contaminants behind. Pair it with lint-free swabs or a small brush to remove flux residue, oxidation, and oils.
Flux is another essential item, available in liquid or pen form ($5–$15). It helps clean oxidation from copper pads and improves solder flow. Apply it sparingly using a brush or the pen tip before resoldering, and always clean off any excess with isopropyl alcohol afterward to prevent corrosion over time.
Choosing the Right Solder
For mechanical keyboard PCBs, 60/40 rosin-core solder (60% tin, 40% lead) is the go-to option. It melts at a relatively low temperature - about 370°F (188°C) - and flows smoothly, creating strong, shiny joints. The rosin core contains built-in flux, which cleans the surfaces as you solder, making it ideal for copper pads commonly found on keyboard PCBs. A 1–4 oz spool costs $8–$20 and will last through numerous repairs. While lead-free solder is better for the environment, it requires higher temperatures and is harder to work with - especially for beginners - making cold joints more likely if you're still mastering the technique.
sbb-itb-3cb9615
How to Repair Cold Solder Joints: Step-by-Step
5-Step Process to Repair Cold Solder Joints on Mechanical Keyboards
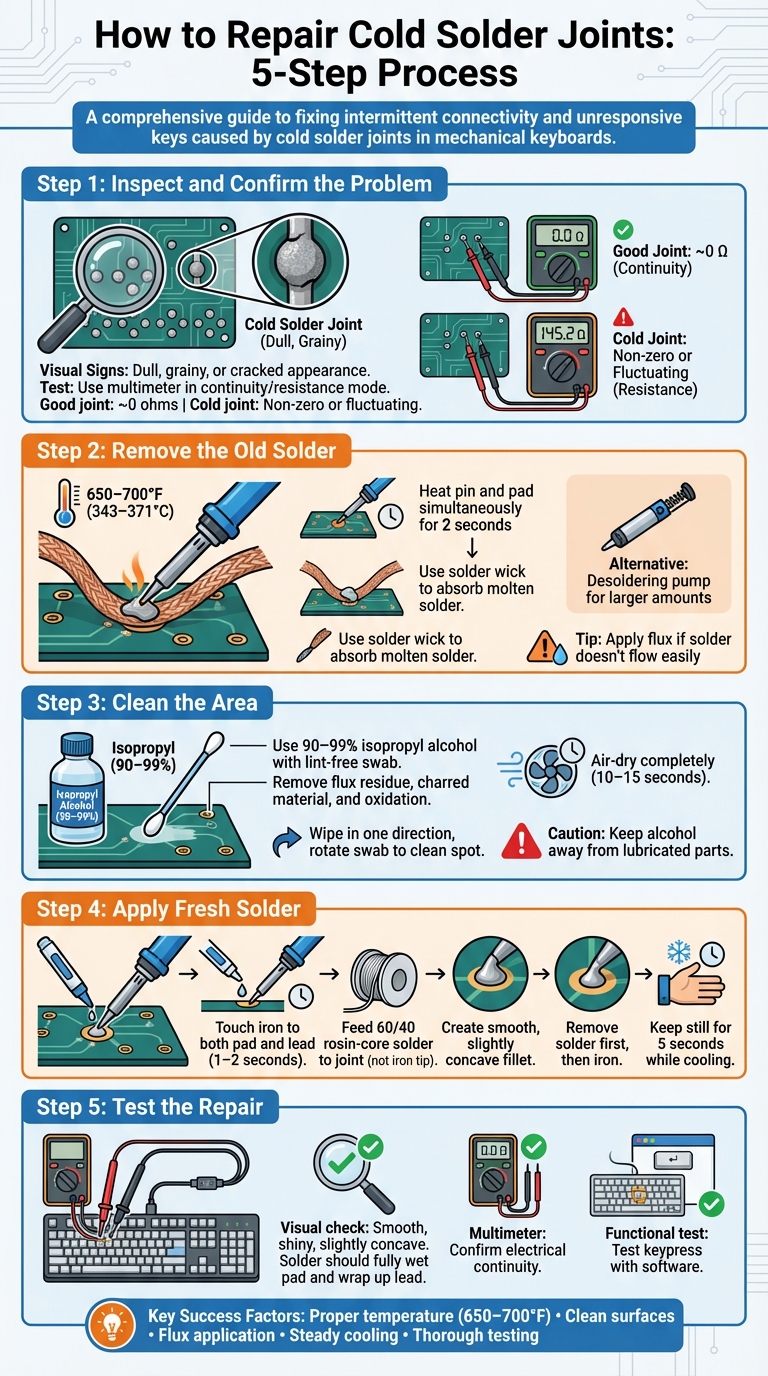
Step 1: Inspect and Confirm the Problem
Start by examining the solder joint under bright light. A cold joint often looks dull, grainy, or cracked, unlike the smooth and shiny appearance of a proper joint. You may also notice the solder doesn’t fully wrap around the switch pin or forms an irregular blob. To confirm the issue, use a multimeter in continuity or resistance mode. A good joint should show a reading close to zero ohms, while a cold joint will display a non-zero or fluctuating value. Once you’ve identified the faulty joint, it’s time to remove the old solder.
Step 2: Remove the Old Solder
Set up your workspace with proper ventilation and ensure it’s heat-resistant. Unplug your keyboard before proceeding. Heat your soldering iron to 650–700°F (343–371°C) and tin the tip for better heat transfer. Place the iron tip against the switch pin and pad simultaneously for about 2 seconds to melt the old solder. Then, use a solder wick to absorb the molten solder. If there’s a larger amount of solder, a desoldering pump can make the process quicker: heat the joint and press the pump button to suction the liquid solder. If the solder doesn’t flow easily, apply flux to clean oxidation and help release stubborn solder without risking damage from excessive heat.
Step 3: Clean the Area
After removing the old solder, clean the joint thoroughly. Use a lint-free swab dampened with 90–99% isopropyl alcohol to gently scrub the pad and switch pin. Wipe in one direction, rotating the swab to a clean spot to remove flux residue, charred material, and oxidation. For tougher residue, use a small ESD-safe brush with alcohol, but avoid applying too much pressure that might damage the copper pad or solder mask. Allow the area to air-dry completely, which usually takes around 10–15 seconds. Be cautious to keep alcohol away from lubricated parts like stabilizers or switch housings, as it can dissolve the lubricant. With the joint clean, you’re ready to apply fresh solder.
Step 4: Apply Fresh Solder
Apply a small amount of flux to the cleaned pad and pin. Position your soldering iron so it touches both the pad and the switch lead at the same time - this ensures even heating. After holding the iron in place for 1–2 seconds, feed 60/40 rosin-core solder into the joint from the opposite side where the pad meets the pin, rather than directly onto the iron tip. Add just enough solder to create a smooth, slightly concave fillet. Once done, remove the solder wire first, then the iron. Keep the board completely still for about 5 seconds while the solder cools. Moving the joint during this time can lead to cracks or a frosty appearance, indicating a disturbed joint.
Step 5: Test the Repair
Inspect the joint visually to ensure it’s smooth, shiny, and slightly concave, with the solder fully wetting the pad and wrapping slightly up the component lead. Use a multimeter to confirm electrical continuity. Finally, plug in your keyboard and test the repaired switch using keyboard testing software or a text editor to ensure the keypress registers correctly.
How to Prevent Cold Solder Joints
Once you’ve repaired your solder joints, the next step is ensuring they stay solid. Starting with the right techniques can go a long way in reducing the chances of cold solder joints in the future.
Proper Soldering Techniques
The most effective way to prevent cold solder joints is by using the correct soldering method right from the beginning. Set your temperature-controlled soldering iron to the appropriate range: 650–700°F (350–370°C) for leaded solder or 700–750°F (370–400°C) for lead-free solder. This range is about 15°C above the solder’s melting point, ensuring it flows properly. When soldering, make sure the iron touches both the PCB pad and the component pin simultaneously. Heat them evenly for 2–3 seconds before feeding the solder to the joint itself - not to the tip of the iron. This allows the solder to flow naturally around the lead, creating a smooth, shiny connection.
Before starting, apply a thin layer of flux to the pad and clean both the pads and component leads with isopropyl alcohol (90% or higher). This step is particularly important for older or reused PCBs, as oxidation can build up and interfere with the soldering process. These small but crucial steps help remove contaminants and oxidation, which are common culprits behind cold solder joints.
When finishing, always remove the solder wire before lifting the iron, and make sure the joint stays undisturbed while it cools. Even slight movement - whether from your hands, a shaky desk, or an unsecured component - can create microcracks, leaving the joint with a dull, grainy finish. To avoid this, use tools like a PCB holder, vise, or even the keyboard case itself to stabilize your board during soldering. By following these methods, you can achieve reliable, high-quality joints for your projects.
Maintaining Your Soldering Iron
Keeping your soldering iron in top condition is just as important as using the right technique. A clean, well-tinned tip ensures consistent heat transfer, which is critical for proper soldering. If the tip becomes dirty or oxidized, it may fail to deliver enough heat to melt the solder effectively, increasing the risk of cold joints. After every 5–10 joints, wipe the tip on a damp sponge or brass wool to remove burnt flux and oxidation. Then, apply a thin coat of fresh solder (a process called tinning) to protect the tip and maintain good thermal contact for future use.
Inspect your soldering tips regularly. If you notice heavy pitting, discoloration, or an uneven shape, it’s time to replace the tip. Worn-out tips can’t transfer heat evenly, making them more likely to cause cold solder joints. For those who build or repair custom mechanical keyboards frequently, investing in a high-quality temperature-controlled soldering station is a smart move. Tools like these, along with compatible accessories, provide the precision and consistency needed for reliable results.
If you’re buying second-hand keyboards, especially from platforms like KFA Marketplace, take a close look at the solder joints. Dull, lumpy, or cracked joints might indicate cold solder issues that should be reflowed before putting the keyboard into regular use. A little extra care with your tools and techniques can save you from unnecessary rework down the line.
Conclusion
Cold solder joints aren’t just minor imperfections - they can lead to unreliable connections, causing intermittent key failures or even total circuit breakdowns in your mechanical keyboard. By recognizing signs like dull, cracked, or uneven solder surfaces, testing for continuity with a multimeter, and using proper repair techniques, you can restore your keyboard’s performance and avoid the headaches of repeated troubleshooting.
When it comes to repairs, follow these key steps: remove the old solder, clean the joint with isopropyl alcohol, apply flux, and reheat the joint until it appears smooth and shiny, ensuring near-zero ohm resistance.
Keep your soldering iron at the right temperature - at least 15°C above your solder’s melting point - and make sure the tip stays clean and properly tinned after every 5–10 joints. Use high-quality flux, keep a steady hand while the joint cools, and take your time. These habits will help you avoid cold joints and create reliable, long-lasting connections.
Whether you’re building a custom keyboard from scratch or inspecting a pre-assembled one from KFA Marketplace, a quick visual check and continuity test can save you from future issues. By mastering these techniques, you’ll ensure your builds are dependable and frustration-free.
FAQs
What are the main reasons cold solder joints occur?
Cold solder joints occur when the solder doesn't melt and flow as it should during the soldering process. This often happens because the soldering iron isn't hot enough, the soldering surface is dirty or contaminated, or components are moved before the solder has completely cooled and solidified. To avoid this problem, make sure surfaces are clean, use the right technique, and apply enough heat for proper soldering.
How do I avoid cold solder joints when building a mechanical keyboard?
To prevent cold solder joints when assembling a mechanical keyboard, it's essential to master proper soldering techniques. Start by setting your soldering iron to the right temperature - typically between 650°F and 750°F. When soldering, evenly heat both the component lead and the pad before applying solder. Aim for a smooth and shiny connection, using just enough solder without overloading the joint.
Stability is key during the cooling process. Keep your workspace steady to avoid any movement that could weaken the connection. Using high-quality tools and components can further minimize potential issues. Take your time, and carefully inspect each solder joint as you go to ensure a strong and durable build.
What happens if I don’t fix cold solder joints on my keyboard?
Cold solder joints can lead to intermittent key issues or even cause your keyboard to fail entirely over time. Beyond that, these weak connections pose a risk of electrical shorts, which might harm other components on the board. If left unaddressed, they can also diminish the keyboard’s reliability and lifespan, potentially leading to more expensive repairs down the road.
To keep your keyboard functioning smoothly, it’s crucial to spot and fix cold solder joints promptly.