
Ultimate Guide to Keyboard Layers for Coding
[ Back to Mechanical Keyboards 101 ]Keyboard layers can transform your programming workflow. They allow a single key to perform multiple functions, depending on the active layer, reducing hand movement and improving efficiency. With tools like QMK firmware and VIA, you can remap keys to keep essential coding symbols and navigation functions within easy reach, even on compact keyboards. Here’s what you’ll learn:
- What are keyboard layers? Layers act like virtual stacks, where each key can have different functions based on the active layer.
-
Why use them for coding? Assign frequently used symbols (
{},[],=>) and navigation shortcuts (arrows,Home,End) to layers, keeping your hands on the home row. - How to configure layers? Use methods like Momentary (MO), Toggle (TG), or One-Shot (OSL) for layer activation. Tools like VIA make customization straightforward.
- Practical setups: Start with a base layer for typing, a symbols layer for punctuation, and a navigation layer for editing.
What Are Keyboard Layers?
Definition and Basic Functionality
Keyboard layers are a feature in keyboard firmware that allow a single key to perform multiple functions depending on the active layer. Picture layers as transparent sheets stacked on top of a base layer (Layer 0), which is always active and serves as the foundation.
When you press a key, the firmware starts from the topmost active layer and works its way down. If a key on the top layer is set to "transparent" (KC_TRNS), the firmware checks the layer below to find the key's assigned function. This stacking system makes layers incredibly versatile, enabling multiple uses for each key without physical modifications.
"Imagine you have a piece of paper with things written on it. Now, imagine you put two pieces of paper on top of it. You can read the top page, but you need to read something on the bottom page... This is exactly how layers work." – Robin Leinonen, ZSA Support Team
The idea of layers isn't new. In fact, the Shift key is one of the earliest examples of a keyboard layer. On typewriters, it physically shifted the strikers to access a secondary set of characters. This same principle now powers the flexibility of modern keyboard layers, particularly for coding and productivity.
Why Use Layers for Coding
Keyboard layers can significantly enhance coding workflows by reducing unnecessary hand movement. For example, assigning brackets, braces, and navigation keys to the home row means your fingers stay in place, improving both speed and comfort.
Layers are especially valuable for smaller keyboards, like 40% or 60% layouts, which lack keys such as the Numpad, function row, and dedicated arrow keys. With layers, you can still access all these functions, even on a compact keyboard, making it both portable and space-efficient.
The key difference between traditional and layered layouts lies in flexibility. A standard full-size keyboard assigns one function to each physical key, while layered layouts use toggles or combinations to achieve the same functionality with fewer keys. While it takes some time to learn, this approach offers a more ergonomic and customizable setup - an advantage many programmers find well worth the effort.
I Built My Own Keyboard Layout for Coding
Layer Switching Methods
Keyboard Layer Activation Methods Comparison: MO vs TG vs OSL
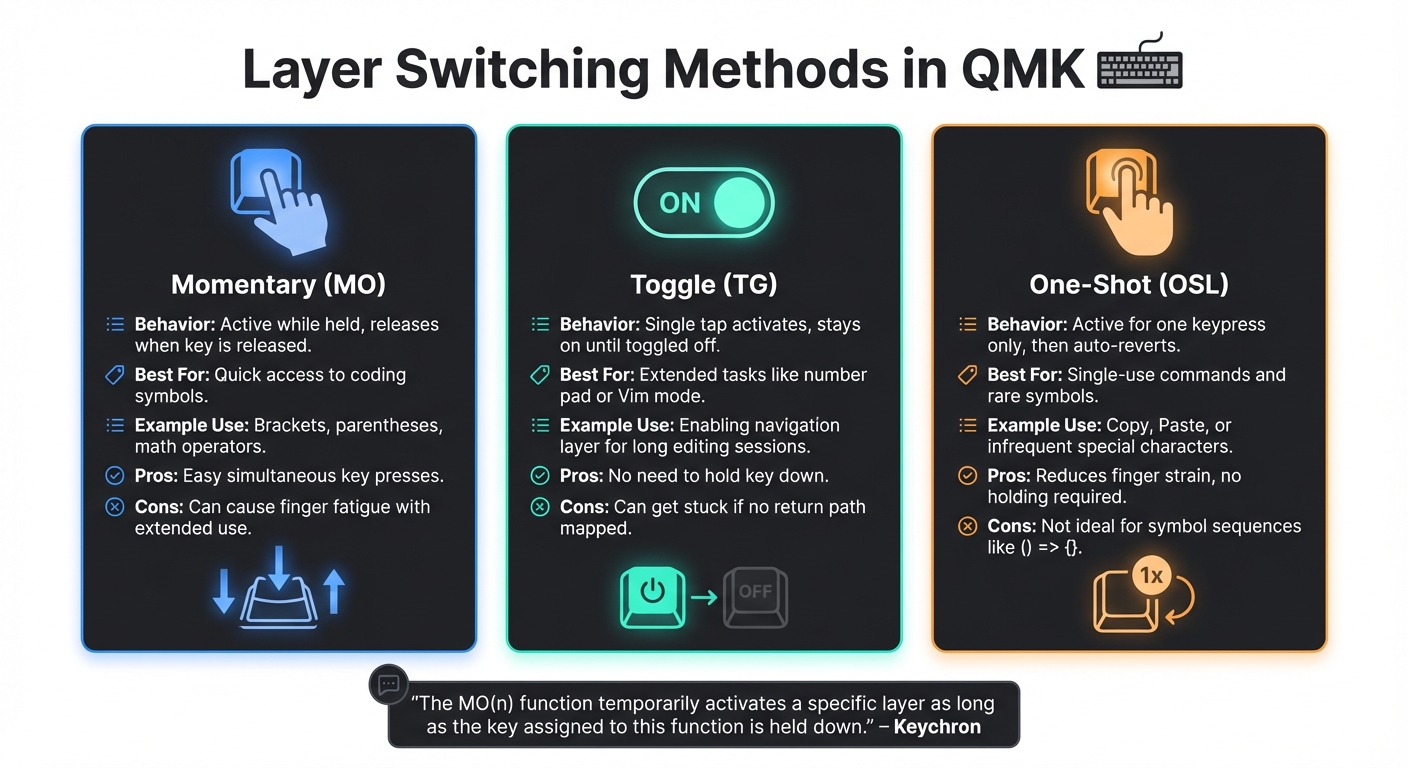
Knowing how to activate layers is just as crucial as deciding what to assign to them. QMK firmware offers several ways to switch between layers, with Momentary (MO), Toggle (TG), and One-Shot (OSL) being the most commonly used. These methods help you fine-tune your keyboard's functionality to suit your needs.
Momentary Layer Activation (MO)
Momentary activation works like the Shift key - it only stays active while you're holding it down, then reverts to the base layer when released. This method is particularly useful for quick access to coding symbols since it allows you to press multiple keys simultaneously with ease.
"The MO(n) function temporarily activates a specific layer as long as the key assigned to this function is held down. Once you release the key, the layer is immediately deactivated." – Keychron
For example, you can assign brackets, parentheses, or math operators to an MO layer, making them accessible without moving your fingers too far from the home row. The downside? If you're frequently holding the modifier key for long symbol sequences, it can lead to finger fatigue.
Toggle Layer (TG)
The Toggle method lets you switch a layer on or off with a single tap. Once activated, the layer stays active until you tap the toggle key again. This approach works well for tasks like enabling a number pad or activating a "Vim mode" layout.
With no need to hold the key, it's convenient for extended tasks. However, there's a catch - if you forget to map a way back to the base layer, you might find yourself stuck in the toggled layer, potentially requiring a keyboard reset.
One-Shot Layer (OSL)
One-Shot activation is designed for single-use commands. It activates a layer for just one keypress and then reverts to the previous layer. This is ideal for quick actions like "Copy" or "Paste", or for accessing a symbol you rarely use.
"OSL(n) is a 'one-shot' layer activation, meaning the layer stays active only for a single keypress or action. After you press any key while the layer is active, the keyboard returns to its previous state." – Keychron
One-Shot layers are great for reducing finger strain since you don't need to hold down a key while reaching for another. However, they're not ideal for typing sequences, like coding structures that require multiple symbols (e.g., () => {}). For one-off shortcuts or macros, though, it's an efficient option.
Layer Configurations for Coding
Now that we've covered activation methods, let's dive into practical setups that are particularly useful for programming. A well-designed layer system typically includes three key components: a base layer, a symbols layer, and a navigation layer.
Base Layer: Standard Typing
The base layer, often referred to as Layer 0, serves as the foundation of your keyboard layout. This is where your standard alphanumeric keys reside, whether you're using QWERTY, Colemak, Dvorak, or Workman. Every other layer builds upon this base, which remains active at all times.
While QWERTY is the most commonly used layout among programmers, alternatives like Colemak and Workman offer ergonomic advantages. For instance, Workman reduces lateral finger movement while keeping frequently used shortcuts, such as Undo (Ctrl + Z) and Copy (Ctrl + C), in familiar positions.
"The keyboard is arguably the most important tool in a programmer's arsenal." – HHKB
One popular modification among programmers is remapping the Caps Lock key to Control. This tweak minimizes the stretch required for shortcuts, keeping your hands closer to the home row and reducing strain during long coding sessions.
Symbols Layer: Coding Punctuation
The symbols layer is a game-changer for programmers. Instead of constantly reaching for the number row to type brackets, braces, and other punctuation marks, you can assign these essential characters to more accessible positions. By using momentary activation (MO), you can quickly toggle the symbols layer as needed.
For maximum efficiency, place frequently used coding symbols near the home row. Logical pairs like ( and ) or [ and ] should be mapped to adjacent keys for easy recall. If you work in languages that rely heavily on certain symbols - like semicolons in C++ or colons in Python - position these keys in ergonomic spots.
Transparent keys in the symbols layer inherit their base layer functions, so you can still type normally while the layer is active. Additionally, you can use Layer Tap (LT) to give keys dual functions. For example, the Space bar can act as a regular space when tapped but activate the symbols layer when held.
| Symbol Type | Common Keys | Recommended Position |
|---|---|---|
| Brackets |
( ), [ ], { }
|
Home row or adjacent keys |
| Operators |
+, -, *, /, =
|
Right-hand home row area |
| Special Characters |
!, @, #, %, &
|
Upper row, easily reachable |
| Punctuation |
;, :, ,, .
|
Near pinky or ring finger |
Navigation Layer: Editing and Movement
The navigation layer is designed to streamline editing by reducing hand movement. One popular approach is to map arrow keys to home row positions, such as H, J, K, and L.
"The default Voyager layout puts the arrow keys right on the home row where your fingers already are, so navigation can be very quick." – Robin Leinonen, ZSA Support Team
In addition to arrow keys, this layer can include commands like Home, End, Page Up, and Page Down, making it easier to navigate through lengthy source files. To simplify layer switching, assign the navigation layer activation to a thumb key using momentary activation (MO). This allows your thumb to handle layer changes while your fingers remain ready for movement.
You can also use Layer Tap (LT) for keys like Space or Enter. When tapped, these keys perform their standard functions, but when held, they activate the navigation layer. This setup is particularly helpful for word-by-word navigation using Ctrl + arrow keys.
While QMK firmware supports up to 32 layers, these three core layers - base, symbols, and navigation - are usually sufficient for most programming needs. The firmware prioritizes layers by scanning from the highest active layer downward, stopping at the first non-transparent key it encounters. This ensures smooth transitions between typing, symbols, and navigation modes.
Up next, we'll walk through configuring these layers on KeebsForAll keyboards using VIA.
sbb-itb-3cb9615
Setting Up Layers on KeebsForAll Keyboards

KeebsForAll's Freebird series - featuring the Freebird60, Freebird75, and Freebird TKL - comes with VIA firmware support, making it easy to configure layers. VIA provides a real-time, visual interface for remapping keys, with changes saved directly to your keyboard's onboard memory. This means your custom layouts will work on any computer you connect to, without needing extra software. It's a simple way to personalize your keyboard for any task.
Using VIA to Configure Layers
To get started, open usevia.app in Chrome or Edge and connect your Freebird keyboard via USB-C. VIA should automatically detect your keyboard. If it doesn’t, enable the 'Show Design tab' option and manually load the JSON keymap file from the product page on KeebsForAll’s website.
Once connected, navigate to the 'LAYERS' tab. Here, you can switch between Layers 0, 1, 2, and 3. VIA supports up to four layers. To assign a key for activating a particular layer, select a key on Layer 0 - like Caps Lock or Right Alt - and pick a function from the "Layers" tab. Use MO (Momentary) for temporary access to a layer, or TG (Toggle) for persistent modes like navigation. All changes are saved automatically.
"Programming turns a good keyboard into your perfect keyboard. Whether that means remapping two keys or building an elaborate four-layer system... the tools are accessible." – Mechalick Guides
For advanced setups, explore the 'Quantum' tab. For example, you can use Mod-Tap to make Caps Lock function as Escape when tapped and Control when held. Additionally, the "MACROS" tab lets you create shortcuts for repetitive tasks, such as inserting console.log() or boilerplate code. You can assign these macros to any key on a secondary layer.
Example Layer Assignments
Here’s an example setup: assign MO(1) to Right Alt for quick access to symbols. On Layer 1, you could map brackets and braces to the home row, then assign MO(2) to Right Ctrl for navigation keys. For instance, you can map arrow keys to H, J, K, and L. On compact boards like the Freebird60, map F1–F12 to the number row on Layer 1. Media controls, like volume up and down, can go on secondary layer keys such as F and G.
When your layout is ready, updating firmware is straightforward. To flash new firmware, enter DFU mode by holding Escape while plugging in the USB-C cable. The Freebird60 uses the atmega32u4 microcontroller, so ensure it's correctly selected in QMK Toolbox before flashing.
Best Practices for Coding Layers
Keep Layers Simple and Limited
Start with just two or three layers and only add more once you're comfortable. While QMK firmware supports up to 32 layers, most users stick to a straightforward setup - usually a base layer with one or two functional layers for symbols and navigation. This keeps things manageable and avoids unnecessary complications.
Think of your layers as a "tree" with Layer 0 as the root. This means that layer-switching keys should only point to higher-numbered layers. For instance, a key on your base layer might activate a secondary layer, but avoid placing keys on a secondary layer that loop back to an earlier one. This structure minimizes logic errors and prevents getting stuck in an unintended layer.
"If you are just getting started with QMK you will want to keep everything simple." – QMK Documentation
For coding, consider the frequency of characters. For example, the underscore (_) shows up in 1.369% of C/C++ code and 2.213% of Python code, making it a great candidate for easy access. Additionally, map common coding bigrams like !=, ->, and += to keys that are easy to reach, such as inward finger movements. These small tweaks can make your layers more intuitive and efficient.
Optimize Thumb Cluster Usage
Your thumbs are some of the most capable digits on your hands - far more so than your pinkies. Take advantage of this by assigning layer-switching functions to the thumb cluster. For example, use the LT(layer, kc) function to give your spacebar a dual purpose: tap it for a space, or hold it to activate a symbol or navigation layer. This allows your thumbs to handle layer switching while your other fingers focus on typing or hitting symbols.
"This is because you can put modifiers on the thumb cluster... this keymap removes the need for the top row, and the outer/pinky columns - the hardest to reach keys. If this works, it will be the basis of a smaller keyboard with less stretching." – tobywf, Software Engineer
If you're using a split keyboard, consider placing layer switches on both thumb clusters for a more balanced experience. Once you've made these adjustments, test your layout to ensure it improves your typing efficiency and comfort.
Test and Refine Your Setup
After setting up your layers, spend about a week testing each configuration before making further adjustments. Document your layout and practice until it feels natural. During this period, pay attention to any keys that require uncomfortable stretching - these are prime candidates for relocation.
If your keyboard supports RGB lighting, use it to indicate the active layer. This provides instant visual feedback and makes navigation easier. For less frequently used symbols, try One-Shot Layers (OSL). This feature allows you to activate a layer for a single keypress, automatically returning to the base layer afterward. It’s a great way to streamline access to symbols while reducing hand strain. Experiment with this method to see if it enhances your workflow for single-character inputs.
Conclusion
Keyboard layers can transform your coding experience by bringing every symbol, navigation key, and function closer to your fingertips. As Robin Leinonen from the ZSA Support Team explains, "Adjusting to layers can take some time and practice, but it's worth it". The benefits are clear: less hand movement, quicker edits, and a more natural typing position that keeps your fingers anchored on the home row.
One of the standout advantages of layers is how they enable even compact keyboards - like 40% or 60% layouts - to handle complex coding tasks with the same ease as full-sized boards. By assigning frequently used symbols and navigation keys to secondary layers, you can create a keyboard tailored to your workflow. Cansu Sener from KeebsForAll highlights this flexibility, saying, "This can be really powerful and it's how some people can be very adept at using even 40% sized keyboards".
If you're ready to dive into building a layer-optimized setup, KeebsForAll provides QMK and VIA-compatible keyboards such as the Freebird60 (starting at $160.00), Freebird75 (starting at $199.00), and Freebird TKL (starting at $249.99). These keyboards come with hot-swappable PCBs and pre-flashed firmware, making it easy to customize your layers using VIA right out of the box. To get started, create a base layer along with one or two functional layers for symbols and navigation. Test your layout for a week, tweak as needed, and fine-tune it until it feels just right. The goal is to design a setup that keeps your hands comfortable and your coding workflow seamless.
FAQs
How can keyboard layers make coding more efficient?
Keyboard layers let you assign coding shortcuts, macros, and context-specific commands to different virtual key layouts. This setup allows you to access your most-used functions while keeping your hands on the home row, cutting down on extra movement and boosting your workflow speed.
Customizing these layers means you can design a layout that fits your programming style perfectly. It streamlines repetitive tasks and helps you work more efficiently. Plus, many developers find that using layers not only keeps them focused but also encourages a more ergonomic typing posture.
What’s the best way to set up keyboard layers for coding?
Keyboard layers can transform a compact keyboard into a highly efficient tool for coding by allowing multiple layouts on the same set of keys. To make the most of this feature, it’s important to organize your layers thoughtfully. Start with a base layer for regular typing, then add layers for specific tasks like navigation, coding shortcuts, or media controls. Giving your layers clear names, such as _CODE or _NAV, can help keep things tidy and easy to manage.
When configuring your layers, take advantage of transparent keys (KC_TRNS) to let unused keys inherit functions from lower layers. Also, choose activation methods that align with your workflow. For instance, you can use MO for temporary access to a layer or LT for a tap-and-hold combination. To keep things simple and avoid overwhelm, stick to 3 to 5 layers - this range is usually enough for most coding needs.
Before making any changes, always back up your configuration to avoid losing your work. After flashing updates, test each layer thoroughly to ensure everything works as expected. Remember, your layout doesn’t have to be set in stone - tweak it over time to match your evolving coding habits. With a well-organized setup, layered keyboards can significantly streamline your workflow and make coding more efficient.
How do I customize keyboard layers using VIA?
To set up custom keyboard layers using VIA, start by ensuring your keyboard is running firmware that supports VIA. Once that's confirmed, open the VIA app - either the web or desktop version - and connect your keyboard. The app will automatically detect your device and display its current keymap.
Head over to the Layers tab in the app to manage your keyboard's layers. Choose a layer, then click on any key in the visual layout to assign it a function. This could be a keycode, a macro, or even a layer-switch command like MO(1) for temporary layer activation. To make the new layer accessible, you'll need to assign a layer-switch key within your base layer.
VIA saves any changes immediately, allowing you to test your setup right away using the Key Tester feature. Keep in mind that VIA supports up to four layers per keyboard, so plan your layout wisely. If you're looking for keyboards or accessories to enhance your experience, check out KeebsForAll for tailored options.