
Want to customize your keyboard's functionality without adding extra keys? QMK layers let you do just that. Layers are like virtual overlays that allow each key to perform differently based on the active layer. This feature is especially useful for compact keyboards, giving you access to functions like media controls, programming shortcuts, or gaming layouts without needing more physical keys.
Here’s what you need to know:
- Base Layer (Layer 0): Your standard typing layout, like QWERTY.
- Additional Layers: Add specialized layouts for media, gaming, or custom shortcuts.
- Activation Methods: Use keys to momentarily activate, toggle, or switch between layers.
-
Tools Required: QMK Configurator (web-based), QMK Toolbox (for flashing firmware), or manual edits to the
keymap.cfile. - Setup Process: Back up your keymap, organize layers, customize functions, compile firmware, and flash it to your keyboard.
Layers are easy to set up using the QMK Configurator or by directly editing the keymap.c file for advanced control. Whether you’re a beginner or an experienced user, this guide covers everything from creating layers to troubleshooting common issues.
Ready to transform your keyboard? Let’s dive in.
DIY Keyboard from Scratch - with QMK and ATmega32U4
Getting Ready
Before jumping into customizing layers for your QMK keymap, it's essential to have the right tools and a well-thought-out plan. A bit of preparation upfront can save you a lot of frustration and ensure your layers function exactly as you want.
Tools and Software You’ll Need
Start by setting up the necessary software and tools to create and manage your keymap.
- QMK Configurator: This drag-and-drop tool is perfect for designing layouts, creating layers, and previewing changes without any coding knowledge.
-
Text Editor: For those who prefer direct control, you’ll need a plain text editor to modify the
keymap.cfile. Options include Notepad++ (Windows), TextEdit (macOS), or more advanced editors like Visual Studio Code. -
QMK MSYS: Install this on Windows or macOS to access the QMK Command Line Interface (CLI) and required dependencies. The CLI is vital for tasks like compiling firmware (
qmk compile) and setting up your environment (qmk setup). - QMK Toolbox: Use this tool to flash your firmware and troubleshoot any issues that might arise.
Once these tools are ready, you'll have everything you need to start customizing your keyboard.
Backing Up Your Keymap
Before making any changes, always back up your current keymap. This step ensures you can revert to a working setup if something doesn’t go as planned.
- Export your keymap as a JSON file if you’re using the QMK Configurator.
-
Alternatively, copy your
keymap.cfile to a secure location and rename it with the current date for easy reference.
Having a backup will save you from unnecessary headaches if you need to troubleshoot or start over.
Organizing Your Layers
With your backup secure, you can approach layer organization with confidence and clarity.
- Base Layer (Layer 0): This should be your primary typing layout - whether it’s QWERTY, Dvorak, or another setup. Layer 0 acts as the foundation and is always active.
-
Specialized Layers: Assign distinct purposes to additional layers. For example:
- Use one layer for media controls.
- Dedicate another to gaming-specific keys.
- Reserve a layer for programming symbols or shortcuts.
When naming your layers in the code, go for meaningful labels like MEDIA, GAMING, or SYMBOLS instead of generic ones like LAYER1 or FN. Clear names make it easier to update and maintain your keymap down the road.
Planning Activation Methods
Decide how you’ll activate each layer before diving into the coding. You can choose from several methods:
- Momentary Activation: The layer stays active only while a specific key is held down.
- Toggle Activation: The layer remains active until you toggle it off.
- Complex Behaviors: For advanced users, you can define custom activation methods tailored to your needs.
Consistency in how you activate similar layers will make your keyboard more intuitive to use.
How to Add Layers Step by Step
Now that your tools are ready and your keymap is safely backed up, it’s time to dive into adding new layers to your keyboard. You can approach this in two ways: using the visual QMK Configurator or manually editing the keymap.c file. Both methods get the job done, but they differ in complexity and the level of control they offer.
Using QMK Configurator for Adding Layers
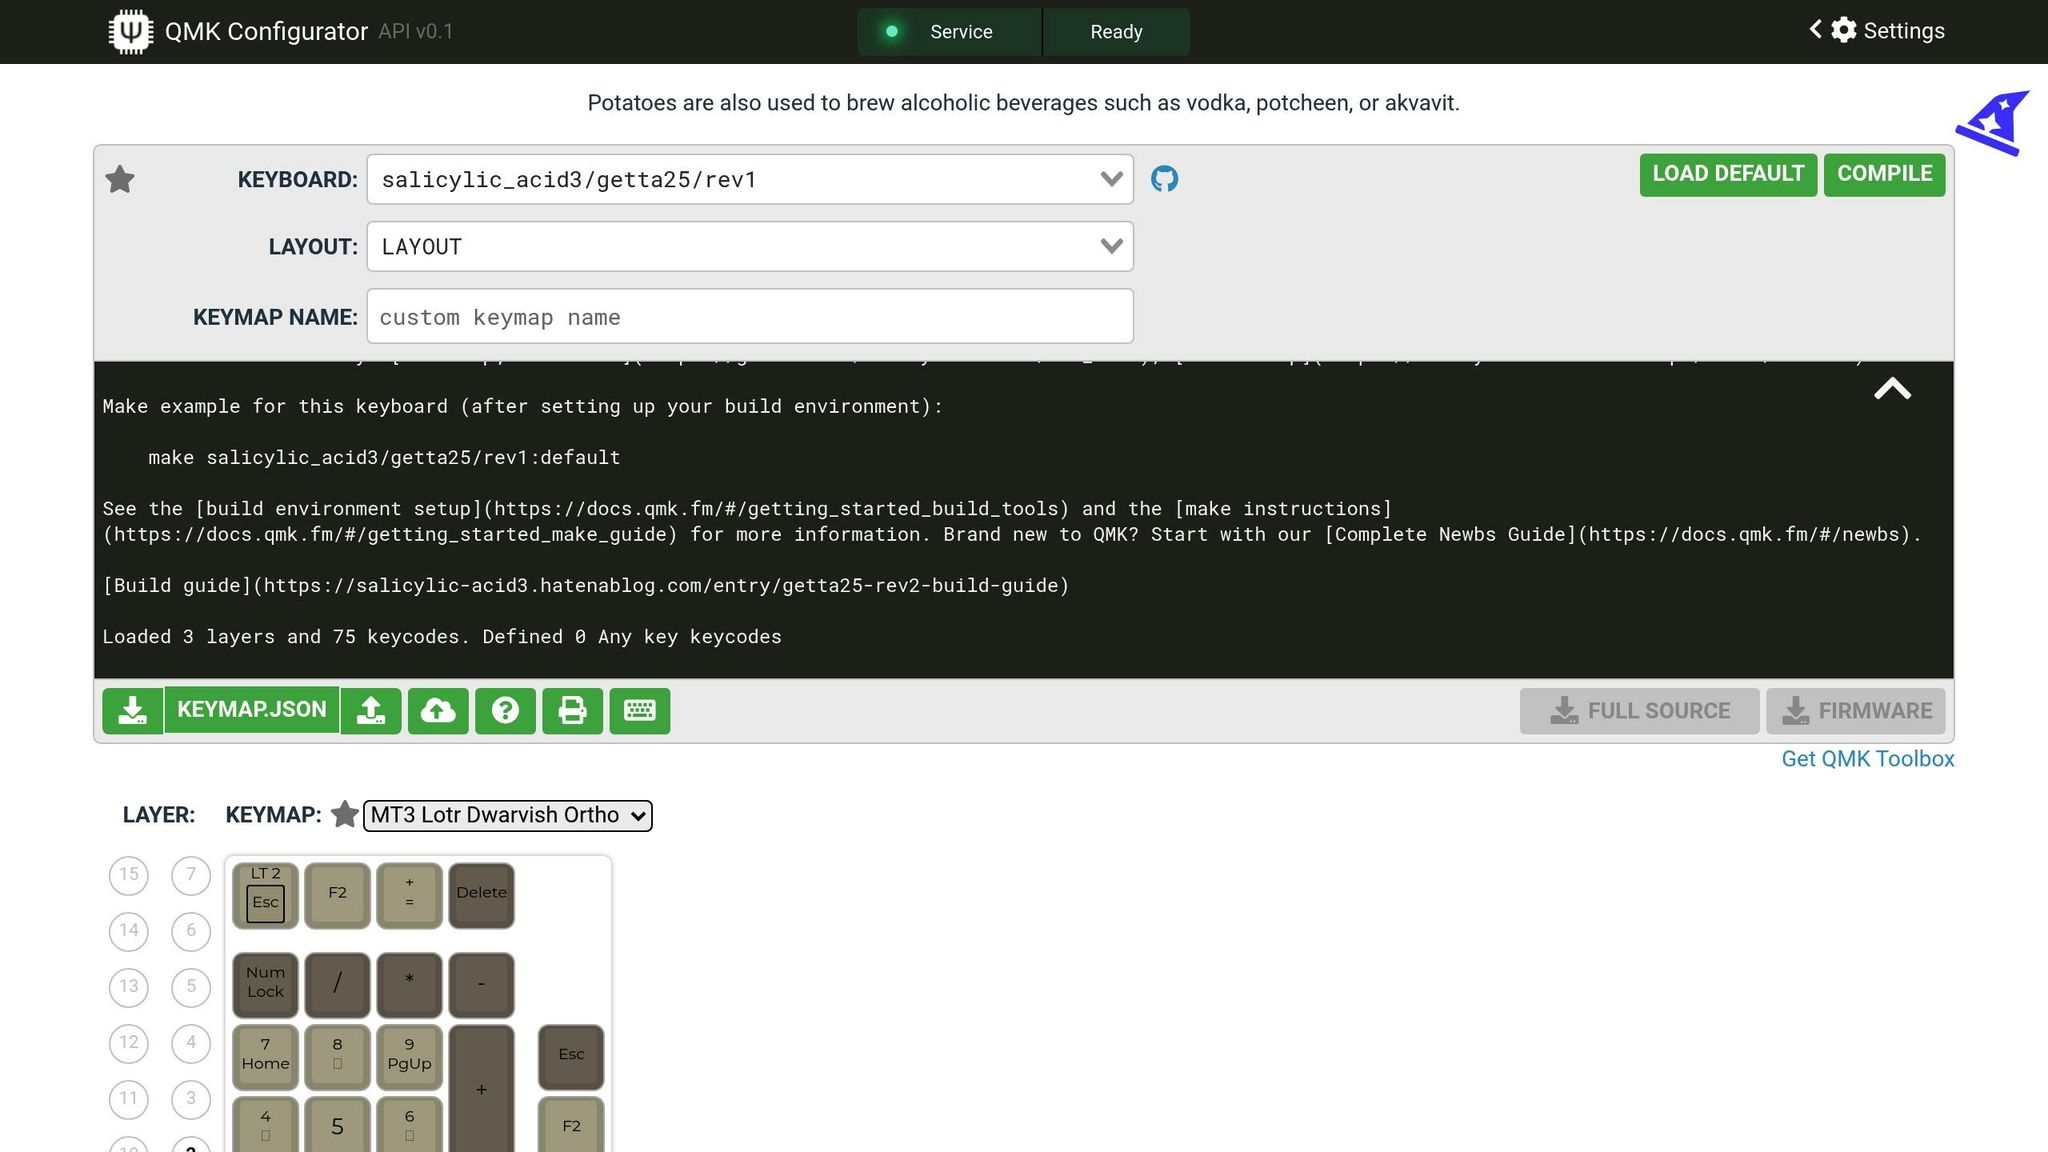
The QMK Configurator is a user-friendly, web-based tool, perfect for anyone new to QMK customization. It allows you to design your keymap visually without writing a single line of code.
- Head over to the QMK Configurator website and select your keyboard model from the dropdown menu. This will display a visual layout of your keyboard.
- At the top of the interface, you'll find the layer selector. By default, you’ll see Layer 0, which is your base layer. To add a new layer, click the "+" button to create a new layer tab.
-
Click on the new layer tab to start customizing it. The layer will initially appear empty or filled with transparent keys (
KC_TRNS), which allow keypresses to fall back to lower layers. - Use the panel on the right to assign functions to your keys. Drag and drop keycodes from categories like Basic, Media, Layer, and Special onto the desired spots in the layout.
- Once you’re done, name your keymap and click "Compile" to generate your firmware. The Configurator will create a .hex or .bin file, ready for flashing.
If you’re looking for more customization options, you can manually edit the keymap.c file instead.
Manually Editing the keymap.c File
For those who want maximum control, editing the keymap.c file directly is the way to go. This method allows you to implement advanced features and fine-tune your keymap.
-
Locate the
keymap.cfile in your QMK installation directory. The typical file path is:qmk_firmware/keyboards/[your_keyboard]/keymaps/[your_keymap]/keymap.c -
Open the file in a text editor. Look for the keymaps array, which is defined as:
This array contains all your layers, with each layer represented as a two-dimensional array of keycodes.const uint16_t PROGMEM keymaps[][MATRIX_ROWS][MATRIX_COLS] -
To add a new layer, define it within the array. QMK supports up to 32 layers (indexed from 0 to 31). Higher-numbered layers take priority when multiple layers are active.
Here’s an example of a two-layer keymap:
const uint16_t PROGMEM keymaps[][MATRIX_ROWS][MATRIX_COLS] = { [0] = LAYOUT( KC_Q, KC_W, KC_E, KC_R, KC_T, KC_Y, KC_U, KC_I, KC_O, KC_P, KC_A, KC_S, KC_D, KC_F, KC_G, KC_H, KC_J, KC_K, KC_L, KC_SCLN, KC_Z, KC_X, KC_C, KC_V, KC_B, KC_N, KC_M, KC_COMM, KC_DOT, MO(1) ), [1] = LAYOUT( KC_1, KC_2, KC_3, KC_4, KC_5, KC_6, KC_7, KC_8, KC_9, KC_0, KC_F1, KC_F2, KC_F3, KC_F4, KC_F5, KC_F6, KC_F7, KC_F8, KC_F9, KC_F10, _______, _______, _______, _______, _______, _______, _______, _______, _______, _______ ) }; -
When adding a new layer, use
KC_TRNS(or its shorthand_______) where you want keypresses to pass through to lower layers. -
Define your layer activation keys. For example:
-
MO(1)provides momentary access to Layer 1. -
TG(1)toggles Layer 1 on or off. -
LT(1, KC_SPACE)assigns dual functionality to a key (e.g., Space on tap, Layer 1 on hold).
-
-
Save your changes and compile your firmware locally to check for errors. Open your terminal, navigate to the QMK directory, and run:
qmk compile -kb [your_keyboard] -km [your_keymap]
Flashing the Updated Firmware
Once your new layers are ready, the final step is to flash the updated firmware to your keyboard.
- Open QMK Toolbox and load the compiled firmware file by clicking "Open" and selecting the .hex or .bin file.
- Put your keyboard into bootloader mode. The method varies by keyboard model but often involves pressing a reset button on the PCB, using a key combination (e.g., Fn + Esc), or activating a programmed reset keycode. Check your keyboard’s documentation for details.
- When your keyboard is in bootloader mode, QMK Toolbox will detect it and display connection details. Click the "Flash" button to upload your firmware.
- Avoid disconnecting your keyboard or closing QMK Toolbox during the flashing process. Interrupting it could make your keyboard unresponsive.
- Once the flashing is complete, test your new layers to ensure everything works as expected. If something isn’t right, you can always reflash your backup keymap to restore the previous setup.
sbb-itb-3cb9615
How to Switch Between Layers
Once you've flashed your new layers, the next step is learning how to switch between them. QMK offers several methods for activating layers, each catering to different needs and workflows. The method you choose can have a big impact on your typing efficiency and overall productivity. Let’s dive into the key activation methods QMK provides.
Methods for Layer Activation
QMK gives you a variety of ways to activate layers, allowing you to access different key layouts in a way that works best for you:
-
Momentary activation (
MO(n)): Press and hold the key to activate the layer, then release to return to the previous layer. This is perfect for temporary access to symbols, function keys, or media controls. -
Toggle activation (
TG(n)): Press the key once to turn the layer on and press it again to turn it off. This is a great option for layers you want to keep active for longer periods, like gaming or number pad layouts. -
Layer tap (
LT(n, KC_KEY)): Tap for the key’s normal function, or hold it to activate a layer. For example,LT(1, KC_SPACE)outputs a space when tapped but switches to Layer 1 when held. -
Default layer switching (
DF(n)): Permanently sets a new base layer until you change it again or restart your keyboard. This is handy for switching between layouts like QWERTY and Colemak or for activating specialized setups. -
One-shot layers (
OSL(n)): Temporarily activates a layer for a single keypress. After you press a key on that layer, it automatically deactivates.
Once you’ve chosen your preferred activation method, understanding how layers interact is the next step.
Understanding Layer Stack Behavior
QMK uses a stacking system for layers, meaning multiple layers can be active at the same time. The firmware supports up to 32 layers (numbered 0 to 31), and higher-numbered layers take priority over lower ones. Here’s how it works: when you press a key, QMK scans the active layers, starting from the highest and working down, and processes the first non-transparent key it finds.
This stacking behavior is especially important when multiple layers are active. For example, if Layers 0, 1, and 2 are all active, and a key position is assigned KC_F1 on Layer 2, KC_EXCL on Layer 1, and KC_Q on Layer 0, QMK will output KC_F1 since Layer 2 has the highest priority.
Transparent keys play a key role here. When a key is set to KC_TRNS (or _______), it lets the keypress "fall through" to the next active layer below. This allows you to override specific keys on higher layers while keeping the rest of your base layer intact.
The layer stack updates dynamically. For instance, when you release a momentary layer key, that layer is removed from the stack, and QMK recalculates the active key priorities.
Avoiding Common Pitfalls
Here are a few challenges to watch out for when working with QMK layers:
- Getting stuck on a layer: This is a common frustration for new users. Make sure every layer includes a way to return to Layer 0, whether through a dedicated key, a toggle function, or simply releasing the momentary activation key.
- Conflicting layer activations: If multiple layers use the same physical key for activation, it can lead to unpredictable behavior. Plan your layer activation keys carefully and test all combinations.
- Overusing transparent keys: While transparent keys are useful, too many of them can make it hard to predict which layer will handle a keypress. Be deliberate about where and when you use transparency.
- Function key overlap: If different layers assign overlapping functions (e.g., media controls on Layer 1 and function keys on Layer 2), activating both layers at once can block access to the intended keys. Pay attention to how your layers stack.
-
Reset key access: Always ensure you can access the reset function (
QK_BOOTorRESET) from at least one layer. Ideally, this should be tied to a key combination that’s unlikely to be pressed accidentally.
Thorough testing is crucial to make sure your layer setup works as expected. Spend time experimenting with your configuration to avoid surprises!
Troubleshooting and Advanced Tips
Once your layers are set up, you might encounter some hiccups that require troubleshooting or advanced adjustments to fine-tune your configuration. Most problems have straightforward fixes, and once you're comfortable with the basics, there are plenty of ways to push your setup further.
Common Issues and Solutions
Compilation Errors
These are often caused by small syntax mistakes - missing commas, mismatched brackets, or typos. Carefully check the error message, which usually points to the exact issue.
Unresponsive or Misbehaving Keys
If a key doesn't work or behaves unpredictably, you can enable debug output to track the issue. Add the following to your rules.mk file:
CONSOLE_ENABLE = yes
Then, insert this code into your keymap.c:
void keyboard_post_init_user(void) {
  debug_enable = true;
  debug_matrix = true;
}
With debug mode active, tools like QMK Toolbox, the qmk console command, or hid_listen will show you real-time feedback. This helps you see active layers and the keycodes being processed. For more detailed debugging, include print.h at the top of keymap.c and use functions like print("Layer 2 activated") or uprintf("Current layer: %d", layer) to monitor layer activity.
Key Conflicts
If keys don't work as expected, check whether higher layers are unintentionally overriding lower ones.
Memory Limits
Too many layers or complex macros can exceed your keyboard's flash memory. When this happens, simplify your setup by reducing the number of layers or removing unused features in your rules.mk file.
Advanced Layer Techniques
Once you're comfortable with the basics, try these advanced techniques to customize your keyboard for specific tasks or workflows.
-
Multiple Base Layers: Use different base layers for different scenarios, like QWERTY for general use, Colemak for ergonomic typing, or a gaming layout. The
DF(n)function allows you to switch between these base layers permanently. - Conditional Layer Activation: Activate a layer only when specific conditions are met, such as holding two keys simultaneously. This is a clever way to access rarely-used functions without sacrificing key space.
- Layer Tap Combinations: Assign dual functions to a key based on how long it's pressed. For instance, a space bar could output a space when tapped, activate a symbol layer when held briefly, or switch to a number pad layer when held longer.
- Custom Macros Within Layers: Automate repetitive tasks by creating macros that type text, switch layers, send media commands, or execute complex actions. This is especially useful for programming or creative workflows.
- Dynamic Layer Switching: Advanced users can implement setups that switch layers based on context, like the active application, time of day, or external sensor input. This adds a layer of intelligence to your keyboard.
Pros and Cons of Layer Activation Methods
Here’s a quick comparison of layer activation methods to help you decide which works best for your needs:
| Activation Method | Advantages | Disadvantages | Best Use Cases |
|---|---|---|---|
| Momentary (MO) | Activates only while held, ensuring it reverts to the base layer immediately | Requires constant holding, which can cause finger fatigue | Temporary access to function keys, symbols, or media controls |
| Toggle (TG) | Stays active without needing to hold, reducing strain for extended use | Easy to lose track of the active layer, leading to confusion | Gaming layouts, dedicated number pads, or alternative typing layouts |
| Layer Tap (LT) | Combines dual functions for efficient key use | Timing can be tricky and may lead to accidental activations | Space bar for symbols, modifiers, or frequently used secondary functions |
| Default Layer (DF) | Permanently switches to a new base layer | No quick way to revert to the previous layer; requires a dedicated key for switching | Switching between QWERTY and Colemak layouts, or work vs. gaming setups |
| One-Shot (OSL) | Automatically deactivates after a single keypress, reducing cognitive load | Limited to one keypress; not ideal for sequences | Quick access to symbols, capital letters, or occasional function keys |
Finding Your Perfect Setup
The best way to refine your layers is through testing and iteration. Start with a simple setup and gradually add complexity as you get more comfortable with how layers interact. Ultimately, your ideal configuration will depend on your workflow, typing habits, and the specific keyboard you're using.
Conclusion
Expanding your QMK keymap with layers opens up a world of possibilities for customizing your mechanical keyboard. By defining layers, assigning keycodes, and flashing updated firmware - whether through the QMK Configurator or by editing the keymap.c file - you can tailor your keyboard to suit your exact needs. This process not only enhances your keyboard's capabilities but also helps you develop a deeper understanding of QMK.
Start with simple layers and gradually explore more complex features as you become familiar with how they interact. Whether you use momentary layers, toggles, or layer taps, each method offers unique benefits for different workflows. Experimentation is key to discovering the setup that works best for you.
Once you're comfortable managing basic layers, you can dive into advanced techniques like conditional layer activation or creating custom macros. These tools allow you to push your keyboard's functionality far beyond its physical key count. With layers, you're not just customizing your keyboard - you’re transforming it into a tool that fits your workflow like a glove.
FAQs
What are the benefits of using QMK layers on compact keyboards?
When working with a compact keyboard, QMK layers offer an incredible way to expand its functionality without increasing its physical size. By assigning multiple functions to a single key, layers essentially transform your keyboard into a multi-purpose tool, all while keeping it sleek and space-saving.
This setup is perfect for creating personalized key mappings, setting up macros, or even designing alternative layouts that suit your workflow. With just a quick layer switch, you can seamlessly access these features, making compact keyboards not only practical but also highly adaptable for daily tasks or more specific needs.
Why aren’t my new QMK layers working, and how can I fix them?
If your new QMK layers aren’t functioning as expected, the issue often lies in incorrect key assignments or conflicts within the keymap. Start by checking that layer-switching keys like MO, LT, or TT are correctly set up and positioned. Also, make sure no other keys are interfering with their functionality.
If the problem continues, consider resetting the EEPROM using the QMK HID command-line tool. This can be especially helpful if you’ve recently updated the firmware or made changes to your hardware. Another good step is to thoroughly review your keymap for missing or overlapping layer keys. These adjustments usually resolve most layer-related issues.
Can I use QMK layers to create custom layouts for specific tasks or applications?
QMK layers are an excellent way to design custom keyboard layouts that fit specific tasks or applications. Think of layers as virtual overlays - each one can change how your keys behave, letting you toggle between setups for different activities like gaming, coding, or video editing.
This setup allows you to assign unique key functions or shortcuts, making your workflow smoother and more efficient. With some configuration, you can create layouts tailored to your needs, transforming your keyboard into a tool that works perfectly for you.