![[Pre-Order] Autumn Leaves PBT Keycaps - KeebsForAll](http://keebsforall.com/cdn/shop/products/DSC09732.jpg?v=1676148273)


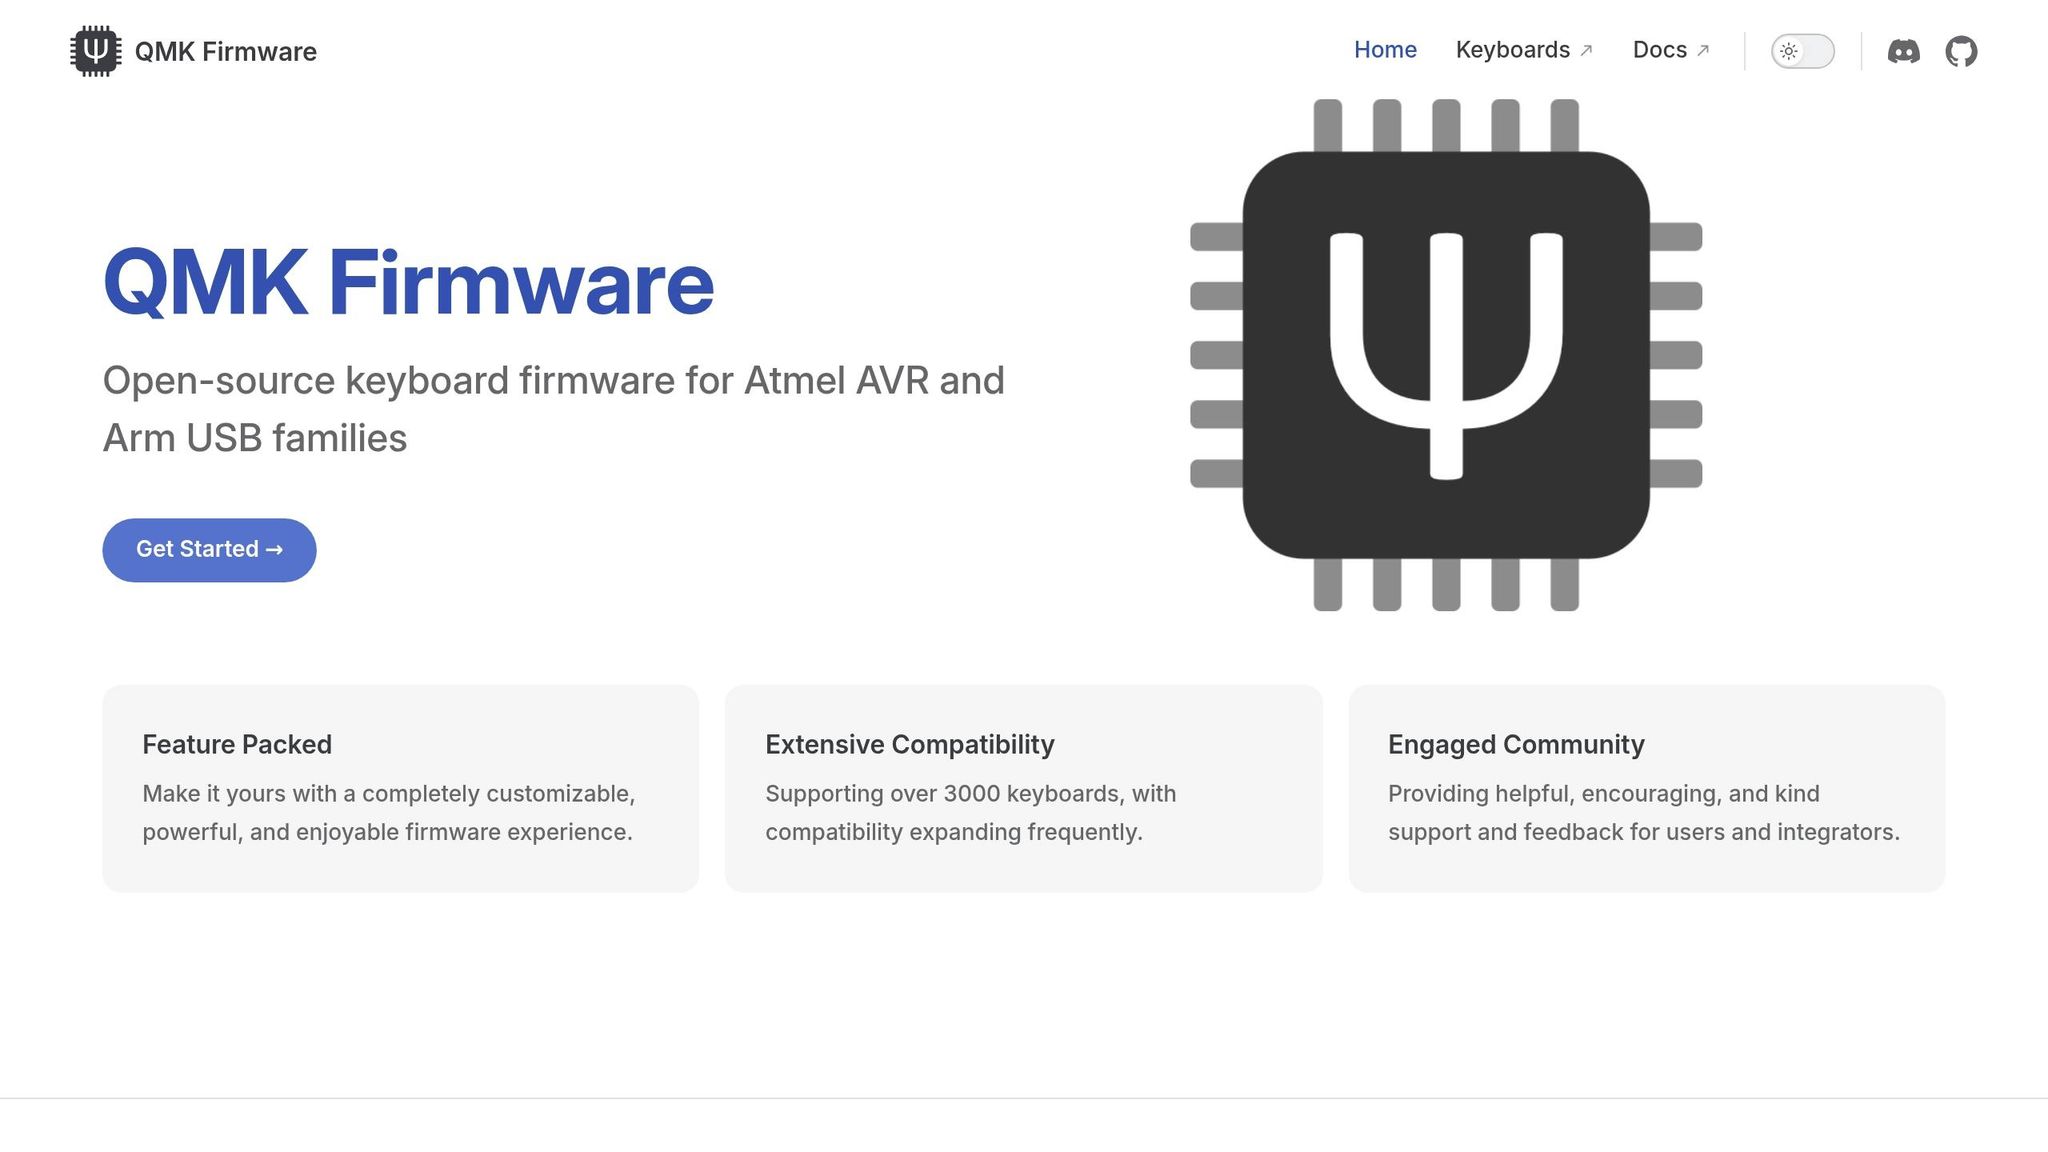
QMK Firmware is an open-source software that lets you customize your mechanical keyboard to fit your needs. It supports remapping keys, creating macros, adding layers, and controlling hardware features like RGB lighting. Whether you’re a beginner or an advanced user, QMK provides tools like the browser-based Configurator for easy setup or manual coding for deeper customization.
Key facts:
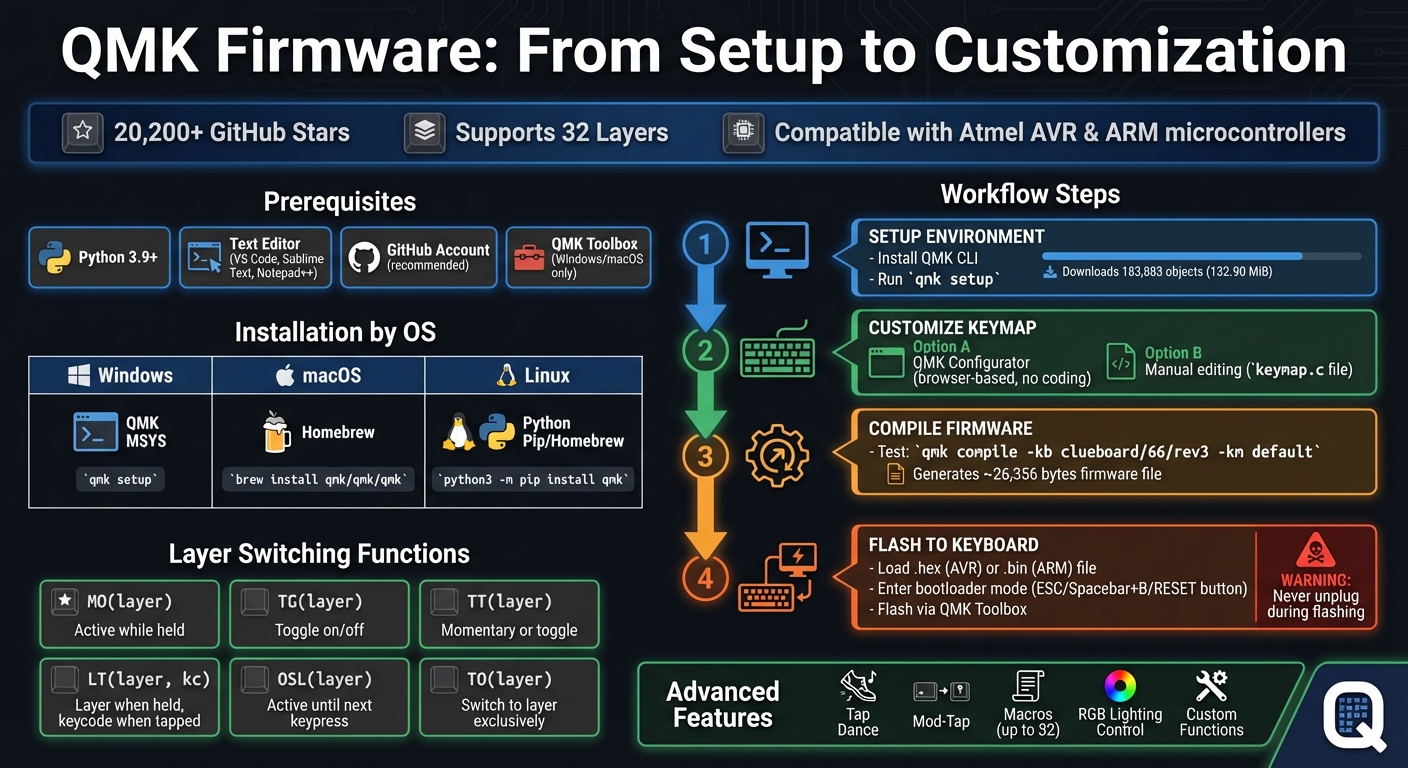
- Over 20,200 stars on GitHub as of March 2026.
- Supports Atmel AVR and ARM microcontrollers.
- Allows up to 32 layers for complex layouts.
- Features include Tap Dance, Mod-Tap, and Macros.
- Works with tools like QMK Toolbox for firmware flashing.
To get started, set up your environment by installing Python 3.9+, a text editor, and QMK CLI or Toolbox. From there, you can create, compile, and flash firmware tailored to your keyboard model. This guide also covers advanced features like layer switching and custom functions, ensuring your keyboard operates exactly how you want.
QMK Firmware Setup and Customization Workflow Guide
Getting Started with QMK Firmware
To make the most of QMK's customization features, you'll first need to set up your build environment. This involves installing the necessary tools to compile and flash firmware. The setup process varies slightly depending on your operating system, but QMK has made it relatively straightforward.
Prerequisites for Installing QMK
The starting point for QMK customization is Python 3.9 or greater - this is essential since the QMK CLI won't work without it. You'll also need a plain text editor like VS Code, Sublime Text, or Notepad++. Any editor that supports .c files will do the job.
For managing your custom keymaps and version control, a GitHub account is highly recommended. While not mandatory for basic use, having an account allows you to fork the QMK repository and run qmk setup <github_username>/qmk_firmware. This approach ensures you have your own copy of the repository, making it easier to contribute layouts to the community or sync configurations across devices.
For Windows and macOS users, QMK Toolbox is a helpful graphical tool that simplifies firmware flashing and offers debugging features. However, it's not available for Linux. As the documentation states, "The Toolbox is currently only available for Windows and macOS. If you're using Linux... flash the firmware from the command line". Linux users will need to rely entirely on command-line tools, which will be covered later.
| Operating System | Recommended Build Environment | Primary Installation Command |
|---|---|---|
| Windows | QMK MSYS |
qmk setup (run in QMK MSYS terminal) |
| macOS | Homebrew | brew install qmk/qmk/qmk |
| Linux | Python Pip / Homebrew | python3 -m pip install qmk |
Once you've met these prerequisites, you can move on to installing the build environment for your operating system.
Installing the QMK Build Environment
When the prerequisites are in place, you're ready to set up the build environment and start compiling firmware. Windows users should download the latest QMK MSYS installer from MSYS.QMK.FM. This package includes MSYS2, the QMK CLI, Git, and all necessary dependencies in one installer. After installation, open the QMK MSYS terminal (look for the blue icon) and run qmk setup. This command clones the qmk_firmware repository - expect it to download over 183,883 objects totaling around 132.90 MiB - and configures your environment automatically.
For macOS and Linux users, the setup process is simpler with Homebrew. On macOS, run brew install qmk/qmk/qmk in Terminal, followed by qmk setup. Linux users can use Homebrew, uv tool install qmk, or python3 -m pip install qmk, depending on their package manager.
Once the setup is complete, test your installation by compiling a sample firmware. Run qmk compile -kb clueboard/66/rev3 -km default. If the build succeeds, it will generate a firmware file (approximately 26,356 bytes for this keyboard model), confirming that your environment is ready. To save time in the future, set some defaults with qmk config user.keyboard=<keyboard_name> and qmk config user.keymap=<username>. This will eliminate the need to repeatedly specify these details.
sbb-itb-3cb9615
Customizing Your Keyboard with QMK
Now that your build environment is ready, it’s time to make your keyboard truly your own by customizing its functionality.
Using the QMK Configurator
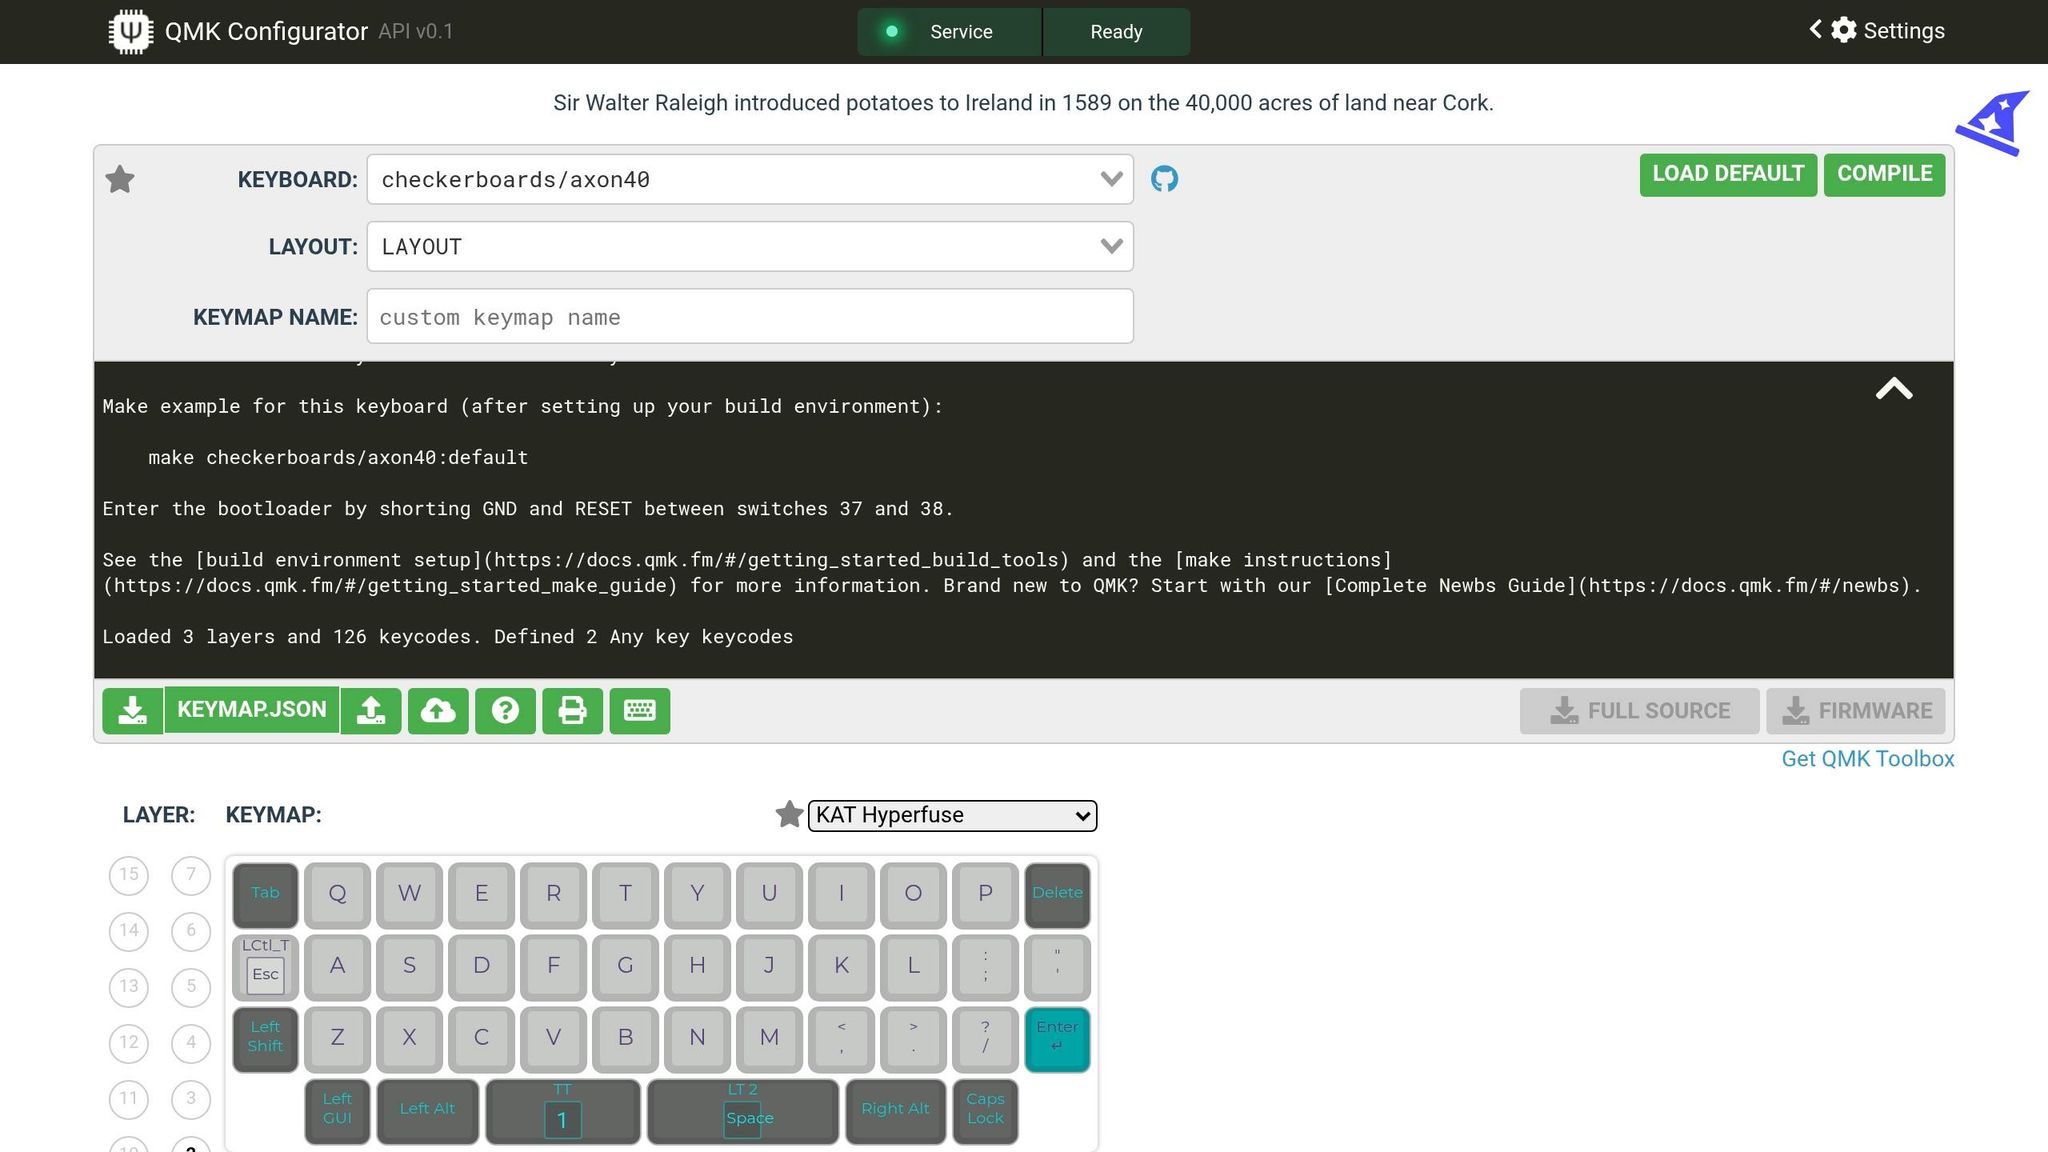
The QMK Configurator is a browser-based tool that makes customization straightforward, even if you have zero coding experience. To get started, select your Qwertykeys keyboard or other model from the dropdown menu. Be sure to pick the exact version to avoid issues during flashing. If you don’t see your specific layout, go with LAYOUT_all as a backup option.
You can assign key functions in three simple ways:
- Drag and drop keycodes from the palette.
- Click on a layout spot to choose a keycode.
- Press the corresponding physical key on your keyboard.
Hover over any keycode to see a brief description of its function. If your layout includes more spots than your keyboard has keys, leave the extra spaces blank. Once you’re satisfied with your setup, download the configuration as a QMK Keymap JSON File to save your work for future tweaks. Then, hit "Compile" to generate the firmware. When it’s ready, click "Download Firmware" to get the file needed for flashing. Keep in mind that JSON files from other tools like kbfirmware.com won’t work with the QMK Configurator.
Editing Keymaps Manually
If you’re looking for more control than the Configurator offers, manually editing your keymap is the way to go. Start by running qmk new-keymap, which will create a file at qmk_firmware/keyboards/<keyboard>/keymaps/<username>/keymap.c. Open this file in a text editor to begin customizing.
Inside, you’ll find a keymaps[] structure that defines your keyboard layers. Use enum layer_names to assign descriptive names like _BASE or _FN to your layers. Then, modify the LAYOUT() macro to map keycodes to your keyboard’s physical keys. For transparency, use _______ (equivalent to KC_TRNS), and for unused keys, use XXXXXXX (equivalent to KC_NO).
It’s a good idea to compile your keymap frequently to catch errors early. Watch out for misplaced commas in your array - small mistakes can cause compilation to fail. If your changes don’t seem to work after flashing, VIA settings stored in EEPROM might be overriding your keymap. In this case, use a bootmagic key or QMK Toolbox to clear the EEPROM. For added convenience, you can define custom aliases like #define ALT_TAB LALT(KC_TAB), allowing you to use shorthand (ALT_TAB) in place of the full syntax.
Advanced QMK Features
QMK isn’t just about basic key mapping - it also supports advanced features like layer switching and macros.
Layer Switching:
QMK offers several ways to switch between layers:
-
MO(layer): Activates a layer only while the key is held. -
TG(layer): Toggles a layer on or off with a tap. -
TT(layer): Acts momentarily when held, but toggles on/off with multiple taps. -
LT(layer, kc): Activates a layer when held, but sends a keycode when tapped. -
OSL(layer): Keeps a layer active until the next keypress. -
TO(layer): Deactivates all other layers and switches to the target layer.
Always set Layer 0 as your base layer (e.g., QWERTY or Dvorak), as it’s the default and will be blocked if placed above other layers. For momentary layer switching, make sure the destination layer’s corresponding key is set to transparent (KC_TRNS) to avoid getting stuck.
Macros:
Macros let you perform a sequence of keystrokes with a single press. You can define up to 32 macros in a keymap.json file for use with the Configurator. For more complex logic, use the SEND_STRING() function in keymap.c. Additionally, the process_record_user function can handle conditional actions or timed sequences. Be cautious, though - don’t store sensitive information like passwords in macros, as they’re saved in plain text.
For a visual touch, you can use the layer_state_set_user callback to adjust your keyboard’s RGB lighting based on the active layer. This provides instant feedback on which layer is currently in use.
| Layer Function | Behavior |
|---|---|
MO(layer) |
Active only while held |
TG(layer) |
Toggles on with a tap, toggles off with another tap |
TT(layer) |
Acts as momentary when held; toggles with multiple taps |
LT(layer, kc) |
Activates a layer when held; sends a keycode when tapped |
OSL(layer) |
Remains active until the next keypress |
TO(layer) |
Deactivates all other layers and activates the target layer |
Flashing Firmware to Your Keyboard
After compiling your firmware, the final step is transferring it to your keyboard. This process, called flashing, writes the updated software directly to your keyboard's microcontroller.
Using QMK Toolbox
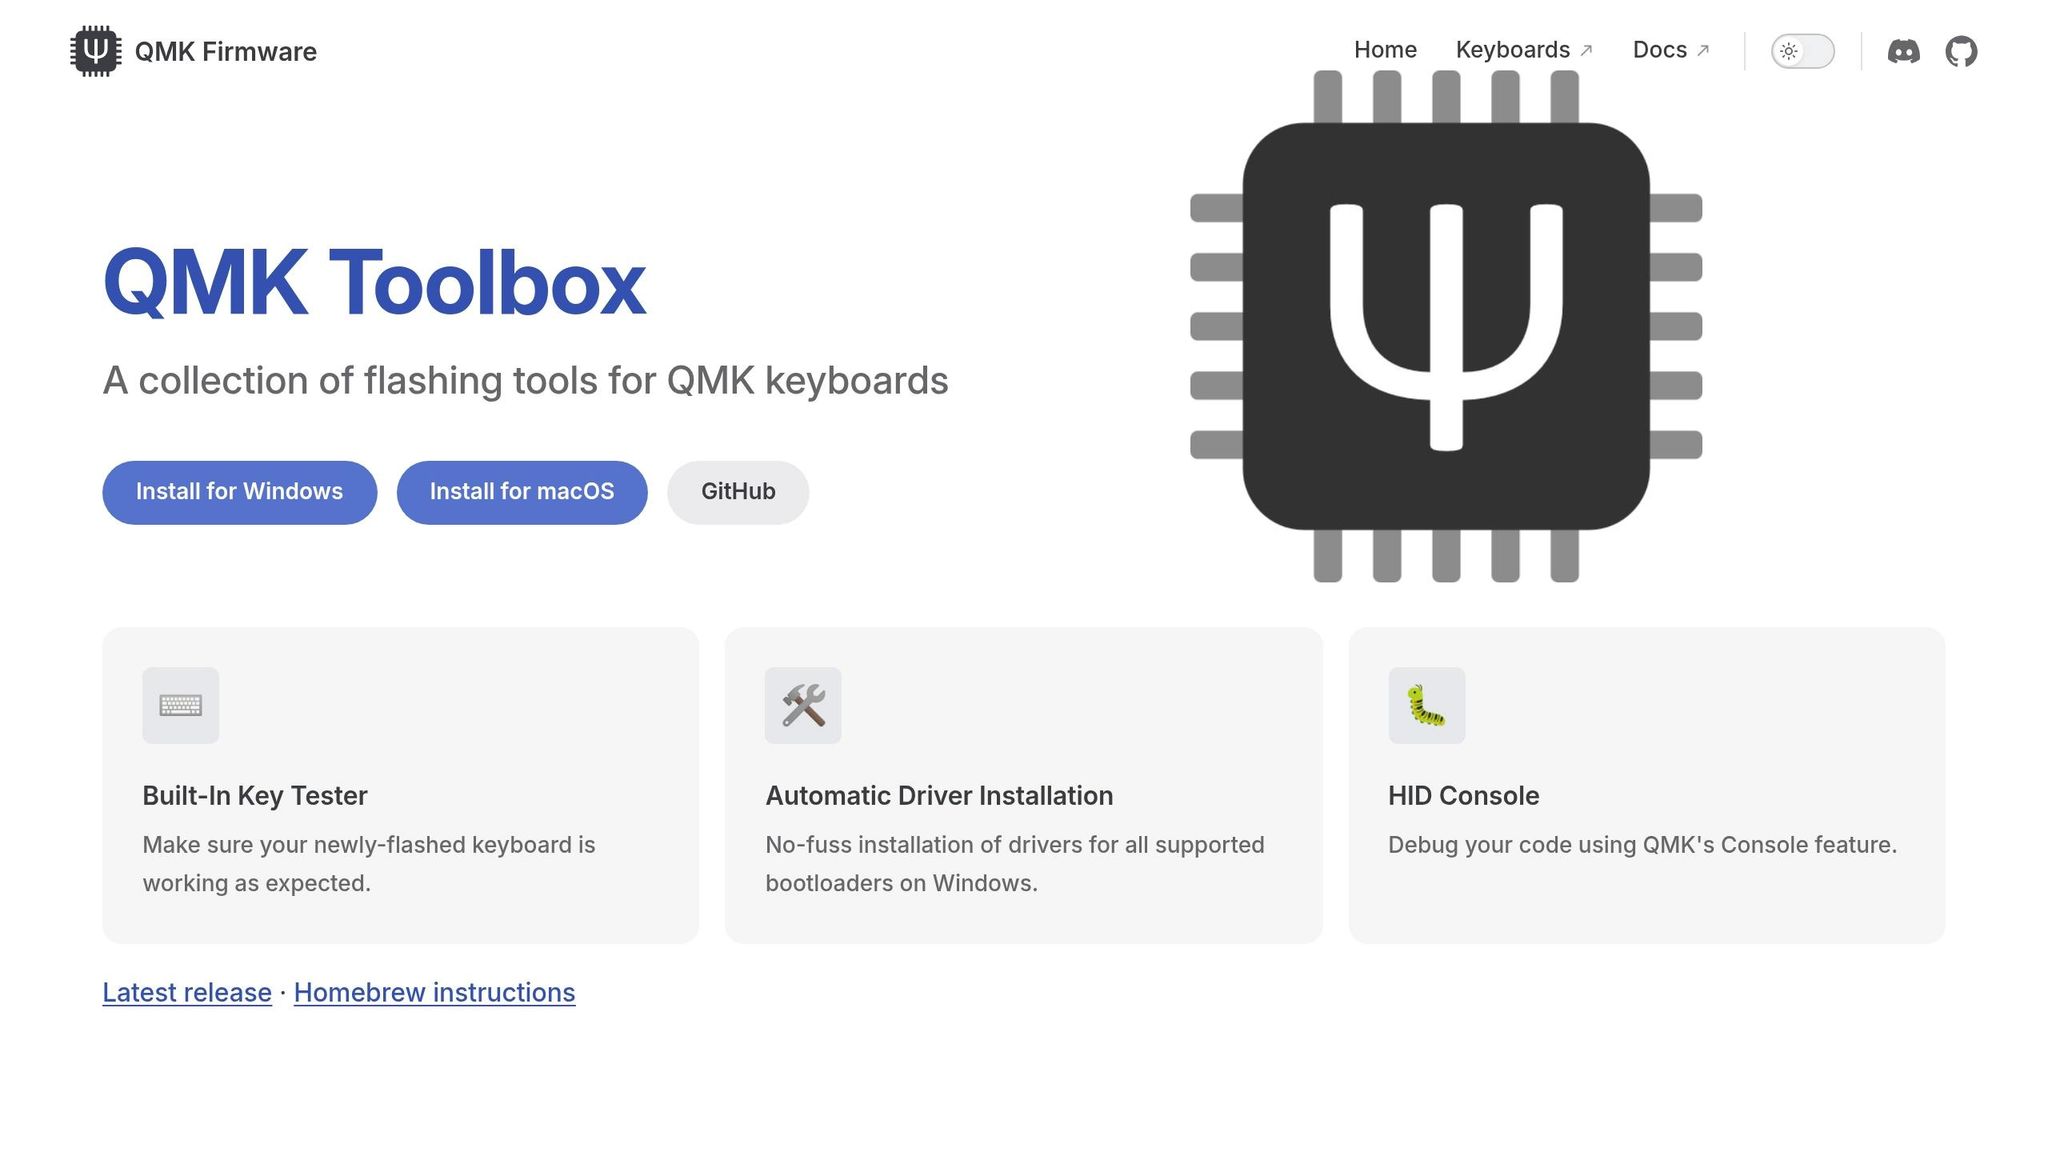
QMK Toolbox is a user-friendly application for Windows and macOS that makes flashing straightforward for most keyboards. It supports various firmware formats - primarily .hex files for AVR-based chips and .bin files for ARM-based chips like STM32. Before getting started, you'll need to install the necessary drivers. On Windows, go to Tools > Install Drivers to ensure your computer can communicate with the keyboard when it’s in bootloader mode.
Once the drivers are installed, load your firmware file into QMK Toolbox. You can do this by selecting "Open" or simply dragging and dropping the file into the application. Next, put your keyboard into bootloader mode. This can usually be done in one of the following ways:
- Pressing a physical RESET button on the PCB
- Holding Spacebar + B while plugging in the USB cable
- Holding the Esc key while connecting the USB cable (this applies to the Freebird series)
When the keyboard enters bootloader mode, QMK Toolbox will show yellow text stating, "*** DFU device connected", confirming it’s ready to be flashed. If the "Flash" button is still grayed out, double-check that the keyboard is in bootloader mode and that the drivers are correctly installed. Once everything is set, click "Flash" and wait for the console to confirm the process is complete.
"It is very important that you do not unplug the keyboard or otherwise interrupt the flashing process while the firmware is being written." - QMK Documentation
After flashing is successful, unplug the USB cable and reconnect it to activate your new keymap. If your keyboard becomes unresponsive during this process, you can force it into bootloader mode by shorting the RESET and GND pins on the PCB with a metal object (like a paperclip) while plugging it in. Always ensure the firmware you’re using is specifically designed for your PCB model - using incompatible firmware can permanently damage your keyboard.
QMK and KeebsForAll Keyboards
KeebsForAll’s Freebird series - featuring the Freebird60, Freebird75, and Freebird TKL - offers full compatibility with QMK and VIA. These keyboards are designed with hot-swappable PCBs and USB-C connectivity, making firmware customization a breeze without the need for soldering. As part of the QMK ecosystem, these models allow you to take complete control over your keyboard's functionality. The Freebird60, in particular, is powered by the atmega32u4 microcontroller, which integrates seamlessly with QMK. Below, we’ll walk you through how to tweak your Freebird layout using QMK and share some accessory recommendations to elevate your setup.
Customizing the Freebird Series
Although Freebird keyboards are ready to go right out of the box, their firmware can be customized through QMK for a more tailored experience. To get started, head to the QMK Configurator and search for your specific model, such as "keebsforall/freebird60", in the keyboard field. The Freebird60 supports multiple layouts, including a standard 60% configuration and an arrow key variant, identified as "LAYOUT_all" in the configurator. In January 2021, KeebsForAll released a detailed guide to help users switch between these layouts, ensuring that all units are pre-flashed for immediate use - perfect for those new to mechanical keyboards.
"On the Freebird60... you can put it into DFU mode by holding down the ESC key while plugging in the USB-C into the PCB socket." - Cansu Sener, KeebsForAll
For firmware updates or layout changes, use QMK Toolbox. After compiling your customized .hex file, load it into QMK Toolbox and select atmega32u4 as the microcontroller. To enter bootloader mode on the Freebird60, hold the ESC key while connecting the USB-C cable. Once QMK Toolbox confirms "DFU device connected", click Flash and wait for the process to complete. If you encounter issues, refer to earlier sections for instructions on forced DFU mode.
Recommended Accessories from KeebsForAll
Enhancing your Freebird keyboard doesn’t stop at firmware. Pairing it with high-quality accessories can make a noticeable difference in your typing experience. Here are some top recommendations:
- Krytox 205 g0 Lubricant ($7.95): Ideal for smoothing out switches and stabilizers, this lubricant is a must-have for a more refined typing feel.
- KFA Switch Opener ($19.00): This tool simplifies the process of modifying hot-swap switches, whether you’re testing new switch types or applying lubricant.
These accessories complement the hot-swap design of the Freebird series, letting you experiment and fine-tune your keyboard without making permanent changes.
Conclusion
QMK firmware transforms your keyboard into a highly customizable tool. Whether you're remapping keys quickly with the Configurator or diving into the source code to implement advanced features like Tap Dance and custom macros, QMK offers something for everyone. Its open-source nature ensures a wealth of community support and resources.
Key Takeaways
QMK is designed to cater to users of all skill levels. If you're a beginner, the Configurator allows you to remap keys effortlessly without touching code. For those who like to tinker, editing keymap.c files opens up the possibility of creating intricate layer systems and custom functions. Features like One Shot Modifiers help eliminate common typing mistakes (like "THe" instead of "The"), while Magic Keycodes let you make on-the-fly changes, such as swapping Ctrl and Caps Lock or disabling the GUI key, all without reflashing your firmware. The expanded keycode library even supports Unicode characters and OS-specific functions, offering far more options than standard firmware.
What truly sets QMK apart is its community-driven model. Instead of isolated repositories, QMK promotes sharing keymaps through a centralized system. This collaborative environment fosters knowledge exchange, benefiting all users. Additionally, its support for various microcontrollers, like the atmega32u4 used in KeebsForAll's Freebird60, ensures your keyboard can grow and adapt to your needs.
Armed with these insights, you're ready to take the next steps in customizing your keyboard experience.
Next Steps
Begin by downloading your current layout as a QMK Keymap JSON file from the Configurator. If you're feeling adventurous, set up a local build environment to explore QMK's powerful 32-layer system and custom C functions.
KeebsForAll's Freebird series serves as an excellent starting point for your QMK journey. With hot-swappable PCBs and full QMK compatibility, you can easily flash firmware, experiment with layouts, and fine-tune your setup - no soldering required. Pair your Freebird keyboard with top-notch accessories like Krytox 205 g0 lubricant and a KFA Switch Opener to craft a truly personalized typing experience that goes far beyond what stock keyboards can offer.
FAQs
Will QMK work with my keyboard?
QMK firmware works with many custom mechanical keyboards, particularly those built by hobbyists or as DIY projects. However, compatibility hinges on your keyboard's hardware and microcontroller.
Keyboards that use a microcontroller listed in QMK's supported hardware guidelines are typically good to go. On the other hand, if your keyboard has an unsupported microcontroller or a unique design, it might require extra modifications to work with QMK.
To confirm if your keyboard is compatible, check the microcontroller it uses and make sure it aligns with QMK's hardware requirements.
Can I use QMK without coding?
Yes, you absolutely can! The QMK Configurator is a visual, user-friendly tool designed for those who want to customize their keyboard without diving into code. It allows you to create custom keymaps with just a few clicks.
With the Configurator, you can:
- Select your keyboard model.
- Choose from various layouts.
- Define and customize your keymaps.
While more advanced tweaks might require some coding skills, the Configurator is perfect for handling the basics and getting your keyboard set up just the way you like it.
How do I recover if flashing fails?
If flashing doesn't work, the first step is to place your keyboard into DFU (bootloader) mode. The method to do this depends on your keyboard model. Common approaches include holding specific key combinations (like both Shift keys and Pause) or unplugging the keyboard and reconnecting it while holding Spacebar and B.
If you're still encountering problems - especially with keyboards using STM32 or RP2-B1 chips - refer to the instructions for your PCB or reach out to the QMK Discord community for guidance. Be sure not to interrupt the flashing process, as this can lead to errors.


Leave a comment
This site is protected by hCaptcha and the hCaptcha Privacy Policy and Terms of Service apply.