
If your keyboard's larger keys - like the spacebar or Enter - feel uneven or make rattling noises, stabilizer mods can fix these issues. Stabilizers are mechanisms that keep larger keys steady and level, but most come poorly tuned from the factory. This guide covers three simple mods to improve stabilizers: lubing (to reduce noise and friction), clipping (to improve key feel), and the band-aid mod (to soften impacts). You’ll need tools like a screwdriver, keycap puller, and lubricants like Krytox 205g0 or dielectric grease. These mods are beginner-friendly, cost under $30, and can make a big difference in how your keyboard sounds and feels.
How Stabilizers Work
What Stabilizers Do
Stabilizers are essential for keeping larger keys - like the spacebar, Enter, Shift, and Backspace - steady and level. They work by distributing pressure evenly across the key, even if you press it off-center. For example, a Cherry-style stabilizer uses two housings, inserts, and a connecting metal wire. When you press one side of a large key, the wire ensures the pressure is evenly transferred to the other side. This keeps the key moving straight down, preventing it from tilting or feeling uneven. Without stabilizers, large keys would wobble, feel rough, and create an annoying rattling noise. Pressing the edge of a spacebar, for instance, could lead to inconsistent key activation and increased wear due to sideways force. By linking both sides of the key with a sturdy wire, stabilizers ensure smoother, more predictable key presses and a better typing experience.
Understanding how stabilizers work sets the stage for exploring their different types and how they impact your keyboard's performance.
Stabilizer Types
Stabilizers come in a few main types, depending on how they attach to your keyboard:
- Plate-mounted stabilizers: These clip directly into the metal plate of the keyboard rather than the PCB (printed circuit board). They’re common in prebuilt and budget keyboards, easy to install, but can be noisier and less stable since they rely on plate clips for attachment.
- PCB-mounted stabilizers: These fit into cutouts on the PCB itself, secured by friction or clips. They generally offer a more stable and secure fit, resulting in better performance - though they require a PCB designed to accommodate them.
- Screw-in stabilizers: A premium version of PCB-mounted stabilizers, these use screws and nuts to secure the housing to the PCB. They reduce movement, making them less prone to wobbling or rattling. Many keyboard enthusiasts prefer these for their stability and ease of tuning.
- Costar stabilizers: These use wire clips that snap into the keycaps and mount separately on the plate, unlike Cherry-style stabilizers. You’ll mostly find these on older or OEM keyboards. They’re harder to modify and have a snappier, louder feel, which some users enjoy.
For those building or upgrading keyboards in the U.S., stores like KeebsForAll offer a wide selection of stabilizers and other mechanical keyboard components.
How They Affect Sound And Feel
The type and quality of stabilizers play a big role in how your keyboard sounds and feels. Poorly installed or loose stabilizers can produce a rattling noise - a shaky, loose sound - or ticking, a sharp metallic click caused by the wire hitting the housing. Plate-mounted stabilizers, especially on budget keyboards, are more prone to these issues since they can flex within the plate and often come without lubrication or with unevenly applied lube.
On the other hand, PCB-mounted and screw-in stabilizers generally provide a more stable and solid feel. When properly lubricated, they deliver a deeper, more satisfying "thock" sound and reduce lateral movement. Costar stabilizers, while louder and snappier, appeal to some users - especially gamers - though they may not be ideal in quieter environments like offices or homes. Even budget stabilizers can perform well with proper tuning and lubrication, transforming them into smoother, quieter components.
Tools And Materials You'll Need
Required Tools
Before diving into your keyboard modding project, make sure you have the right tools on hand. You'll need a Phillips screwdriver (#0 or #00), a keycap puller, and a switch puller (for hot-swappable keyboards) to access under-mounted stabilizers. Add tweezers or needle-nose pliers and flush cutters or sharp nail clippers for more precise tasks.
For lubing, grab Krytox 205g0 (starting at $7.95) for stabilizer housings and stems, and dielectric grease (around $5–$10 at hardware stores) for stabilizer wires. A small, fine paintbrush (size 0–2) ensures you can apply the lube neatly without overdoing it. If you're planning the band-aid mod, you'll need fabric band-aids (cloth type) or thin cloth tape, along with scissors to cut them to size. Stores like KeebsForAll carry all these essentials.
Once you've gathered your tools, it's time to set up your workspace.
Setting Up Your Workspace
Start by unplugging your keyboard. This step is crucial for safety and prevents accidental keypresses. Choose a clean, flat surface for your work. To protect your keyboard case and keep small components from rolling away, lay down a soft mat, towel, or large mousepad. Use small containers or a magnetic tray to organize screws, wires, and housings. If this is your first time opening a keyboard, consider taking photos at each step to make reassembly easier.
After prepping your workspace, it's a good idea to test your keyboard's current performance.
Testing Before You Start
Before making any changes, test how your keyboard sounds and feels. Focus on the larger keys - like the spacebar, Enter, Shift, and Backspace - and press them at different points (edges and center). Listen for rattling (a loose, metallic noise) or ticking (a sharp click), and check for wobbling. Take note of the keys that perform the worst so you can prioritize them during the modding process. This initial test will help you compare the before-and-after results, giving you a clear picture of how much your efforts improve your keyboard.
Stabilizer Modding & Lubing for Beginners
sbb-itb-3cb9615
How To Mod Your Stabilizers
3-Step Keyboard Stabilizer Modding Process Guide
If you’re aiming to get rid of noise and friction in your keyboard stabilizers, there are three key mods you should try. Start by removing the stabilizers from your PCB or plate. For screw-ins, unscrew them carefully, and for plate-mounted stabilizers, unclip them. Keep the parts organized - labeling them can help avoid mix-ups. Then, tackle each mod step by step for the best results.
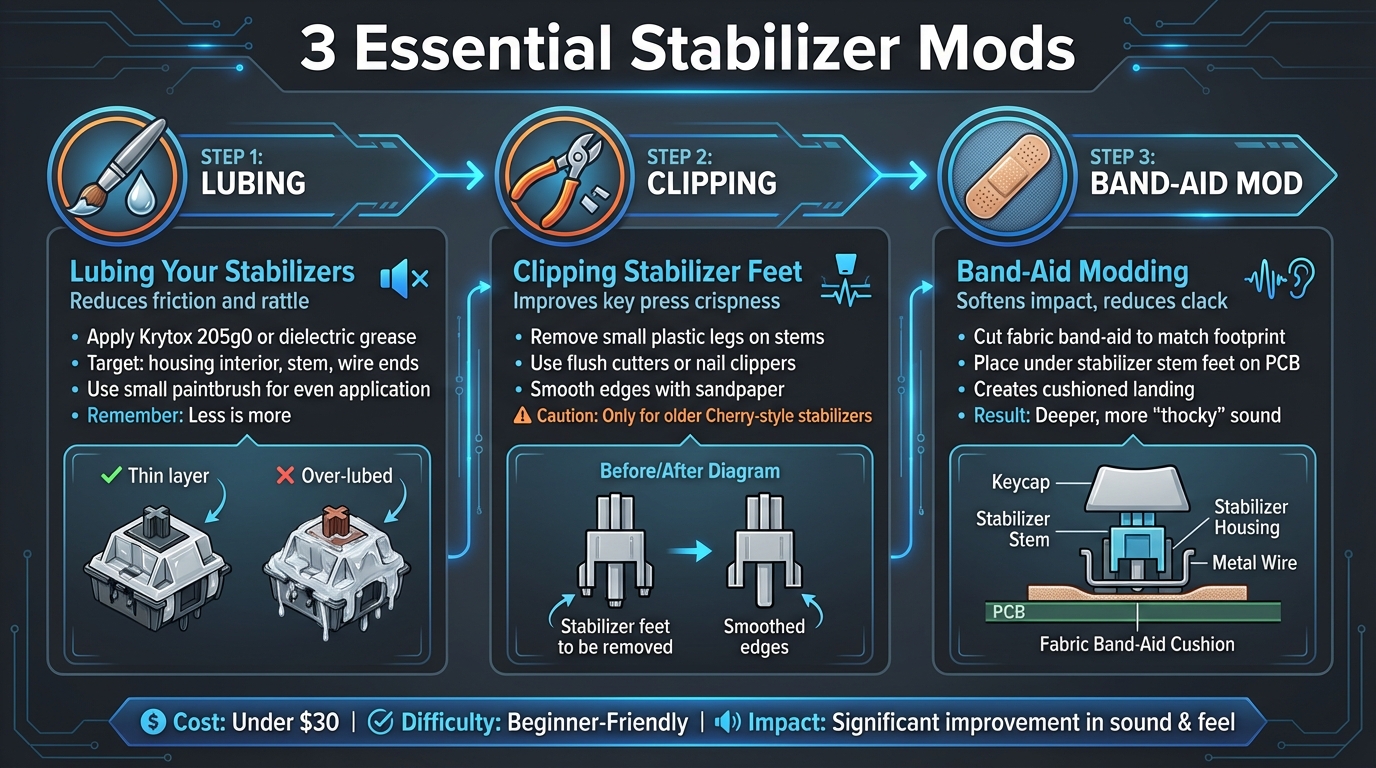
Lubing Your Stabilizers
Lubrication is key to reducing both friction and rattle. First, lay the stabilizer wires on a flat surface and check for any ticking sounds when you tap them. If you hear ticking, gently bend the wires until it stops - this ensures smooth performance. Once the wires are ready, apply a thin layer of Krytox 205g0 or dielectric grease. Focus on the inside of the housing, the stem (but avoid the center post), and the wire ends. Use a small paintbrush to spread the lube evenly - remember, less is more. Overdoing it can make the keys feel sticky, especially larger ones like the spacebar. After lubing, reassemble the stabilizer, insert the wire, and press the stem a few times to ensure it moves smoothly without sticking.
Clipping Stabilizer Feet
Clipping stabilizer feet is a mod that removes the small plastic legs on older Cherry-style stabilizer stems. These legs often create a mushy feeling by bottoming out before the stem does. By trimming them, you can achieve a crisper, more direct key press that many enthusiasts prefer. Use flush cutters or nail clippers to remove the protruding legs, then smooth the edges with fine sandpaper.
However, be cautious - modern aftermarket stabilizers, especially premium screw-in designs, are often pre-optimized and might not have these extra legs. Clipping them in such cases can reduce stability or cause wobbling. This mod is best suited for older Cherry-style stabilizers with visible protruding legs. If you’re unsure, inspect the stabilizer stems and research your specific model before making any permanent changes.
Band-Aid Modding
The band-aid mod is a simple way to soften the impact when stabilizer stems hit the PCB. By placing small pieces of fabric bandage or soft material on the PCB under the stabilizer stem feet, you can create a cushioned landing. This reduces sharp "clack" noises and gives the keys a deeper, more muted sound - often described as more “thocky.”
To do this, cut small pieces of cloth bandages or thin cloth tape to match the stabilizer footprint on the PCB. Press the material firmly in place, then reinstall the stabilizer, ensuring the housing sits flush and the wire moves freely. This mod is particularly appealing for hobbyists in the U.S., as band-aids are inexpensive and easy to find at local drugstores. It’s a budget-friendly way to improve the feel and sound of entry-level or prebuilt keyboards without investing in new stabilizers.
Modding Your Full Keyboard
The Modding Process
Once you're comfortable modding individual stabilizers, it's time to work on your entire keyboard. Start by unplugging it - remove the USB cable or batteries to ensure safety. Take off the keycaps from all the larger keys, and make a mental note (or take a photo) of their positions for later.
Next, unscrew the keyboard's bottom shell using a Phillips screwdriver. Carefully disassemble the case, and keep all screws and parts organized to avoid any headaches during reassembly. Remove the plate and PCB, then take out each stabilizer. If you're dealing with screw-in stabilizers, unscrew them gently to avoid damaging the PCB. For plate-mounted stabilizers, unclip them carefully. Once everything is disassembled, it's time to apply your mods: straighten and tune the stabilizer wires, clip the feet if necessary, add band-aid padding under the housings, and lube the housings, stems, and wire contact points.
Reinstall the stabilizers securely. As you reassemble the plate, PCB, and case, double-check that no foam or wires are obstructing the stabilizer's movement. Once everything is back together, it's time for testing. Press each stabilized key at the center and both ends, listening for any rattling or ticking sounds and checking for smooth key movement. Plug the keyboard into your PC and use a key tester program to ensure every stabilized key works properly. It's a good idea to test each key thoroughly before fully reassembling the keyboard.
Fixing Common Problems
Even after reassembly, some issues might crop up. If you notice persistent rattling or ticking, the wire contact points may need more lubrication, or the wire itself might be slightly bent. Open the case, remove the wire, and apply a small dab of dielectric grease to the contact points. Straighten any bends in the wire until pressing the key produces no ticking sounds.
If a key feels sticky or returns slowly, you might have over-applied lube or used padding that's too thick. Disassemble the affected stabilizer, clean off the excess lube with isopropyl alcohol, and reapply a thinner layer. Consider using thinner tape or smaller band-aid pieces if the padding is causing the issue. For uneven keypresses - where one side feels heavier than the other - check that the wire is fully seated in both stems and that the housing is securely clipped or screwed in place.
A mushy bottom-out often happens when there's too much padding or foam interfering with the stabilizer housing. Reduce the padding layers or trim any foam that's in the way to allow the housing to bottom out properly. If you need replacement parts or additional supplies, U.S. vendors like KeebsForAll offer a range of stabilizers and lubricants at competitive prices.
Conclusion
Transforming rattly, uneven stabilizers into smooth, quiet ones is totally achievable with a few key steps. The three main techniques - lubing, clipping, and the band-aid mod - work together to tackle wobbling, cut down noise, and deliver a typing experience that feels polished. If you're just starting out, begin with lubing - it offers the most immediate difference. Once you're comfortable, move on to clipping and the band-aid mod for even better results.
Take it one step at a time. After each mod, test how your keyboard feels and sounds, making adjustments to suit your typing style. Some enthusiasts love ultra-smooth, silent stabilizers, while others prefer a bit more tactile feedback. It’s all about finding what works best for you.
Even high-end stabilizers can benefit from some extra care. A touch more lube or a slight alignment tweak can make a noticeable difference. If you're still facing issues, experiment with different lubricants or refine your technique - the beauty of these mods is that they’re both forgiving and reversible. Fine-tuning is part of the process, helping you achieve the exact performance you’re after.
Need supplies? Check out KeebsForAll for stabilizer kits, lubricants, and modding tools. They’ve got everything you need to get started.
FAQs
What makes screw-in stabilizers better than other types?
Screw-in stabilizers are a favorite among mechanical keyboard enthusiasts, and for good reason. They attach directly to the PCB, offering a firm and stable fit that outperforms clip-in or plate-mounted stabilizers. This secure connection helps cut down on unwanted movement, which means less rattling and noise while typing.
Another perk? Screw-in stabilizers are easier to modify. Whether you're lubing them for smoother operation or clipping them to improve performance, these stabilizers make the process straightforward. If you're working on a custom keyboard and aiming for that premium typing feel and sound, screw-in stabilizers are a solid choice.
How can I tell if I've over-lubed my stabilizers?
If your stabilizers feel sluggish, sticky, or unresponsive when pressed, there's a good chance you've used too much lubricant. Over-lubing can also result in a muted or uneven sound compared to the rest of your keyboard.
To address this, carefully remove the excess lubricant with a cotton swab or a lint-free cloth. When reapplying, use a light touch and focus only on the key contact points to ensure smooth and consistent performance without overdoing it.
Can you use the band-aid mod on all stabilizer types?
The band-aid mod works with most types of mechanical keyboard stabilizers, including plate-mounted, PCB-mounted, and screw-in variants. That said, how effective it is can depend on the specific design of the stabilizers and how they’re installed. To get the best outcome, make sure your stabilizers are a good match for your keyboard and follow the right modding steps.
For those unfamiliar, the band-aid mod is a simple technique where small pieces of tape or fabric are placed underneath the stabilizers. This helps reduce noise while also improving the feel of each keypress. It’s a popular and beginner-friendly way to elevate your typing experience.